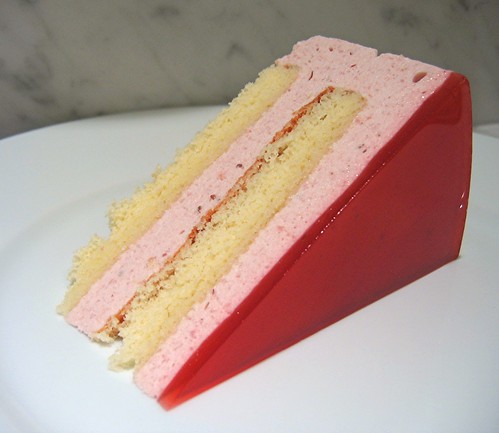
The end of the month is here and that can only mean one thing. It's Daring Baker time! Who are the Daring Bakers? Well, we're a group of bloggers who challenge ourselves once a month by following the exact same recipe and posting our results whether they are good or bad. The group started back in November 2006 when Ivonne and Lisa decided that they would make pretzels using the same recipe and help each other along the way. This month's host is none other than Peabody of Culinary Concoctions and she challenged us with a gorgeous strawberry mirror cake. The cake was not difficult, but it was an exercise in timing and assembly and perhaps even disassembly. More on that disassembly thing later in my post.
All the individual elements of the strawberry mirror cake were pretty to easy to make. Making the individual elements can be spread out over a couple days, but I just did mine all on the same day. I think it took about 5 hours from start to finish. I believe I used every mixing bowl, measuring cup, and spatula I own. And I own a lot of them too!
The sponge cake was very simple. There is no chemical leavening used in this cake. Instead the rise comes from the air beaten into the eggs. This is where having a stand mixer really comes in handy. The whole eggs and egg yolks must be beaten to 2-3 times its original volume or the cake won't rise. Unless you really want to put your arm muscles through a workout, the machine is your friend. Of course a hand mixer will work too but it'll just take a bit longer to achieve the correct volume.
The baked sponge cake was also a joy to work with. It cut so cleanly and didn't crumble. The cake was flexible enough to be handled without being falling apart. And oh so spongy too! I loved this sponge cake recipe so much that I considered forgoing all other sponge cake recipes for this one.
It was my very first time making a bavarian cream and I didn't really know what to expect but Peabody's instructions were pretty clear. I did encounter a minor issue when I combined the cooked pastry cream with my gelatinize puree. I guess my gelatin hadn't softened adequately (I mean, 2.5 tablespoons is a whole lotta gelatin!). I ended up with little clumps of gelatin balls in my mixture. But a quick strain took care of that. My other issue with the bavarian cream was when I was cooling the mixture down in the ice bath. I found out that you can't really leave the mixture unattended too long or the cream on the edges of the bowl will gel since it has the most contact with the icy cold water. So keep a watchful eye and stir more often than not. But don't neglect the heavy whipping cream that you're beating in the stand mixer. I accidentally whipped mine to stiff not soft peaks. Luckily I had some more heavy cream in the refrigerator. I stirred some into the too stiff cream to bring it back down. See what I mean by an exercise in timing?

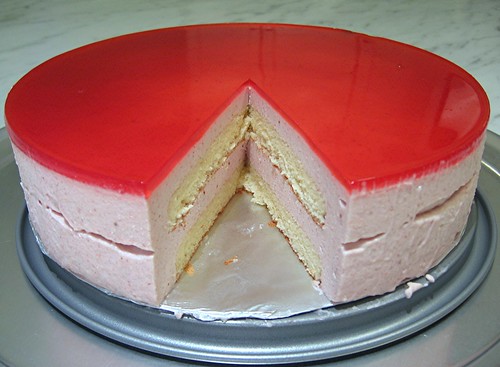
I also mentioned that this cake was about assembly. See those air pockets all around the sides of my finished cake? I guess I should've made sure I really "pushed" the cream into the moat surrounding the cake layers. This is where filling with a pastry bag would've worked much better than filling with a spatula. And try to get the top layer of bavarian cream even and smooth. Otherwise the mirror will be uneven. I found that a small offset icing spatula worked really well. Also if your cream has set too much then it may be hard to get a nice smooth top. It's that timing thing again.
As I mixed up my ingredients for the strawberry mirror, I was thinking that I just made fancy strawberry jello. (As in "I'm so fancy that I make my own jello with homemade strawberry juice made from organic strawberries which I carefully strained with unbleached cheesecloth." Insert major eye roll here. But for the record, I have nothing against packaged jello mix or against being fancy.) Just like when I make Jell-O brand jello, I like to whisk it like crazy to make sure the gelatin completely dissolves and also because I like eating the foamy bubbles on the surface of my jello. However, this mixture was the mirror in the mirror cake and you can't have foam and bubbles covering up the surface. So like the anal-retentive OCD stricken chef that I am, I skimmed away all that foam that I created leaving a crystal clear ruby red liquid ready to pour over the chilled cake.
Now I mentioned that disassembly was just as important as assembly. What good is all this effort if you can't get the cake out of the pan in one piece? Those of you who spend time and effort cooking and baking may refer to this as "the moment of truth". Getting it out of the pan is almost as important as the taste. Peabody's instructions read " Mirror will tear when sides are unlatched if it is stuck at ANY point." If that's not a warning to heed I don't know what is. Her instructions suggested wrapping a hot towel around the sides of the springform to slightly warm the mirror so that it'll release from the pan but I like the "hair dryer set on low" method. If I had one of those food safe acetate cake strips I would've used that to help me get the cake out of the pan. I've seen professional bakers use them all the time. The hair dryer seemed to do the trick and the mirror was released unscathed.

My overall impression of the final dessert? Despite my bavarian cream "air pockets", it was a beautiful cake to look at. The mirror was absolutely stunning. I initially thought the mirror was just there for looks. But in my humble opinion, it actually added a nice burst of strawberry flavor and provided a nice textural contrast to the cream and sponge cake. Tasters who are not fond of jello felt the cake didn't need the mirror. And what do I think of the bavarian cream? It was like eating a fluffy strawberry ice cream – very yummy. The sponge cake played a perfect supporting role.
I would like to thank Peabody for putting forth such a fun and educational recipe. I was so happy that I finished my strawberry mirror cake before I hurt my back. If I had to sit this one out, I may not have gotten around to trying the recipe and that would've been a shame. I now have a great sponge cake recipe, I learned to make bavarian cream and I, once again, got to expand my baking horizons. I really love being a Daring Baker.

Please check out the amazing results from the other Daring Bakers by visiting their blogs. A complete list of members can be found here.

Strawberry Mirror Cake
Cake
3 large eggs
3 large egg yolks
3/4 cup sugar
1 tsp vanilla extract
3 egg whites
1/8 tsp cream of tartar
2 TBSP sugar
2/3 cup sifted cake flour
Soaking Syrup
1/2 cup water
1/3 cup sugar
2 TBSP kirsch or strawberry liqueur
Strawberry Bavarian Cream
2 1/2 TBSP unflavored gelatin
1 1/2 cup strained strawberry puree (I used 18 oz strawberries to make 1.5 c puree)
5 large egg yolks
2/3 cup sugar
1 1/2 cup whole milk
1 TBSP lemon juice
1 3/4 cup heavy whipping cream
Strawberry Mirror
1 1/2 cup strawberry juice (see below for strawberry juice ingredients and instructions)
1 tsp lemon juice
1 TBSP kirsch
1 TBSP water
1 TBSP unflavored gelatin
Strawberry Juice
18 oz strawberries
3/4 cup sugar
3/4 cup water
1. Preheat oven to 450F (yes, 450F, it is not a typo). Butter and flour the sides of an 11-by-17 inch jelly roll pan (rimmed baking sheet). Line bottom of pan with a sheet of parchment paper cut to fit bottom pan exactly.
2. Beat eggs, egg yolks and 3/4 cup sugar together in a medium bowl until light and thick (should be about tripled in volume). Beat in the vanilla extract.
3. In a separate bowl, beat the egg whites until foamy, add cream of tartar and beat until whites begin to form peaks. Add the 2 TBSP sugar and beat until the whites hold stiff, glossy peaks (do not over beat).
4. Sift flour over the egg yolk mixture and gently fold in the flour. Stir in one fourth of the whites. Then carefully fold in the remaining whites.
5. Spread batter evenly in pan. Bake until cake is light brown and springy to touch, about 7 to 10 minutes. Cool in pan 5 minutes. Run a knife along edge to loosen. Invert cake tin to cut out two 8 1/4 inch circles of cake. Wrap the cake layers, separated with waxed paper, and set aside. Cake may be frozen at this point.
6. To make soaking syrup: Combine the 1/2 cup water and the 1/3 cup sugar in saucepan; bring to a boil to dissolve sugar. Cool to room temperature; flavor with liqueur. Set aside or refrigerate in glass jar until ready to use.
7. To assemble cake: Brush sides of 10-inch springform pan lightly with flavorless salad oil or almond oil. Cut out a cardboard circle that is exactly the same size as the bottom inside of the pan; cover cardboard with aluminum foil and fit into bottom of pan. Center one layer of the cake bottom of pan. Brush the cake with some of the soaking syrup to just moisten (not drench) the cake; set aside.
8. Prepare Strawberry Bavarian Cream (see Prep Work section). Immediately pour about half of the Bavarian Cream over the first layer of cake in the pan. Set the next layer of cake on top of the cream. Pour remaining Bavarian Cream over cake and smooth top of the cream with spatula. Refrigerate until the cream sets (1 to 2 hours).
9. Prepare the Strawberry Mirror (see Prep Work section).
10. To serve: Warm the sides of the springfrom pan by wrapping a hot dish towel around the outside of the pan for a few minutes (or use a hair dryer on low heat). Run a small sharp knife tip around the edge of the strawberry mirror to separate it form the sides of pan. Mirror will tear when sides are unlatched if it is stuck at ANY point. Slowly unlatch the pan and slide it off the cake. Slice cake in wedges and serve.
Prep Work
Strawberry Bavarian Cream
1. Sprinkle the gelatin over the1 1/2 cup strawberry puree in a bowl and set aside until gelatin is soft and appears spongy.
2. Combine egg yolks and sugar in a bowl & beat until light. Bring whole milk to a boil in saucepan. Pour hot milk into yolk mixture and stir with a wooden spoon (it doesn't say so but I would temper the egg mixture first to be safe). Return this mixture to the saucepan and cook over medium heat, stirring constantly, until your finger leaves a clear trail in sauce when drawn across the back of the spoon about 10 minutes. (Do not boil or the mixture will curdle.) Immediately remove from heat and stir in softened gelatin mixture. Pour into a stainless steel bowl placed over a bowl of ice water. Stir in lemon juice. Cool over ice water, stirring occasionally, until mixture thickens to the consistency of softly whipped cream.
3. While gelatin mixture is cooling, whip the heavy whipping cream until it holds soft peaks. When the gelatin mixture is cooled and resembles softly whipped cream, fold the whipped cream into the gelatin mixture.
Strawberry Mirror
1. Prepare strawberry juice.*
2. Place lemon juice, kirsch, and water in a small bowl. Sprinkle gelatin over this mixture; set aside until gelatin is soft and appears spongy.
3. Measure 1 1/2 cups strawberry juice into a small saucepan and bring to a simmer; pour over gelatin mixture and stir to dissolve gelatin. Place bowl over bowl of ice water and stir occasionally until the mixture is syrupy and just beings to thicken (do not let it gel); remove from ice water.
4. When mixture is syrupy, pour a 1/16-inch layer over the top of cake. Refrigerate until the mirror is set.
*Strawberry Juice
Wash and hull strawberries; coarsely chop. Place strawberries in saucepan; crush to start juices flowing. Place over low heat; add sugar and water; simmer slowly 10 minutes. Pour juice and pulp through damp jelly bag or cheesecloth-lined colander and drain into a bowl for 15 minutes. (Do not press down on fruit or your juice will be cloudy).
Note: If you want the cake to be non-alcoholic, it's okay to leave out the kirsch. That's what I did. I also left out the food coloring that was called for in the original recipe.

This is the photo from the cookbook where Peabody got the recipe. I think I did a pretty decent job recreating the cake.


 //PART 2