Wednesday, 29 August 2007

0 Just A Bunch Of Sassy Tarts

caramelchoctart_slice21875


The Daring Bakers are back and this time we're bringing you a milk chocolate and caramel tart! Who are the Daring Bakers you may ask? Well, we're a group of rogue operatives strategically placed all over the world and secretly trying to conquer our baking fears one recipe at a time. At least that's how I see it. In actuality, we're a group of food bloggers who, once a month, make the exact same recipe and then blog about our experience on the same day. It's a fun way to try new recipes and techniques. Everyone has such a unique experience preparing the same recipe and the posts are always interesting to read.

I have to admit that I wasn't overly excited when this month's challenge of Eric Kayser's milk choclate and caramel tart was announced. No offense to kind hostesses Veronica of Veronica's Test Kitchen and Patricia of Technicolor Kitchen, but I'm just not a big fan of milk chocolate or caramel. But being the obedient Daring Baker that I am, I put my personal preferences, and perhaps even food prejudices, aside, and tried my very best with the assigned recipe. [And on a side note, I was so excited to meet Veronica for dinner when she was visiting San Francisco a couple weeks ago. She's super sweet and super smart!]

Like with most of our challenges, there were some positives about this challenge. Once again I would be tackling caramel like I did for the Gateau St. Honore challenge. I'm still not completely over my fear of caramel making, but I'm slowly finding my way to a comfort zone. But I think one can never get too comfortable with making caramel. I always have a big bowl of ice water within arm's reach. And to complicate matters a bit, the caramel would be turned into a caramel cream sauce which is then turned into a caramel cream "custard". Hot molten sugar! Furiously bubbling cream! Potential clumping from the eggs and flour! Oh, the dangers we face as a Daring Baker! And to top it all off, I still have trouble rolling out tart and pie crusts into a circular shape. It always looks so easy on television. So here was another wonderful opportunity to practice my rolling skills. This is why I love these challenges. I always find something new to learn, techniques to refine or discover an appreciation for an ingredient or certain component of the recipe.

MILK CHOCOLATE
I don’t normally use milk chocolate but since I vowed to follow the rules, I tried to find some high quality and, hopefully, high cacao percentage milk chocolate. I found a couple of milk chocolates at my Whole Foods market that seemed to fit the bill perfectly. Michel Cluizel's Grand Lait 45% and El Rey's Caoba 41%, which is, according to El Rey's website, "a fluid, smooth 'dark' milk chocolate with wonderful caramel, nut and earthy flavors. Its notable flavor is the result of increased cacao content, among the highest of any milk chocolate on the market". The combination of the two milk chocolates for my chocolate mousse layer would be nice. With my milk chocolate secured, I was ready to move forward with the recipe.

CRUST
I had no clue how thick to roll out the shortbread dough for my crust or how high the sides should be to hold both fillings. The chilled shortbread dough rolled out nicely but transferring the rolled dough to my springform pan in one piece was a total pain. So I just patched and pressed the dough into the pan as evenly as possible until I had no more dough left. So that's how thick and how high it ended up.

To blind bake my crust, I lined my crust with parchment paper and filled it with pie weights. After baking for 15 minutes the bottom dough was still uncooked and actually stuck to the parchment paper as I lifted it away. I really, really didn't want to roll out another disk of dough since the other two-thirds of the shortbread dough were frozen. Instead, I tried to save my swiss-cheese looking crust. So I removed my pie weights, scraped the dough off the parchment paper, patched my bottom crust with the scrapings, returned it to the oven for a few more minutes and hoped that I managed to salvage the crust. It ended up a tad lumpy and bumpy but at least it didn't have any more holes. I guess it was okay, but I wouldn't know for certain until I cut into the finished tart.

caramelchoctart_lumpy_1863
lumpy and bumpy crust

CARAMEL
I have to say making the caramel wasn't too scary this time. I used the wet method by adding 1/4 cup of water and 2 teaspoons of corn syrup to my 1 cup of sugar. I placed my saucepan with the lid on over medium heat for about 4 minutes and then removed the lid and increased the heat to high until my desired color and temperature. The lid traps some of the condensation and actually "washes" down the sides of pan so I wouldn't need to do that with a wet pastry brush.

Sadly I think I let my caramel get too dark before adding the cream. My goal was to let the caramel get to 335F (per Veronica's recommendation) to 350F (per Sherry Yard's "The Secrets of Baking"). But I don't think I got an accurate temperature reading since I couldn't immerse my thermometer more than 1 cm into the caramel without touching the bottom of my saucepan. I guess I can call this a burnt caramel.

Also, my caramel cream custard refused to set in the oven after 15 minutes of baking. So I actually continued baking it until the edges were set and the center still wiggled a bit. I think it took a total of 30 minutes. At this point the top of the baked caramel was pretty dark (and I mean as dark as black coffee). So this meant that my caramel could be doubly burnt. The outlook was grim.

CHOCOLATE MOUSSE
From the chatter during the days prior to posting, some Daring Bakers had issues with their cream deflating when the melted milk chocolate was added. I had the opposite problem. My melted chocolate seized up a bit when I folded the cream and chocolate together. So if you look closely, you may see little bits of chocolate speckled throughout the chocolate mousse. So now I may have to call this a double burnt caramel and mini milk chocolate chip mousse tart.

carmelchoctart_bite_1881

THE MOMENT OF TRUTH
So after the required chill, I finally cut into my tart. I was really afraid that the caramel layer would be dark all the way through and be completely inedible. I told myself that I could still salvage dessert if I scraped off the chocolate mousse and serve the mousse in cups. I breathed a huge sigh of relief when I saw that the caramel was not black but a rich caramel brown. Thankfully, the caramel didn't taste burnt either.

I liked how the crust held together nicely when the tart was sliced and was very tender. Sadly I felt it was a bit flavorless though. The crust was neither chocolaty nor hazelnutty nor buttery. The flavors were a bit muddled. I did like the hint of cinnamon. (BTW, I only used 1/2 tsp cinnamon in the dough since 2 tsp seemed overwhelming.)

I expected the finished tart to be super sweet. But surprisingly, it wasn't as sweet as I thought it would be. Perhaps it's because the caramel was a bit darker and the milk chocolate had a high percentage of cacao (and therefore less sugar). The mousse was delicious even with the tiny random bits of chocolate I encountered and the caramel was pretty delicious. The two fillings definitely made a nice pairing. So overall I would call this challenge a wonderful success. I would definitely make both fillings again, but I would probably use a different tart dough. The tart was an excellent breakfast with my morning coffee. (Yes, I am admitting to having a slice for breakfast.)

And as always, you can find links to the other Daring Bakers' tart posts on our blogroll.
db_logo_orange


Milk Chocolate and Caramel Tart
(from Eric Kayser’s "Sweet and Savory Tarts")

Preparation time: 40 minutes
Baking Time: 30 minutes
Refrigeration time: 1 hour
One 9-inch (24-cm) square pan or one 10-inch (26-cm) round baking pan

Ingredients
Crust
1/2 lb (250 g) chocolate shortbread pastry (see recipe below)
Caramel Layer
1 cup (200 g) granulated sugar
1 cup (250 g) heavy whipping cream (30-40 percent butterfat) or crème fraiche
1/4 cup (50 g) butter
2 whole eggs
1 egg yolk
2 1/2tablespoons (15 g) flour
Chocolate Mousse Layer
1 1/4 cups (300 g) heavy whipping cream
1/2 lb (250 g) milk chocolate

1. Preheat oven to 325 °F (160 °C).
2. Line the baking pan with the chocolate shortbread pastry and bake blind for 15 minutes.
3. In a saucepan, caramelize 1 cup (200 g) granulated sugar using the dry method until it turns a golden caramel color. (Or alternatively, caramelize using the wet method by adding 1/4 cup water + 2 tsp corn syrup.) Incorporate the heavy whipping cream or crème fraiche and then add butter. Mix thoroughly. Set aside to cool.
4. In a mixing bowl, beat the whole eggs with the extra egg yolk, then incorporate the flour.
5. Pour this into the cream-caramel mixture and mix thoroughly.
6. Spread it out in the tart shell and bake for 15 minutes. Remove from oven and allow to cool.
7. Prepare the milk chocolate mousse: beat the whipping cream until stiff. Melt the milk chocolate in the microwave on low or in a bain-marie, and fold melted and slightly cooled chocolate gently into the whipped cream.
8. Pour the chocolate mousse over the cooled caramel mixture, smoothing it with a spatula. Chill for one hour in the refrigerator.

Optional decoration: melt 1/2 cup (100g) granulated sugar in a saucepan until it reaches an amber color. Pour it onto waxed paper laid out on a flat surface. Leave to cool. Break it into small fragments and stick them lightly into the top of the tart.

Chocolate Shortbread Pastry

Preparation time: 10 minutes
Refrigeration: overnight
To make 3 tarts, 9 ½ inches (24 cm) square or 10 inches (26 cm round)

Ingredients
1 cup (250g ) unsalted butter, softened
1 cup plus 2 tablespoons (150 g) confectioners’ sugar
1/2 cup (50 g) ground hazelnuts
2 level teaspoons (5 g) ground cinnamon (optional)
2 eggs
4 1/2 cups (400 g) cake flour
2 1/2 teaspoons (10 g) baking powder
1 1/2 tablespoons (10 g) cocoa powder

Prepare dough at least one day before you need the dough.
1. In a mixing bowl of a food processor, cream the butter.
2. Add the confectioners’ sugar, the ground hazelnuts, and the cinnamon, and mix together
3. Add the eggs, one by one, mixing constantly
4. Sift in the flour, the baking powder, and the cocoa powder, and mix well.
5. Form a ball with the dough, cover in plastic wrap, and chill overnight.

caramelchoctart_close_1862

Sunday, 19 August 2007

0 Lemon Curd Cake

lemcurdcake_1659_birdseye


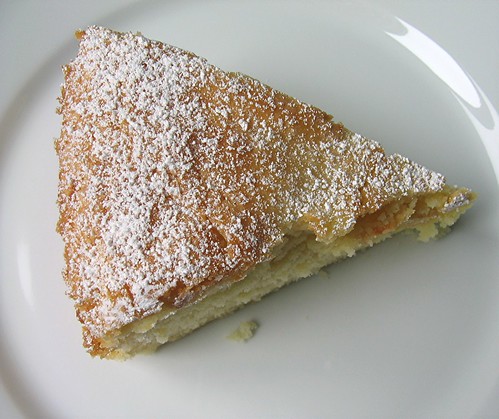
Like the saying goes, when life gives you lemons, make lemonade. Or in my case, lemon coconut macaroons, chiffon cake, sables au citron, lemon bars, french yogurt cake and this lemon curd cake from Emily Luchetti. It's not a cake with alternating layers of cake and curd like the name may imply. Instead the lemon curd is incorporated into the batter.

I learned to make this cake about 10 years ago when I attended a baking class taught by Emily Luchetti in Berkeley, California. I don't remember much about the class itself, but I do remember loving the cake (and the other desserts) she made for us. Of course, I went home, signed cookbook in tow, and proceeded to make the cake for my family. They thought it was just a plain 'ole lemon cake but, as a lemon lover, I knew it was so much more.

lemcurdcake_1663_closecut

There's an almost custard-like quality to this cake which I can only assume comes from the addition of lemon curd to the cake batter. The cake's appearance is so simple, but the taste just screams "lemon". It can take you by surprise if you're not expecting it. My co-worker said that it was so lemony that it couldn't be made from real lemons. But I assured her that no artificial flavorings were involved. Just the goodness of fresh lemons.

And I want to thank my dear husband for taking care of our meyer lemon tree so that it can continue to produce tons of juicy fragrant lemons year after year. I might complain about the abundance of lemons but it's better than complaining about not having enough. And there is something so satisfying knowing that we grew them ourselves.

When he pruned the tree last month, we got over 50 pounds of lemons. Yup, we weighed them. That's not bad for a couple of city folk with one tiny little tree. Our meyer lemons aren't pretty to look at but, boy, do they taste good! We had a lot of people willing to take them off our hands and the lemons were all gone in a blink of the eye. Hopefully this will be last time I post something lemon until next season's crop. Although I can't be 100% sure since we still have fruit on the tree.

lemon2007feb
before (above) and after (below) pruning
lemon2007july


Lemon Curd Cake
(from Emily Luchetti's Four-Star Desserts)

Curd Ingredients
4 large egg yolks
2 large eggs
1/2 cup granulated sugar
1/2 cup freshly squeezed lemon juice

Cake Ingredients
2 cups sifted cake flour
2 1/4 cup granulated sugar (divided into 3/4 cup & 1 1/2 cup)
1 tbsp baking powder
1/2 tsp salt
4 tbsp (=half stick=2 oz) unsalted butter, softened at room temp.
3 tbsp freshly squeezed lemon juice
2 tsp finely grated lemon zest
6 large egg whites

To make the lemon curd
Fill a medium pot 1/3 full of water and bring to a very low boil.

In a medium heatproof bowl whisk together egg yolks, egg, 1/2 cup sugar. Whisk in 1/2 cup lemon juice.

Set the bowl over the pot of water making sure water doesn't touch the bottom of the bowl. Cook, stirring occasionally, until mixture is thick, about 10 minutes.

Strain the curd into a bowl. Place plastic wrap directly onto the surface of the curd (to prevent a skin from forming). Chill curd until cold (but it's okay to chill it until it's cooled down to room temperature).

To make the cake
Preheat oven to 325F. Butter and flour a 9-inch round x 3-inch high cake pan.

Sift together cake flour, 3/4 cup sugar, baking powder, and salt. Set aside dry ingredients.

In a large mixing bowl, mix together butter, lemon juice, zest, and cooled lemon curd. Stir in dry ingredients.

Using the whisk attachment, in the bowl of a stand mixer beat the egg whites on medium speed until frothy. Increase speed to high and gradually add the 1 1/2 cup sugar. Whip until soft peaks form. Gently fold the whipped egg whites into batter.

Spread batter into you prepared cake pan. Bake at 325F until cake tester comes out clean, about 50-60 minutes. Cool on rack and then remove cake from pan.

Dust with 1 tablespoon powdered sugar if desired.

lemcurdcake_1609_closeuncut

Sunday, 12 August 2007

0 Blackberry Pie

bbpie_whole


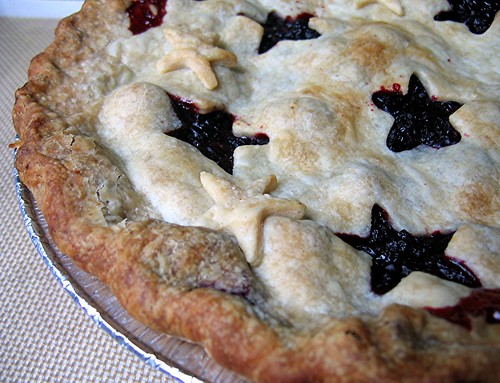
When the CFO of my company came into my office and presented me with a huge ziploc bagful of gorgeous blackberries just picked from the brambles in his backyard, I knew I had to make him a pie to show my thanks. I had to exercise some restraint after eating about a third of the blackberries straight from the bag or I wouldn't have any berries left for the pie.

I went home that evening and started right away on making the pie dough since I knew there would be some periods of resting (not for me but for the dough). Since I've never made a blackberry pie before, I turned to Rose Levy Beranbaum and hoped that she would have a recipe in her tome "The Pie and Pastry Bible". Sure enough, she had a simple and straightforward recipe for blackberry pie. From the many (and I do mean many!) pie crust recipes in her book, she recommended her basic flaky pie crust for the blackberry pie.

Rose explains that the secret behind her basic flaky pie crust is that the butter is added in 2 stages. First the butter is cut in to 3/4-inch cubes and divided into 2 portions. The larger portion of butter (which has been refrigerated) is finely incorporated into the flour. This helps keep the flour from absorbing too much water and from making gluten. Too much gluten will make the pastry tough. The smaller portion of butter (which has been frozen) is incorporated in larger pieces. These larger pieces of butter will end up in layers with the flour and, when baked, will separate and become very flaky pie crust layers.

I always have trouble rolling out pie dough. Mine always ends up looking more like Illinois or Maine than a circle. But despite my deficiencies in rolling, the dough was a joy to handle. Because I rolled it out larger than I needed and trimmed away the ragged edges, my dough was a bit thinner than the 1/8-inch called for in the recipe. But it wasn't so thin that it tore. When baked, the crust was just thick enough to hold all that yummy fruit filling when sliced, but still quite tender. And it was just as flaky as Rose said it would be too! That Rose really knows her stuff. I'm sure that with time and practice, I can improve my pie dough rolling skills using this delightful pie crust recipe.

bbpie_close

Blackberry Pie
(from Rose Levy Beranbaum's The Pie & Pastry Bible)
(makes one 9-inch pie)


Flaky Pie Crust (see recipe below)
1/2 cup granulated sugar (I used a bit sugar less since my berries were super sweet)
2 1/2 tbsp cornstarch
pinch of salt
2 tsp finely grated lemon zest
2 tbsp freshly squeezed lemon juice
1 pound fresh blackberries

Remove one disc of pie dough from the refrigerator for the bottom crust. If it's too hard to roll, let it sit out for about 10 minutes. Roll out the dough to about 1/8 inch thick and about 12 inches in diameter. Carefully transfer to a 9-inch pie pan. Trim the dough edge to about even with the edge of the pan. Cover with plastic and let dough rest in refrigerator for 30 minutes and up to 3 hours.

In a medium bowl, whisk together the sugar, cornstarch, salt, lemon zest. Whisk in the lemon juice to make a slurry. Add the blackberries and gently toss the berries to coat with the slurry. Be careful not to crush the berries. Let sit for about 15 minutes. Toss the berries once more and then pour the mixture into the bottom crust.

Roll out the remaining disk of dough to about 12-14 inches in diameter. Cut a 12-inch diameter circle from the dough for the top crust. Moisten the edges of the bottom crust with water and gently place the top crust over the berries. Tuck the overhang under the bottom crust and press down to seal the two crusts. Crimp the border with your fingers or with the times of a fork. With the tip of a knife, cut 3-5 slits in the top crust to allow steam to vent. (Or if you prefer, before covering the fruit with your top crust, using a decorative cutter to cut out whatever shape you like. Save the cut outs to place on top of the pie before baking).

Cover pie loosely with plastic wrap and refrigerate 1 hour before baking. This rest will allow the pastry to rest so that it remains flaky and to help keep the crust from shrinking.

Set your oven rack to the lowest position. This helps to ensure that your bottom crust is completely baked. Preheat over to 425F. Place your pie on a rimmed baking sheet to catch any juice. You may want to line your baking sheet with foil or parchment for easier clean up. Bake at 425F for 30-45 minutes or until the crust is golden brown. (Check the pie after 30 minutes and protect the edges from over browning with a ring of foil if necessary.)

Allow pie to cool on a rack for at least 4 hours before serving.

Flaky Pie Crust
(from Rose Levy Beranbaum's The Pie & Pastry Bible)
(makes 21 ounces dough - enough pastry for a two-crust 9-inch pie)


7 ounces (14 tbsp) unsalted butter, cut into 3/4 inch cubes
11.25 ounces (2 1/4 cups) bleached all-purpose flour
1/4 tsp salt
1/4 tsp baking powder
5 to 7 tbsp ice water
1 tbsp cider vinegar

Divide the 7 ounces (14 tbsp) of butter into 2 portions: 4.5 ounces and 2.5 ounces (9 tbsp and 5 tbsp). Refrigerate the 4.5 ounce portion and freeze the 2.5 ounce portion for at least 30 minutes.

Place the flour, salt and baking powder in the bowl of a food processor fitted with the blade. Process for a few seconds to combine.

Add the 4.5 ounces of (refrigerated) butter and process for about 20 seconds or until the mixture resembles coarse meal. Add the 2.5 ounces of (frozen) butter and pulse until the frozen butter is the size of peas.

Add the 5 tbsp of ice water and the vinegar and pulse 6-7 times. Pinch a small amount of the mixture to see if it holds together. If not, add another 1 tbsp water and pulse 3 times. Try pinching again to see if it holds together. If not, add the final 1 tbsp water and pulse 3 times.

Divide the dough in half. Wrap each portion with plastic wrap and flatten into discs. Refrigerate for at least 1 hour and up to 2 days.

bbpie_flakystar

Friday, 3 August 2007

0 Round Em' Up - Sugar High Friday

shf_tropical_lg

Even though it's technically August, I'm excited to (finally) post the July Sugar High Friday 33 "Tropical Paradise" round up. To start, I would like to thank the creator and doyenne of SHF, Jennifer of The Domestic Goddess. Secondly, I'd like to apologize for the delay. I'm touched by all the well wishes for a speedy recovery from my back problems. I'm doing much better now, but I have to remind myself to still take it slow for a while. And last but not least, I'd like to extend a warm and sunny "thank you!" to all the lovely bloggers who participated with their amazing tropical paradise sweets.

Without further delay, let the round up begin! (BTW, entries are listed in no particular order.)

tropicalparadisetart

Melody at Fruit Tart
Illinois, US

Melody reminisces about Caribbean mangos and the wonderful scent of Hawaiian pineapple plantations during harvest with her tropical paradise tart.
~*~
mangolimecurdtart

Amy at Nook and Pantry
Seattle, Washington, US

Amy creates a refreshing mango lime curd tart with a flaky pate sucree as a sweet farewell to her friend Julia.
~*~
strawberrygranita

Abby at Eat the Right Stuff
London, UK

Growing up in Malawi, Abby would often be found in the strawberry patch. Her strawberry granita reminds her of her former home in the tropics.
~*~
durianpancake

Boo_licious at Masak-Masak
Malaysia

Boo_licious scratches her itch to try out a newly acquired cookbook by making pancakes filled with durian cream. Durian is a notoriously "fragrant" tropical fruit.
~*~
frangipanipie

Cakelaw at Laws of the Kitchen
Melbourne, Australia

Even though it's winter down under, Cakelaw beckons the sun with the sunny colors of a frangipani pie.
~*~
mangonatadecocojelly

babe_kl at Babe in the City – KL
Kuala Lumpur, Malaysia

Babe_kl is fortunate enough to live in a tropical paradise. Her mango and nata de coco konnyaku jelly glistens like gems in the sun.
~*~
tropicanacream_summerberries

Meeta at What's For Lunch, Honey?
Weimar, Germany

Meeta has got her 80's groove on with her tropicana cream and summer berries.
~*~
cocadaswithjackfruitfroyo

Mehgan at A Craving For Perfection
Seattle, Washington, US

Mehgan's got a "rawkin' tan" from a recent Mexican vacation and shares a recipe for cocadas.
~*~
mojitocupcake

Ivonne at Cream Puffs in Venice
Toronto, Canada

After consuming what Ivonne described as "the best mojito ever" during her Miami vacation, she was consumed with the idea creating of a mojito cupcake. These cupcakes are too cute for words!
~*~
Pille-bananacakes

Pille at Nami-nami
Estonia

I'd love to have a slice of Pille's Caribbean banana cake with candied ginger nibbles.
~*~
haalo-pineapple

Haalo at Cook (almost) Anything at Least Once
Melbourne, Australia

It's the middle of winter in Australia but Haalo channels the tropics with the cutest pineapple upside down cakelets.
~*~
Becke-cremecoconut

Becke at Columbus Foodie
Columbus, Ohio, US

Becke tempts with a satisfying yet light tropical coconut creme caramel with pineapple concasee (sans basil).
~*~
bril-tropical_mango_treatsm

Brilynn at Jumbo Empanadas
Canada

Brilynn whips up her tropical mango treat. It's even topped with a floral umbrella!
~*~
kate-coconutcreamtart

Kate at A Way to Eat
Vermont, US

Kate's coconut cream tart is the logical solution to tropical = Morrocco + coconuts.
~*~
tigerfish-fruitcups

Tigerfish at Teczcape - An Escape to Food
California, US

Tigerfish presents a fresh fruit medley in the cutest orange cups.
~*~
mark-lapinay_vs

Mark Manguerra at No Special Effects
Manila, Philippines

Mark's chocolate crepes with mangos and Nutella is a combination made in paradise.
~*~
amytartreform_cherrysoup

Amy at Tart Reform
Washington D.C., US

Amy's chilled cherry soup is a precursor to the delicious food she will enjoy on her upcoming cruise to a tropical paradise.
~*~
hannah-blackricepudding

Hannah at Printer & Piemaker: Recipes
Albany, California, US

A stunning black rice pudding with fresh pineapple and coconut milk is offered by Hannah from across the bay in Albany.
~*~
virtualfolis_swingle

Virtual Frolic
New York, New York, US

Virtual Frolic's swingle sorbet might be hard to say 3 times fast, but it definitely won't be hard to eat.
~*~
sarina-mangocake

Sarina at TriniGourmet
Trinidad

It's mango season in Trinidad and Sarina rediscovers her local tropical fruit with a delicious streusel topped mango cake.
~*~
steph-troppavlova

Steph at A Whisk and A Spoon
Sydney, Australia

Steph, armed with a bounty of fruit from her market, coined the phrase "tropicaliness" to describe her magazine cover worthy tropical pavlova.
~*~
helene-Frozen_Mango_Mousse

Helene at Tartelette
Charleston, South Carolina, US

The talented Helene impresses with her creative use of bubble wrap to create her honeycomb mango mousse and pistachio dacquoise.
~*~
andrea-MangoCooler

Andrea at Andrea's Recipes
Northern Virginia, US

Andrea stays cool with her creamy frozen mango dessert.
~*~
jencabaker-pineapple_cookie

Jen at The Canadian Baker
Canada

Jen's pineapple coconut cookies have tropical written all over them. And they're super easy to make too!
~*~
mandy-tropcheesecake

Mandy at Fresh From the Oven
St. Louis, Missouri, US

Mandy's no-bake cheesecake is a stunning creation that incorporates delicious tropical lychee fruits.
~*~
benas-floatingnib

Benas at Floating Nib
US

An exceedingly moist banana loaf topped with chocolate chips (yum!) from Benas.
~*~
sihan-malibu_pineapple_cc

Sihan at Walking in the Rain
Singapore

Inspired by a cocktail from a local nightspot, Sihan creates a Malibu (coconut rum) pineapple cupcake.
~*~
lisa-coconutzucchiniloaf

Lisa at La Mia Cucina
Ohio, US

Queen of Dorkdom Lisa adds some coconut to a bumper crop of zucchini to create the best coconut zucchini loaf in Ohio.
~*~
soula-coconutlimemacadamia

Soula at My Champagne Dreams
Sydney, Australia

Winter in the Southern hemisphere doesn't stop Soula from baking a very summery coconut and lime macadamia cake from Bill Granger.
~*~
zhulaiha-peachcoconutcrumble

Zhulaiha at Ovenhaven
Singapore

A summery combination of peaches and coconut go into Zhulaiha's crumble pie.
~*~
inne-strawberrymangojam

Inne at Vanille & Chocolat
London, UK

Inne's strawberry and mango jam was created by pV=nRT scientifically speaking. But Inne believes it might be magic instead.
~*~
sara-mangogingerpoundcake

Sara Payne at Whisks & Needles
Atlanta, Georgia, US

Sara shares her secret recipe for mango ginger pound cake
~*~
nicole-refresco

Nicole at Audaciousness
San Jorge, Nicaragua

Nicole takes her refresco (a fresh fruit drink) to go in a plastic baggie - Central American style.
~*~
lynn-mangosorbet

Lynn at Cookie Baker Lynn
Washington, US

Lynn ventures into new (to her) tropical fruit territory with her vibrant mango sorbet.
~*~
anita-pfsouffleglace

Anita at Dessert First
San Francisco, California, US

Pastry Girl Anita's passion fruit souffle glace with pineapple fruit soup is melt-in-your-mouth perfection.
~*~
cocada

Mila at Blog Quesadillas
Sweden

Mila escapes the summer rain with cocadas, a Mexican candy.
~*~
keylimetart

Deborah at Taste and Tell
Utah, US

The crystal clear blue waters of the Florida Keys and a taste of authentic key lime pie inspired Deborah to make a key lime tart.
~*~
nicisme-tropicalcake

Nicisme at Cherrapeno
UK

Nicisme's tropical cakes is willing the sun to come out and warm her chili plants.
~*~
sheena-bleedingheartcc

Sheena S. at The Casual Baker
Paris, France

Some "turbulence" with a certain tropical fruit led Sheena to improvise and make these bleeding heart cupcakes.
~*~
pineapplemintsugar

Ulrike at Küchenlatein
Northern Germany

Ulrike recalls her very first pineapple and the Balinese women who prepared the fruit with their skilled knives.
~*~
tropicalcookie_1490

And my entry, white chocolate tropical chunk cookies.

Whew! So there you have it. 41 flavors of the tropics to choose from. I already know which recipes I'm going to try out. =) Thanks again to all the participants.
 
back to top //PART 2