Friday, 29 February 2008

0 Just Four Ingredients

frenchbread_slices


...and not a stick of butter or cup of sugar in sight!

I've been a Daring Baker for over a year now. When I first joined we were a group of only 10 bakers and we didn't have an official name. Now there are almost 600 members plus another 100 joining next month. Who are the Daring Bakers? We're a group of food bloggers who, once a month, make the exact same recipe and then blog about our experience on the same day.

The Sour Dough's Mary and I Like to Cook's Sara are the gracious co-hosts for this month's installment of the Daring Baker challenge. I knew that with Mary being one of the hosts the likelihood of the challenge being bread was quite high. She is the "Breadchick" after all! According to Sara and Mary, the French bread recipe from Julia Child's "Mastering the Art of French Cooking Volume 2" takes up 18 pages in the cookbook! Although that sounds intimidating, the actual recipe is just four simple ingredients: flour, yeast, salt and water. Julia had a great love for le pain Francais and that much love cannot be contained in just a couple pages.

I'm happy to say that since joining last February I haven't missed participating in a challenge yet. I thought I might have to skip this month's challenge because I wasn't sure if I would have the time. Although the active time required for making the French bread was only about 1 - 1.5 hours, the bread dough would require 3 rises. The first rise could be from 3.5 - 5 hours, the second 1.5 - 2 hours and the final about 1.5 - 2.5 hours. It's not like I would need to be chained to my kitchen for 11 hours straight, but I had to find a day where my schedule would allow it. The end of the month was approaching quickly, but I managed to bake my bread last Saturday. That day turned out to be cold, windy and rainy which was great for staying indoors. I was a little worried that the high humidity could wreak some havoc on my dough, but I was worried for nothing.

Like I've done in the past, I used my oven as a proof box. I warmed my oven for couple minutes and then turned it off. When it had cooled to about 80F, it was ready for the dough to sit in there for the rise. Mary and Sara also gave tips for other ways to keep the dough at the optimal rising temperature of 75-80F like using a heating pad or the top of your water heater. I think other Daring Bakers have mentioned using their clean, empty dishwasher still warm from the heating cycle to proof their dough.

I had most of the equipment necessary for making the French bread. I didn't have a pizza stone or unglazed quarry tiles to put in my oven as a baking surface. I decided to take my chances and just use a baking sheet pan lined with parchment paper. I read somewhere that the parchment must be professional grade or it'll char or burn in the oven while the bread is baking. My paper turned pale golden brown but there was no charring or burning. I didn't have stiff board to flip my formed and proofed loaf. I guess I could've gone downstairs and rummaged for a piece of cardboard and then covered it with aluminum foil as a decent substitute, but I just used another baking sheet pan. I turned the pan over so that I could flip my formed and proofed loaf onto the underside of the baking sheet pan. That way I could slide it off without interference from the rim of the sheet pan.

Some of the other bakers mentioned that there was a video of Danielle Forestier making French bread from the Baking with Julia [Child] PBS television series. Although it was not the same recipe we were using, the techniques are the same. Even though the recipe given to us by Mary and Sara was very detailed and included all the information we needed (plus a lot of helpful tips too), the video helped me understand what it means to create the "gluten cloak" or how to "pucker" my loaf. I even learned how to flour my linen towel properly so that my formed loaf wouldn't stick to it. As a novice with yeast and bread baking, that video was invaluable.

frenchbread_loaf

Even though my bread didn't turn out to be good looking, it tasted pretty good. It's awesome that four simple ingredients can be transformed into something so amazing with just a little kneading and time. Even though I've only worked with yeast three times before, this French bread challenge absolutely felt like a turning point for me. The bagels, cinnamon buns and potato bread from previous DB challenges helped me to conquer my fear of working with yeast, but this challenge made me feel like I could eventually become a decent bread baker. The concept behind the Daring Bakers is so simple: just follow the recipe chosen by the host. It may or may not be a recipe I would've picked if left to my own devices, but occasionally being coaxed (well, forced) out of my baking comfort zone has opened my eyes to a whole new world. So once again I am thankful to be part of this wonderful group of bakers. Without the Daring Bakers I may never have had this incredible breakthrough.

db_logo_orange


Normally this is where I would post the recipe. Since the recipe is quite long, please visit Breadchick Mary's blog,The Sour Dough, to see the recipe.

frenchbread_crumb

Sunday, 24 February 2008

0 Cocoa Almond Meringue Cookies

chocmeringue_2


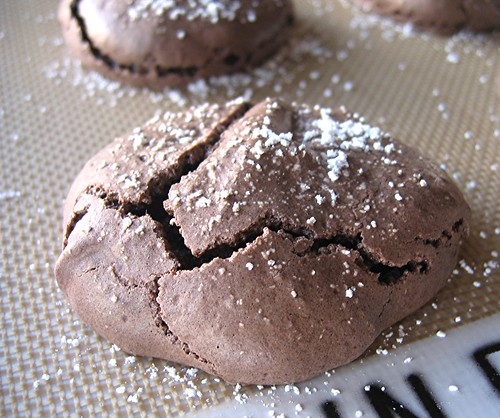
I seem to use more egg yolks than egg whites when baking so I always have egg whites left over. Thankfully egg whites can be frozen for up to 3 months. One large egg white is equal to 35 ml (2 tablespoons plus 1 teaspoon) so I like to portion and freeze them in ice cube trays, pop out the frozen cubes, and then store them in a plastic freezer bag. These individual portions can be thawed fairly quickly in the refrigerator.

Somehow I never have enough whites saved up to make an angel food cake, but I usually have enough for making cookies. Normally I bake some soft amaretti with my saved egg whites, but sometimes a girl craves a bit of chocolate. I saw this recipe for meringue cookies in Dorie Greenspan's "Baking From My Home to Yours" and decided to try it out.

My meringue cookies turned out much darker and were much flatter than the peaked mounds than the ones pictured in the book. Darker because the cocoa I used is particularly black. (It was Hershey's Special Dark Dutch Processed Cocoa.) Flatter because I planned to use the cookies to make ice cream sandwiches. The crispy meringue shells went really well with the toasted almond ice cream and espresso gelato. Unfortunately I don't have any photos of the ice cream sandwiches because we ate them all too quickly.

chocmeringue_1

Cocoa Almond Meringue Cookies
(from "Baking From My Home to Yours" by Dorie Greenspan)
(makes about 30 cookies)


1 cup confectioners' sugar, plus extra for dusting
1/3 cup finely ground blanched almonds
1/4 cup unsweetened cocoa powder
4 egg whites, at room temperature
pinch of salt
1/2 cup granulated sugar
1/2 tsp pure vanilla extract

Preheat oven to 300F. Line baking sheets with parchment paper or silicone baking mats.

Sift confectioners' sugar, ground almonds and cocoa. Set aside dry ingredients.

In the bowl of a stand mixer on medium speed, using the whisk attachment, whip the egg whites and salt until the whites are opaque. Increase to medium-high speed and continue to whip while adding the granulated sugar 1 tablespoon at a time. Continue whipping until the whites are shiny and hold a stiff peak. Beat in vanilla extract.

Remove bowl from mixer and gently fold in the dry ingredients with a large rubber spatula. The whites will deflate a little bit, but fold quickly and gently to minimize the deflation.

Drop the batter by tablespoonfuls onto your prepared baking sheets spacing them about 2 inches apart. Dust the tops lightly with confectioners' sugar.

Bake at 300F for 10 minutes, then, without opening the oven door, lower the temperature to 200F and bake for 1 hour more. Remove from oven and allow meringues to cool completely on the baking sheet. Carefully peel meringues off the parchment. If desired, dust with a little more confectioners' sugar before serving.

Monday, 18 February 2008

0 Oatmeal Coconut Walnut Cookies

oatm_coco_waln_391


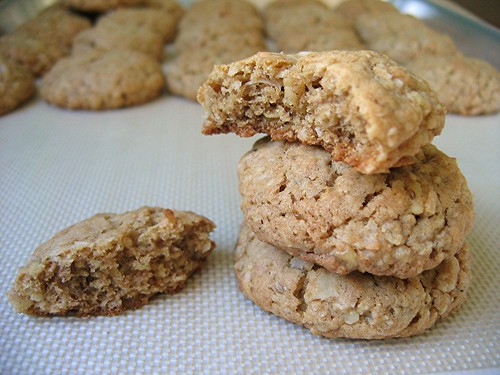
My mom believes that a cookie without chocolate is always better for you than one that contains chocolate. I don't know where she got that idea, but I learned long ago not to argue with her on this point (as well as many other points). Anyways, she likes these oatmeal coconut walnut cookies and doesn't mind if my niece and nephews have more than one cookie at a time. As the name implies, these cookies have oatmeal (grain), coconut (fruit) and walnuts (good fat, some protein), but they also have lots of butter and sugar. I'm not really complaining since butter and sugar are the cornerstones of a super yummy cookie. This time I made the cookies following the recipe but in the past I've also made them with chopped chocolate in place of half of the walnuts. But please don't tell my mom.

oatm_coco_waln_382

Oatmeal Coconut Walnut Cookies
(adapted from Tish Boyle's "The Good Cookie")
(makes 5 dozen cookies)


2 1/3 cups all purpose flour
2 tsp baking powder
1 1/2 tsp baking soda
1 tsp ground cinnamon
1/2 tsp salt
3 1/2 cups quick cooking rolled oats
8 ounces (2 sticks/1 cup) unsalted butter, softened at room temp
1 1/2 cups light brown sugar
1/3 cup granulated sugar
2 large eggs
2 tsp pure vanilla extract
1 1/4 cup sweetened shredded coconut
1 1/2 cup walnuts, chopped

Preheat oven to 375F. Grease or line your cookie sheets with parchment paper.

Sift together flour, baking powder, baking soda, cinnamon and salt. Stir in oatmeal. Set aside dry ingredients.

In the bowl of a stand mixer on medium speed, cream butter and both sugars until light and fluffy, about 2-3 minutes. Add eggs, one at a time, beating well after each addition. Mix in vanilla extract.

On low speed, add flour-oatmeal mixture and mix until just blended. Add coconut and walnuts and mix until just combined.

Drop tablespoonfuls of dough onto your prepared cookies sheets, spacing them about 2 inches apart. Flatten the mounds of dough slightly. Bake at 375F until golden brown, about 12-14 minutes. Cool cookies on sheets for 5 minutes then transfer to a cooling rack.

Monday, 4 February 2008

0 I Heart Nutella

nutellaheart_aerial


The first time I made these hazelnut sandwich cookies was during the holidays for our extended family Christmas party. I used a fluted round cookie cutter and then made tiny cut-outs in the top cookie using very small cookie cutters in the shape of a Christmas tree, candy cane and star. The small cut-out (less than 1 cm) gave just a glimpse of the shiny raspberry jam sandwiched between the cookies. I made a mental note to definitely make these cookies once again in February for Valentine's Day.

My original plan was to make the classic heart shaped cookies with a heart shaped cut-out and fill them with raspberry jam and give them a light dusting of powdered sugar. But when I dug out my set of heart shaped cookie cutters I realized that I didn't have a heart shaped cookie cutter that would be small enough to make the cut-out for the top of the sandwich cookie. So I quickly switched gears and decided to keep both the bottom and tops uncut and fill the cookies with Nutella. That yummy chocolate hazelnut spread went perfectly with the hazelnuts in the cookie dough.

nutellaheart_filling

And as I sit here writing this post my mind drifted back to the last time I made something using Nutella. I created the Nutella cheesecake brownies for last year's World Nutella Day (which was February 6th, 2007). Then I realized that this year's Nutella day could be happening any day. So I quickly Googled and I found out that tomorrow, February 5th, is 2008's World Nutella Day. I didn't even know until this moment. How's that for fate stepping in and making sure I didn't have the right cookie cutter size so that I would have to use Nutella instead jam? And then finding out about Nutella Day with minutes (hopefully) to the deadline?
2008nutella

I don't know if I made the February 4th deadline to be included in Sara and Michelle's roundup. (Yikes! It's Feb. 4th 11:48 pm PST now!) If not, be sure to check out all the other great Nutella creations and most importantly, eat Nutella.

nutellaheart_stack

Hazelnut Nutella Sandwich Cookies
(adapted from Kate Zuckerman's "The Sweet Life")
(makes 5 dozen sandwich cookies)


5 ounces hazelnuts
2 1/2 cups all purpose flour
1/4 tsp salt
1 tsp ground cinnamon
1/4 tsp baking powder
8 ounces (2 sticks/16 tbsp) unsalted butter, softened at room temp
3/4 cup sugar
1 large egg
1/2 cup Nutella (or any brand of chocolate hazelnut spread)

Combine hazelnuts, 1/2 cup flour and salt in the bowl of food processor. Pulse until nuts are ground to a fine powder. In a mixing bowl, combine the nut powder, remaining 2 cups of flour, cinnamon and baking powder. Set aside the dry ingredients.

In the bowl of stand mixer using the paddle attachment, cream the butter and sugar on medium-high speed until light and fluffy, about 6 to 8 minutes. Make sure to stop occasionally to scrape down the sides of the bowl. Add the egg and mix until the batter looks smooth and glossy, about 1 to 2 minutes.

Add the dry ingredients all at once to the mixture. Drape a kitchen towel over the mixer and bowl to prevent the flour from spraying all over the place. Then, on low speed, mix until the dry ingredients are combined, about 1 to 2 minutes.

Scrape the dough onto a sheet of plastic food wrap and form a flat rectangle about 1-inch thick. Chill the dough in the refrigerator for at least 2 hours or up to 3 days.

Preheat oven to 350F. Line your baking sheets with parchment paper or silicone sheets.

Roll the chilled dough out to 1/16-inch thick. Using a 1 1/2-inch cookie cutter, cut out cookies as close together on the dough as you can. Place the cut cookies 1 inch apart on your prepared baking sheets. Shape any remaining dough scrapes into a disk and refrigerate for 20 minutes before rolling it out again.

Chill the cut cookies in the refrigerator for 15 minutes before baking. (This 15 minute chill is optional but I like to give the cut cookies a brief rest to relax the gluten so that my cookies are tenderer).

Bake the cookies at 350F until golden brown, about 12 to 15 minutes. Allow cookies to cool completely before filling. Spread half the cookies with some Nutella and cover with remaining cookies to make a sandwich.

The sandwich cookies are best eaten the same day. You can bake the cookies and store them in an airtight container for up to 4 days. Fill them the day you plan to serve them.

nutellaheart_trail
 
back to top //PART 2