Tuesday, 24 May 2011

0 Grandma Hulda's Sweet Dills


GRANDMA HULDA'S SWEET DILL PICKLES

these are a year 'round staple in our fridge...
always has been, always will be a big barrel jar of Grandma's sweet pickles in the back of the fridge.  sometimes i swear at them as i maneuver around that big glass jar to squeeze something new in, but i wouldn't remove them if my life counted on it...or rather if i counted on staying alive through the night.

Grandma Hulda wasn't what you would call a gourmet cook by any means, but she knew how to throw down a few special things...

these pickles are one of those special things 
and i have yet to meet their match in the pickle world.


i must admit, the idea for this post came about quite a few weeks ago.  it originally was to be all about the last surviving chunk of Easter ham and my fabulous low fat Ham Salad...BUT then...out came the pickles from the back of the fridge for the photo shoot.  as i was shooting a big light bulb went on and i  said...
"ham salad = boring"...
"Grandma's Pickles?...everybody loves pickles AND everybody loves something from Grandma."

hence the recipe for the easiest bestest crunchy sweet pickle ever!
they need to be in the back of your fridge on the ever-ready just for that extra little crunch for your salad, sandwich or burger.


pack a cute little jar of your favorite spreadable salad like ham, tuna or chicken and serve with your pickles.  put them along with your cheese platter, hors d'oeuvres or condiments...or...top off with a layer of chopped sweet pickles for a tasty on the go treat.  great for picnics  or just your everyday brown bag lunch.


GRANDMA HULDA'S SWEET PICKLES

what you'll need...

1 46 ounce store bought jar of Hamburger Dill pickles...crinkle cut
3 cups of white sugar
2 Tblsp pickling spice
2 Tblsp apple cider vinegar

drain the juice from the pickles and put them in a large bowl...save the jar, toss the store bought juice.
add the sugar, spices and vinegar to the pickles and stir to combine.
let this sit on the counter for at least an hour, maybe 2, so the pickles can weep out their juices and the sugar dissolves.  you can stir them a few times during the weeping.
put the pickles and all the new juices back in the jar and in the fridge...let set at least 3 days before using.

i must add that these pickles are best over time...and i mean time because after the first batch is gone, you need to save about a cup of the old juice and add it to the new batch.  after the pickles have done their weeping add a little of the juice from the previous batch to cover the pickles.  you might not need the full cup, but it's kinda fun to keep the juice as an on going flavor addition...
not a totally necessary step, but it's how Grandma Hulda did it and i wouldn't change a thing about these pickles.

they're just perfect as is...Grandma Hulda's way.


PS...as for the lower cal Ham Salad?...
try using cottage cheese instead of mayonnaise.
put the cottage cheese in the processor and blend to smooth.
then add chopped ham and just a few chopped pickles.
pulse to a spreadable texture.  don't over process.
season to taste.

you won't miss the mayonnaise if you take care in the seasoning with salt and pepper.  the pickles add just the right sweet/tart flavor...enjoy

Saturday, 21 May 2011

0 Good Ol' Cobb Salad


COBB SALAD...

a classic...always great...something for everyone...can't go wrong.
invented back in 1937 at the Hollywood Brown Derby restaurant, it's still stands on it own as a fabulous main-dish salad.

especially if there's EXTRA BACON!


no real surprises here...no fabulous recipe to report.


WHAT YOU SEE IS WHAT YOU GET!


just an idea and a little shout out for one of the classics that won't let you down when you need something that will fit everyones taste buds.


what you'll need...
(starting from the left)

some good crumbly blue cheese
10 or more crispy bacon strips
English cucumber
2 roasted chicken breasts
3 vine ripe tomatoes
5 hard boiled eggs...separated
2 ripe Haas avocados
fresh leafy greens with herbs
 head lettuce
scallions or chives

the original Cobb Dressing served at The Brown Derby was an old-fashioned French dressing.  then it evolved somehow into a red wine vinaigrette, but i prefer...
 good old Ranch Dressing
made from Hidden Valley Ranch packet with buttermilk and mayonnaise

if you have the time it's nice to make everyones plate with all the separate components, or you can do as i did and just make one big impressive platter in all it's Cobb glory.
(in my house i think some let out a little sigh of relief that they won't have to partake or endure some fancy or out of the ordinary lunch extravaganza)
to serve, i dressed the greens in a separate bowl and made up each plate as it went to the table, serving from the main platter...drizzle a little dressing over the top with a little more crumbled blue cheese and put some dressing on the table for those who tend to over-dress. i'm an under-dresser.


serve with a fresh crusty baguette OR...some homemade bread.

might i suggest Grandma Nonnie's Zucchini Bread found here

Friday, 13 May 2011

0 Chess Pie...Old School


CHESS PIE

this could just be the surprise winner of the year.  
it figures...a good old classic like Chess Pie.

simple ingredients, simple flavors...

SIMPLY DELICIOUS !

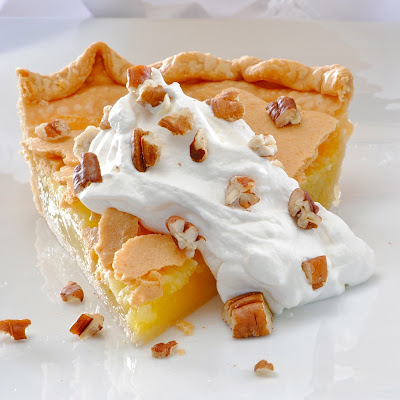
what a fabulous, unique pie...naked with nothing on...


or...all dressed up for the party with a dollop of fresh whipped cream and toasted pecans. 
i made 2 of these in a week and they disappeared faster than any other dessert i've made all year...and i make a lot of desserts.


the beautiful cracked top is like a baked meringue cookie and the inside is a soft sweet melt in your mouth custard.


the name is a little odd because it has nothing to do with the game of chess...
i guess there are many controversies about the origin of the Chess Pie.
 it's a Southern specialty, but some say it came from England and evolved from a similar cheese tart...this being "cheese-less"...some say it was named from a piece of furniture that was common in the early South called a pie chest or pie safe (pies under lock and key?!)
or the one i like is the theory that it was originally called "just pie" because it was so simple and plain and the named morphed into "jess-pie"...or Chess pie.
i'm sure there's more theories out there.  i just grabbed a few from Wikipedia and What's cookin' America.


there are a few variations out there that add vanilla, brown sugar, four and or some cornmeal, but i wanted to go with the flat out basic - simple - easy...and you can't get any easier than this.  i'm even proud to admit i went for the store bought pie crust for the first try.  hey...this recipe calls for it.  don't be afraid to take the easy route...the crust is not the star of the show here.  it's all about the cracked meringue top along with the custardy sweet filling.  
i must add that the second pie was made with a crust from my in-house pastry chef, master pie crust maker...MOM...and it did push the pie over the top.  photos are of the store bought because the second one disappeared before i could take a shot.


4 things is all you'll need for 

AUNT MARY'S EASY CHESS PIE
recipe copied below and found at Tasty Kitchen submitted by Sweeteater

4 Tablespoons softened butter
1 1/2 cups sugar
4 large eggs
1 whole pie shell, frozen

cream the sugar and butter together
add eggs one at a time, mixing well after each addition
pour into unbaked pie shell
bake at 350 F degrees for 35-40 minutes

cool completely before serving


Friday, 6 May 2011

0 Asian Style Pig Ear and Pork Terrine


PIG EARS ?!
yes, they're in there...that pretty  little unassuming stripe is EAR.

 introduce yourself slowly...bit by bit... to the "Nose to Tail" concept.  take the easier softer route and disguise your pig parts in a fancy terrine...sneak it in to your next charcuterie platter...or present as a creative hors d'oeuvre that will amaze your guests.

OR, if you're already gung-ho for "tip to toe"...simply enjoy this delicious Asian style terrine with some pickled ginger,  garlic chili sauce or a pinch of wasabi...yummm 


PIG EAR and PORK TERRINE
i sort of made this up, so if i've left something out please let me know and i'll fix it asap

FOR THE EARS

basically the most important part is the ear...cooking the ears.  i've posted about cooking pig ears in the past as seen ear...woops i mean HERE ...sorry, there's too many jokes readily available when talking ears.  there are a few details like removing any hairs and the pre-boil that can't be missed, please check the link.

(i know it looks scary, but i thought i better show you a photo of what you'll be dealing with...)

in a nut shell you need to cook 3 - 4 pig ears in an Asian flavored stock found HERE (without the Duck, of course).  simmer for about 3 hours or until they are very fork tender.  carefully pull out the ears and strain the broth through some cheese cloth.  let the ears (lay flat) and broth cool (separately) and get to room temp while you are preparing the ground pork.

FOR THE GROUND PORK

1 1/2 lbs of lean ground pork
2 - 3 cloves garlic, chopped
2 - 3 Tbsp fresh ginger, diced small
1/2  onion, diced
1 tbsp soy sauce
1 - 2 tsp sesame chili oil...or just sesame oil
a dash of cayenne
salt and pepper to taste

in a skillet with olive oil, saute the onions garlic and ginger until fragrant.  add ground pork...while pork is cooking separate so it is not in chunks and add the soy sauce and sesame oil...cook completely...salt and pepper to taste.  flavor and seasoning are very important in every part of a terrine.
let this cool a bit for easier handling.  process the pork mixture until it gets to a fine spreadable texture...not as far as a smooth pate, but you don't want any lumps or chunks.  you will want to add a little of the stock in to make a spreadable mixture...again, taste for seasoning when done.

FOR THE TERRINE

line a medium loaf pan with plastic wrap.  i used a glass pyrex loaf dish.  use enough wrap to over hang the sides.  i suggest you lightly oil the dish before trying to get the plastic wrap all the way in.
lay a few long chives down on the bottom for decoration.  
put about an inch of the ground pork mixture evenly on the bottom...then press lightly a layer of ears cut to fit as one layer.  then spread another layer of ground pork...another layer of ears, again, cut to fit for a whole layer.  end with a layer of pork mixture.  note...sprinkle a few small bits of chives in the layers for a little color.
now this next step is terrine 101, but if you don't know it can get messy so be prepared for overflow...
pour a little of the stock over the filled terrine.  a little at a time until it looks well moistened, but not saturated.  cut a rectangle out of cardboard that will fit the inside of the terrine...cover the cardboard with plastic. use the cardboard to press down and release any extra liquid (stock) and air pockets.  this will most likely overflow a little.  i like my terrines tight and well set with no air bubbles or gelatinous areas so i let set with some weight on the terrine...a foil covered brick works well...or some heavy cans.  then refrigerate for a few hours until completely chilled.
to unmold you might need to run a little warm water over the outside...if all turns out well, you should be able to flip the terrine out on a platter and peel off the plastic wrap to reveal a beautiful Pig Ear and Pork Terrine.  cut with a VERY sharp knife and serve with pickled ginger, chinese mustard, garlic chili sauce or maybe some wasabi.


back to top //PART 2