Friday, 28 October 2011

0 Cranberry Orange Oatmeal Bars


apologies for not getting anything posted for a few weeks...i have writers block.  still cooking up a storm with tons of recipes and photos, but i just can't seem to get a post out.  so pardon me if the next few post are a bit short on words...sometimes i like those posts best.  who needs to here all the blah blah blah.

GET TO THE POINT ALREADY !

THESE BARS ARE FABULOUS!

the original recipe can be found at Cooking Light.  great reviews, but i knew i could make it even lighter by what i had gathered from the other bakers.  i substituted the sour cream with non fat greek yogurt and sub'd the white sugar with Splenda.
one thing i would say is don't weigh out your flour...measure it out in a cup.

2 friends already asked for the recipe and i have made them a second time using figs, cardamom, toasted pistachios and lemon zest (might be posting about it).  this second batch i weighed out the flour and they came out a little too moist for my liking, but it DID lend itself to the fig bars.  they turned out like a glorified middle eastern flavored fig newton...DELICIOUS !

try different filling and spices...check the original at Cooking Light and read the reviews.  my friend made the original recipe and said they were great...i just lightened them up a little.  oh, and i added more lemon zest.  enjoy.


CRANBERRY OATMEAL BARS

for the crust...
1 cup white while wheat flour
1 cup oats...i used old fashioned
1/2 cup packed brown sugar (do not substitute)
1/4 tsp salt
1/4 tsp baking soda
1/4 tsp ground cinnamon
6 Tbsp butter, melted
3 Tbsp fresh orange juice
cooking spray

for the filling...
1 1/3 cup dried cranberries (6oz.)
3/4 cup non fat greek yogurt
1st time i used 1/4 sugar and 1/4 splenda, but you might try 1/2 cup all splenda
2 Tbsp white whole wheat flour
1 tsp vanilla extract
1 Tbsp grated orange rind
1 large egg white, lightly beaten

preheat oven to 325 F degrees
to prepare the crust, combine flour and the next five ingredients, through cinnamon, into medium bowl.  stir well with whisk until combined.  drizzle melted butter and orange juice over flour mixture, stirring until moistened...mixture should be crumbly.  RESERVE 3/4 CUP OF CRUST MIXTURE.  press remaining mixture into the bottom of an 11 x 7 inch baking dish coated with cooking spray.

to prepare filling...combine cranberries, yogurt, splenda and remaining ingredients in a medium bowl, stirring well to combine.  spread cranberry mixture over prepared crust and sprinkle remaining oat crust mixture evenly over filling.  i made sure it was crumbly looking by pressing some of it between my fingers and then gave it a little over all pat down to secure the crumble...
i hate it when you take a bite of a good crumble and it all ends up in your lap !

bake at 325 for 40 minutes or until the edged are golden.  cool completely in the pan on a wire rack.

when cut into 16 squares the nutrients are approx...
(nutrition for 1/4 cup sug. and 1/4 cup splenda recipe)
107 calories, 18. carbs, 3.3 fat, 2.1 protein


Wednesday, 26 October 2011

0 Povitica

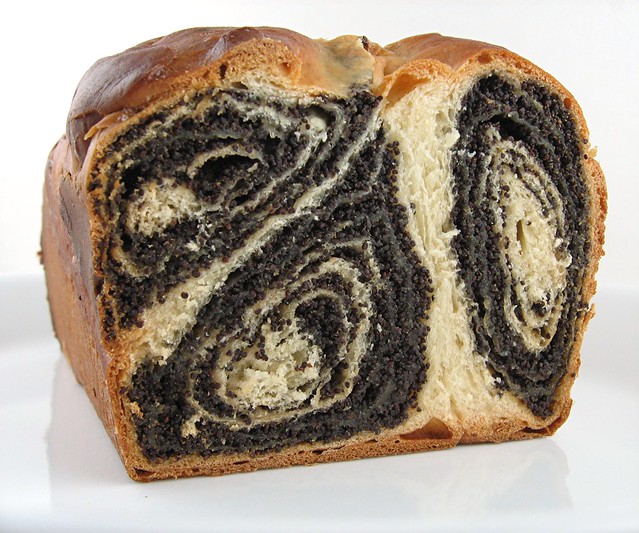
povitica_poppy_seed


I love making yeasted enriched breads. Even though most enriched breads are more bread than pastry, the fact that they are enriched with milk, eggs and butter makes them seem more like dessert. For this month's Daring Bakers' challenge hostess Jenni asked us to make povitica, an Eastern European dessert bread. It can also be known as potica, nutroll, kolachi, or strudia.

I went old school and put away my Kitchen Aid stand mixer. The dough came together quickly and easily using a wooden spoon and a big mixing bowl. It was a sticky dough so I had to knead it for some time before it came together for the initial rise.

Then came the fun part - rolling and stretching. I covered my work surface with a large sheet of cheesecloth and started rolling out the dough with a rolling pin. The dough was really easy to work with and never stuck to the cheesecloth. When it got to about 18 x 18-inches, I lifted the dough off the cloth and started stretching it using the back of my hands and arms. The goal was to get it thin enough that I could read through it.

povitica_very_thin

Dough so thin that I can read through it!


Jenni suggested that we try the traditional walnut filling, but I wanted to use poppy seeds. I used a poppy seed honey filling recipe that I normally use for filling hamentaschen. As you can see I didn't have enough filling to spread over all the edges, but it still turned out just fine. (In hindsight I should have spread the poppy seed filling thinner so that it covered more of the dough. The sliced loaf would have been prettier with evenly spaced layers of dough-filling-dough-filling. Oh well! Live and learn. )

povitica_filling


Then I folded the rolled up poppy seed filled dough like a snake into my prepared loaf pan. For my other loaf, I spread the stretched dough with some apricot jam, a light sprinkle of finely ground almonds and some dried cranberries. I rolled it and then twisted the roll into the pan.

povitica_twisted_in _pan


When the loaves came out of the oven I couldn't wait to slice into them. The smell was amazing. There really is nothing quite like the scent of freshly baked bread still hot from the oven. After patiently letting it cool in the pan for 30 minutes, I turned them out onto a wire rack.

povitica_baked_loaves


They tasted as good as they looked. The dough had a hint of sweetness and was very moist. Both flavors were delicious, but my favorite one was the cranberry. Even though I am on a self-imposed low-carb diet, I had a slice a day until the cranberry loaf was all gone!

povitica_cranberry_apricot


Who knew something so pretty would be so easy to make? A big thanks to Jenni for the recipe and please visit the Daring Kitchen for a slideshow of other bakers' poviticas.

The fine print:

The Daring Baker’s October 2011 challenge was Povitica, hosted by Jenni of The Gingered Whisk. Povitica is a traditional Eastern European Dessert Bread that is as lovely to look at as it is to eat!

Continue reading...

Saturday, 8 October 2011

0 Mean Green Collard Terrine


THE MEAN GREEN COLLARD GREENS TERRINE

i love terrines...i think they can be a work of art.


just about anything can be made into a terrine.  usually you find the good ones in specialty stores or just see them out for special occasions, but once you have made one yourself, i'm sure you'll enjoy a nice beautiful terrine more often.  sometimes i'll have one in the fridge to nosh on through the week.  a little slice can turn an uneventful weekday into at least something a little gourmet...you know what i'm talking about...add a little fancy into your diet and everything looks better.


 first, start with an idea of which type you want...hot or cold, meat or veggie, egg base or aspic...
one of my first terrines was a Pate de Campagne (found here)...for my meat loving friends i suggest you try this one...DELICIOUS!
but...for the veggie lovers the green terrine was a hit..(i DID slip that little layer if ham in).  as i look back i think i bit off a little more than i could chew with this "veggie terrine idea"...i had this visual of a fabulous layered  terrine one day so i went out and bought loads of greens, came home to realize the idea would be a little more effort than expected.  being the perfectionist that i think i am,  i had the bright idea that if i blanched and shocked EACH LEAF it might retain the beautiful green color rather than that semi grey color collards can get when cooked...out came the pots and the bowls and the ice and the paper towels.  after washing each leaf carefully...now i have to touch and coddle each leaf again?!...me and my "bright ideas"
this was definitely a hands on, made with love terrine...more like a work of art rather than a simple dish of collard greens.


THE RECIPE...?....or INSTRUCTIONS to...

A MEAN GREEN COLLARD TERRINE

there really isn't much of a recipe...more like instructions of how to.
if you really have some questions about this terrine please leave a comment and i'll help out.  otherwise here is my attempt at writing out the recipe for this particular terrine...every terrine will come out different and mid way through the building you might want to add a different layer.  i happen to have some sliced ham in the fridge so i slipped a few slices in.  i recommend something with a little more flavor...maybe a little prosciutto or black forest ham.  i find that you need to slightly over season terrines because they just soak it up...choose your ingredients wisely and definitely season as you go along.

2 bunches of collard greens...washed very well, tough middle stalk removed
7 - 10 large asparagus
1 bunch of haricots verts
sliced meat of your choice...prosciutto would be nice
1 - 2 cups good stock made from pig's trotters or chicken feet...something that will be very gelatinous

make your stock...i always keep some rich hearty stock in my fridge.  it has to be made from trotters or tails or chicken feet..(something that creates a gelatinous broth when chilled). not only will this give the terrine some good "glue", but it will have more flavor than using a gelatin or aspic base.
blanch and shock each vegetable separately...this will keep the nice deep green color.
if using a collard layer...keep your greens flat for easier layering and nicer presentation.
next i lined the glass loaf dish with a layer of collard leaves.  let them hang over the sides as you build the inside of the terrine.
now you just start layering...make thick enough layers so you can tell what it is, but just do whatever you want with the vegetables you have chosen.  i happen to have some ham in the fridge so i threw a layer of that in...i think it should have been something else, but it worked.

once you're done with the inside, pour a little broth over the top.  then take the over-hanging leaves and cover the top.  lightly press down to compact everything...there might be some over-spill of broth, so be ready for that...
cut a piece of parchment to cover the top and then cover with foil.
bake in 350 oven for 30 minutes
IMPORTANT NOTE...i used a bain marie,so the outside wouldn't get browned.
preheat your oven and your bain marie vessel of choice.  make sure your water is hot going into the bath.
NOTE...the timing depends on how much you have packed in there, how much liquid, how done you like your veggies and so on and so on...i think mine was 30-40 minutes.  i looked for little bubbles boiling on the sides of the glass dish and took it out.
let this cool to room temp and refrigerate.

to remove you'll need to run a flat thin blade around the edges...or dunk in some hot water to loosen.

slice and serve at room temp or slightly warmed as a side.  i bet a nice poached egg would really be delicious with this and some crumble prosciutto over top

thanks for making it to the end and, again...please leave a comment with any questions

Wednesday, 5 October 2011

0 Crack Pie

crack_pie_fork_2


If you follow the food media, then you know about crack pie. I mean, Crack Pie ™. Yup, I believe that Momofuku has trademarked the name. I did not have a chance to visit Momofuku's Milk Bar during my last visit to New York City, but I will definitely go to Milk Bar during my next trip to NYC. And I will try Christina Tosi's Crack Pie ™. If the real thing tastes anything like the pie I baked today, then I will gladly pay $44 for the pie. Although, if the real thing does taste anything like the pie I baked today, then I actually don't need to buy the pie ever again since I can do it myself.

When I first set out to make the crack pie, I wasn't sure which recipe to use. Searching the internet resulted in 2 or 3 "official" recipes from Tosi. Her Milk Bar cook book is coming out this month and it will probably have yet another version of the recipe. I decided to go with the recipe published in the LA Times.

crack_pie_crust_closeup


The recipe yields two 10-inch pies. I don't have any 10-inch pie pans, so I used one 9-inch pie pan (1-inch deep) and one 10-inch tart pan (3/4-inch deep). My pie version had a lower crust to filling ratio. The bottom crust was less distinct and melded into the thick and gooey layer of filling. My tart version had a higher crust to filling ratio. The crust stayed distinct and crisp. The thin layer of filling was less gooey and a tad more set than the filling in the pie version.

I had a hard time deciding which version I liked more. If I had to pick only one then I choose the tart version. I really liked how crisp the salty and sweet toasted oatmeal cookie crust was in the tart. It had a perfect amount of the sweet, buttery filling. Not too much and not too little.

crack_pie_tart_slice

^tart version^


crack_pie_pie_slice

^pie version^


The pie version was delicious too, but most of the bottom crust was slightly softened with the yummy filling and was not crisp enough for me. The side crust stayed crisp, but I wanted more crispy crust with every bite of my slice and not just at the edge. A 10-inch pie pan would actually result in the perfect ratio of filling to crust and just the right crispiness which is probably why the recipe says to use 10-inch pie pans (duh!). I will be running out soon to buy a couple pans since I will definitely be making this pie again.

There is an incredible amount of hype surrounding this pie. Many swoon over it. But there are just as many haters. Many of the dissenters have tried the pie at Milk Bar and were less than impressed. They tried the real thing and felt it was just so-so and would never pay to eat it again. I have no problem with that. But even more of the dissenters are people who have not tasted the Milk Bar Crack Pie ™ and have only tasted their own homemade version made using one of those "official" recipes. A lot of people are flabbergasted that anyone would have the nerve to charge $44 (or whatever price) for a simple pie and criticize a pie's cost instead of the taste of said pie. A more fair criticism would be that they would never pay $44 for the pie they made.

[BTW...Yes, I know we're in a recession and $44 for any pie in any economic climate can be considered excessive, but this is a luxury item not unlike $5 lattes or $100,000 cars.]

Initially I was a little worried about serving my crack pie since it's quite cosmetically challenged. It's very brown. Even the dusting of powdered sugar didn’t help dress it up. It was hard to slice and get out of the pan cleanly. When I set the pie out to serve, I wasn't sure what to call it. Should I just say it's a chess pie with a salty, toasted oatmeal cookie crust? Would it be presumptuous to label it "crack" pie? What if people didn't get the name? Or even worse, what if they did get it and didn't agree that it was as addictive as crack? My worries were totally unfounded. Everyone who tried my pie absolutely loved it and said it totally lived up to its name. Someone told me that butter is her favorite food group.

crack_pie_fork_1


Crack Pie
(Recipe from LA Times February 11, 2010)
Makes two 10-inch pies

LA Times Note: Adapted from Momofuku. This pie calls for two 10-inch pie tins. You can substitute two 9-inch pie tins, but note that the pies will require additional baking time, about 5 minutes, due to the increased thickness of the filling.

Alpineberry Notes:

-- Instead of a 9x13 pan to bake the oatmeal cookies, I used a half-sheet pan and spread the batter out to about 9x13.

cp_oatmeal_1
cp_oatmeal_2


-- Instead of two 10-inch pie pans, I used one 9-inch pie pan and one 10-inch tart pan.

cp_pie_pan
cp_tart_pan


-- My baking time for the pies was different from what is stated in the LA Times recipe. My total baking time was 40 minutes (350F for 20 minutes and then 325F for 20 minutes).
crack_pie_be


Continue reading...
 
back to top //PART 2