Friday, 26 January 2007

0 A Souffle for Donna Day

souffle 1


Soufflés have a reputation for being difficult to make, but that's not why I've never made one before. I've never made soufflés because I never really craved soufflés. But blogging has been a way for me to expand my horizons and try new things in the kitchen. So when Tami at Running with Tweezers announced soufflés as the theme for 2007's first Hay Hay It's Donna Day, I instantly started craving one. It's the power of suggestion. Or maybe it's the power of food blogs?

Gourmet magazine describes this dessert as "a soufflé without fall … delicate and foolproof ". The word that caught my eye was "foolproof". It was as if the recipe was daring me to mess it up. Technically this isn't your traditional soufflé. Salzburger nockerl is more like a meringue dessert. The original recipe calls for lingonberry sauce, but I decided to use a combination of Nutella (chocolate hazelnut spread) and raspberry jam. Because (1) Why not? (2) I can’t leave well enough alone and (3) in the spirit of HHDD, I wanted to "turn simple into special". It was a treat to find pockets of creamy Nutella and jam underneath the light and airy meringue. And was it foolproof? Well, I wouldn’t go so far as to call it foolproof but it was a pretty easy recipe. Just set your baking dish on a sheet pan to catch any drips and make sure you don’t open the oven while it's baking.

I think the hardest part was getting a photograph of the soufflé. My best light at this time of day was about 11 meters away from my oven. The heavenly clouds of my soufflé deflated with every step. I lost about 3 cm before snapping my first shot.

souffle 2

Salzburger Nockerl
(adapted from Feb 2007 Gourmet)

1/4 cup heavy cream
3 tablespoons Nutella or other chocolate hazelnut spread
2 tablespoons raspberry jam or preserves
5 large egg whites
1/2 teaspoon salt
1/2 cup granulated sugar
1 tablespoon all-purpose flour
3 large egg yolks
1 teaspoon pure vanilla extract
confectioner's sugar for dusting

Put oven rack in middle position and preheat oven to 400°F.

Pour cream into a 9-inch pie plate or shallow gratin dish and spoon Nutella and jam into cream in dollops (it will be sparse).

Put egg whites and salt in a bowl, then set bowl in a larger bowl of hot water and stir whites to warm to room temperature, 1 to 2 minutes. Remove from hot water. Beat whites with an electric mixer at high speed until they just form soft peaks, then beat in granulated sugar, 1 tablespoon at a time, beating until whites just form stiff, glossy peaks. Sprinkle flour over meringue and fold in gently but thoroughly. Whisk together egg yolks and vanilla in a small bowl. Whisk in about 1/2 cup whites to the yolks to lighten up the mixture. Then fold yolk mixture into whites gently but thoroughly.

Spoon large dollops of meringue onto cream mixture and bake until golden brown and set, 13 to 15 minutes. If you prefer a less creamy soufflé, bake 5 minutes more. Dust lightly with confectioners sugar and cool 5 minutes before serving.

Makes 4 to 6 (dessert) servings.

souffle 3
Nutella & raspberry jam peeking out

Sunday, 21 January 2007

0 Frangipane Tart

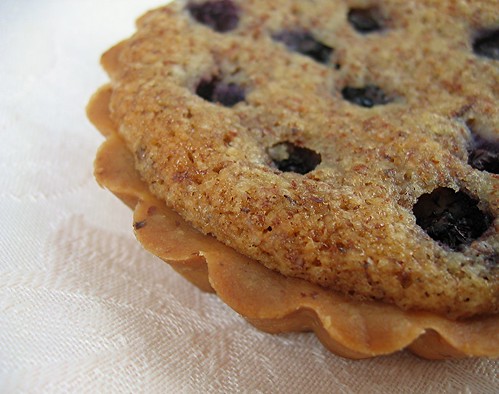
frangipane tart 2


I love all things almond. Amaretti. Check. Marzipan and almond paste. Check and check. Swensen's toasted almond ice cream. Enthusiastic check. Of course it came as no surprise that I love these frangipane tarts. This frangipane is basically equal parts almonds, sugar and butter held together with eggs. This easy to make almond-y goodness bakes up a bit "cakey" and pairs really well with slightly acidic, juicy fruit like blueberries. I baked my tarts in miniature tart forms but I can't remember how long I baked them in the oven. So I've included the recipe for a 9-inch tart. It's not quite as cute but definitely just as delicious.

Frangipane Tart
(makes one 9-inch tart)

2 cups (200g) sliced almonds
1 cup (200g) granulated sugar
3/4 cup + 2 tbsp unsalted butter (200g), softened at room temp.
pinch of salt
2 large eggs
2 tbsp whole milk

1 unbaked 9-inch tart shell (I used this tart dough recipe)
1 1/2 cup blueberries

Make the frangipane cream:
In the bowl of a food processor, combine almonds and 1/4 cup sugar. Process until almonds are finely ground. Set aside.

In the bowl of a stand mixer, cream butter and remaining 3/4 cup sugar. Mix in the almond-sugar mixture and salt. Add eggs, one at a time, mixing well after each addition. Add milk and mix until light and creamy.

frangipane tart 1

Assemble and bake the tart:
Preheat oven to 375F. Fill your unbaked tart shell with the frangipane cream. Arrange your blueberries on top of the cream. Bake tart until the crust is golden brown and the filling is set, about 70-75 minutes. Your filling should feel firm and slightly springy to the touch.

Sunday, 14 January 2007

0 Chocolate Espresso Cupcakes

chocolate espresso cupcake close


At the risk of being so last year (or even so last year's last year) it's another cupcake recipe from me. I would like to think of this cupcake as "retro" instead of passé. Nevertheless, I present to you my deep dark chocolate espresso cupcake. I know it bears a slight resemblance to those brand name cupcakes that you can buy at the supermarket or convenience store and probably ate as a child. But appearance is where the similarity ends. My cupcake is a dark chocolate cupcake filled with a creamy espresso mascarpone cheese, chocolate glazed and decorated with a squiggle of icing. Although I couldn't really taste the coffee in the cupcake, it adds some depth of flavor when paired with chocolate. The filling is all about espresso. Creamy mascarpone cheese is transformed with ground espresso beans making this a grown-up version of a childhood favorite.

chocolate espresso cupcake squiggle

Chocolate Espresso Cupcakes
(makes about 30 cupcakes)

Chocolate Cupcakes
2 1/2 cups all-purpose flour
1 1/4 cup Dutch-process cocoa powder
2 1/2 cups granulated sugar
2 1/2 tsp baking soda
1 1/4 tsp baking powder
1 tsp salt
2 whole eggs
1 egg yolk
1 1/4 cup whole milk
2/3 cup vegetable oil
1 tsp vanilla extract
1 cup brewed coffee (with 2 tsp instant espresso powder dissolved in the coffee)

Espresso-Mascarpone Filling
8 ounces mascarpone cheese
2 tbsp milk
1/2 tsp vanilla extract
2 tsp finely ground espresso beans
2 cups confectioners' sugar, sifted

Chocolate Glaze
2 cups (6 ounces) semi or bittersweet chocolate, chopped
6 tbsp (3 ounces) unsalted butter
1/4 cup light corn syrup
1 tsp vanilla extract

To make cupcakes

Preheat oven to 350F. Line 30 standard (4 fl oz capacity) muffin cups with paper liners.

In the bowl of a stand mixer, sift together flour, cocoa, sugar, baking soda, baking powder, and salt. Add the eggs, egg yolk, milk, oil, vanilla and coffee and beat on low speed until well combined.

Fill your prepared muffin cups about 2/3 full. Bake until a cake tested comes out clean, about 18-23 minutes. Leave cupcakes in pan for 5 minutes then remove from pan and cool completely on cooling rack.

To make filling

In the bowl of a stand mixer, beat the mascarpone, milk, vanilla and espresso until fluffy. On low speed, slowly beat in the sugar until smooth. Transfer filling to a pastry bag fitted with a 1/4-inch plain tip. Insert tip into the top center of cooled cupcake and dispense about 2 tsp filling into the cupcake.

To make glaze

Combine chocolate, butter and corn syrup in a small saucepan. Stir over low heat until well combined about 2-3 minute. Remove from heat and stir in vanilla extract. Frost the filled cupcakes with the warm glaze.

chocolate espresso cupcake filling

EDITED (January 25, 2007)

Kitchen Wench Ellie told me about the cupcake round-up event hosted by Cupcake Bakeshop’s Cheryl and Vanilla Garlic’s Garrett. Fellow San Franciscan Cheryl blogs exclusively about her super creative, out-of-the-box cupcake masterpieces and Garrett does Sacramento proud with his culinary shibby-ness in the kitchen and about town.

I’ve created quite a few fun cupcake combinations in the past few months (like my mojito cupcake and Boston cream pie cupcake), but I thought I would submit my chocolate espresso cupcake since it’s my most recent one. There’s nothing ground breaking as far as the flavors go but this one was all about taking a humble snack food and turning it into fancy food. And thanks to Sarah for making my cupcake Slashfoodpornalicious!

Whew! Now that’s a whole lotta linky love.

END EDIT

Monday, 8 January 2007

0 Cook's Illustrated NY-Style Crumb Cake

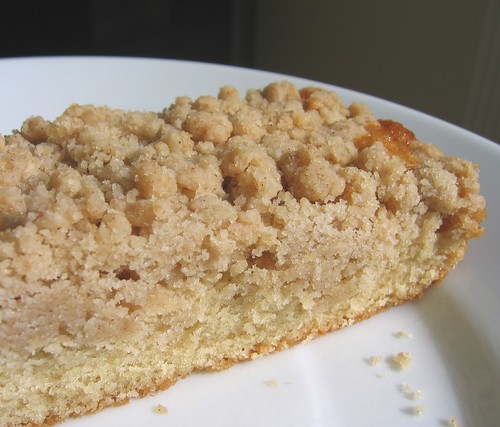
ny crumbcake


I’ve been a loyal Cook's Illustrated magazine reader for almost a decade now. There are no advertisements and the pictures are mostly illustrated (although there are some small photographs on the inside back cover). I love their scientific approach to cooking and the over-the-top attention to detail, but sometimes they can take it a bit too far.

For instance, they complained about using the typical creaming method when making an applesauce cake. According to the author, creaming the butter and sugar, adding eggs and then alternatively adding the dry ingredients and applesauce resulted in an elegant refined crumb but was "an awful lot of fuss for such a simple cake". So they preferred to mix the batter using the muffin method of mixing the wet ingredients by hand before adding the dry ingredients also by hand which produced "a more casual crumb that was better suited to a rustic snack cake". Okay, I don't really have a problem with choosing the most appropriate mixing method that gives the desired texture. But I did have a problem with their solution to increase the apple flavor of the cake. The author decided to simmer dried apple chunks in some apple cider until the liquid evaporates, allow the mixture to cool, put the now re-hydrated apples with the concentrated cider along with some applesauce into a food processor, whirl to make a smooth puree, and then add that puree to the cake batter. Apparently this was not too much fuss for this simple rustic apple cake. I understand that the point was to make the cake more apple-y but this solution was a bit mad.

So that is one of the reasons for my love-hate relationship with CI. Another is the restrictive nature of their recipes. As a baker and a scientist, I understand the need for precision. And because their recipes are designed with such scientific precision, the seemingly tiny details are actually not so tiny. A sauce recipe called for 2 tablespoons of tomato paste per 3 pounds of beef. According to CI, that tiny addition caused their tasters to exclaim "Wow, what did you do?" and made the beefy flavor more intense. However, using 3 tablespoons made my sauce taste of nothing but tomatoes. All my years of cooking told me that the extra amount of tomato paste shouldn’t have severely affected the outcome, but somehow it did. The normal rules just don’t apply when using a CI recipe. I’ve found that there is no wiggle room even with the non-pastry / non-baking recipes.

In any case, the article that accompanies each recipe is almost as, and in some case more, important than the recipe itself. The article gives the author a chance to explain the method to the madness. This is the issue I have with testing their recipes as a "Friend of Cook's". (For those who don't already know, anyone can sign up to be a "Friend" and try out CI recipes before they are published in their magazine. All they ask is that you try the recipe and provide some feedback before the deadline.) The mad methods that end up in many of their recipes need more explanation than what is provided with the test recipe. I guess I’ve gotten so used to knowing all the reasons behind the recipe that I don't want to just follow a CI recipe blindly. I am bursting with questions like a child who has to know why before doing anything. With the test recipes, I have no choice but to forge ahead blindly, putting my faith in the recipe.

I have no idea if this test recipe for New York style crumb cake was a successful "recreation of the crumb cakes of New York’s past" but it was a delicious and simple cake. And y’all know how I adore simple. I only had one question when testing this recipe. Why use cake flour instead of all-purpose flour in the crumb topping? I could make an educated guess but I would like some confirmation from CI. I guess I’ll have to wait until the magazine comes out in a few months.

EDITED (February 17, 2007): I removed the Cook's Illustrated recipe from my post per the CI magazine's request. I apologize for any inconvenience. -Mary

Wednesday, 3 January 2007

0 Raspberry Champagne Trifle

raspberry champagne trifle


Editor and publisher Gabrielle Lichterman of Four Weeks, a monthly online lifestyle magazine for women, asked if I would create a recipe using Champagne for the January issue. I don’t really drink anything alcoholic so I wasn’t sure if I wanted to do it. But after some deliberation, and in the spirit of the holiday season, I thought it would be fun to come up with a Champagne dessert recipe. I’m so glad that I agreed to do it because this raspberry Champagne trifle was absolutely delicious. And I got to practice making genoise, the classic European sponge cake, as well as making sabayon, a light and foamy sauce typically made with egg yolks, sugar and wine.

Both techniques are based on beating air into eggs. Genoise is leavened only by the air beaten into the batter. Folding the flour and butter into the lofty egg mixture must be done very gently to keep all the air you whipped into the eggs. Sabayon (known as zabaglione in Italian) is made by whipping egg yolks and sugar with a liquid (like Champagne or wine) over simmering water until thickened and increased in volume. Sabayon will deflate over time, so cooling it in an ice bath and folding some lightly whipped cream into the sabayon will help it keep a bit longer.

This recipe looks long but the genoise and raspberry puree can be made in advance. The Champagne sabayon cream is best made right before assembling the trifle. I layered my ingredients in a baking dish and served it in slices with raspberries. But it’s just as good scooped from a trifle bowl and served family style.

And don’t forget to check out the other Champagne recipes at Four Weeks Magazine.

Raspberry Champagne Trifle

8 large egg yolks
1/2 cup granulated sugar
pinch of salt
3/4 cup Champagne
1 cup heavy whipping cream
1 recipe orange genoise (see recipe below)
1 1/4 cups raspberry puree (see recipe below)

To make the Champagne sabayon cream:
In a large stainless steel bowl, whisk the egg yolks, sugar, salt and Champagne. Place bowl over a pot of barely simmering water (double-boiler style). Whisk vigorously until thick, about 5 minutes. Remove bowl from heat and set bowl into an ice bath (a larger bowl one-third full of ice water). Whisk occasionally until sabayon is cool.

In a bowl of a standing mixer, whip heavy whipping cream on high speed until soft peaks form. Fold whipped cream into cooled sabayon.

To assemble the trifle:
Using a serrated knife, cut the orange genoise into 4 rectangles. Slice each piece in half horizontally making a total of 8 pieces.

In the bottom of a 3 1/2-quart glass bowl or dish, spread about 1/4 cup of the raspberry puree. Top the puree with about 3/4 cup of the Champagne sabayon. Cover the sabayon with a layer of genoise. It's okay to piece together the genoise pieces. Repeat layering sequence (raspberry puree, sabayon, and genoise, ending with the sabayon). You may have some puree and sabayon leftover.

Refrigerate trifle for 6 hours (and up to 2 days) before serving.

*Orange Genoise
(makes one 12x17 cake)

1 1/2 cup sifted cake flour, sifted then measured by spoon & sweep method
(or 5.25 oz cake flour, weighed then sifted)
3/4 cup + 2 tbsp granulated sugar
1/8 tsp salt
6 tbsp (3 oz) unsalted butter
6 large eggs
1 tsp vanilla extract
1 tbsp finely grated orange zest

Preheat oven to 350F. Butter a 12x17x1 sheet pan. Line the bottom with parchment paper and butter the parchment.

Sift the flour, 2 tbsp sugar, and salt onto a sheet of parchment paper. Set aside flour mixture.

In a small saucepan, melt the butter over low heat. Set aside melted butter.

In the bowl of a stand mixer, whisk the egg and the remaining 3/4 cup sugar together by hand. Place bowl over a pot of barely simmering water (double-boiler style). Stir with a whisk until the mixture is warm to the touch and sugar is dissolved.

Remove from heat and attach the bowl the mixer. Using the whisk beater attachment, beat on high speed until the mixture has tripled in volume and is thick and pale in color, about 4 -5 minutes.

Sift one-third of the flour mixture over the whipped egg mixture. Using a large rubber spatula, gently fold in the flour until just incorporated being careful not to deflate your batter. Repeat with another third of the flour. Add vanilla and orange zest with final third.

Scoop about 1 cup of the batter into the melted butter and stir to combine. Pour butter mixture into back into the batter and fold to combine. Pour batter into prepared pan. Gently smooth the top.

Bake for 10 minutes then rotate the pan. Bake for 6 to 8 minutes more, or until golden brown and the top of the cake springs back when gently pressed.

Allow the cake to cool for 5 minutes. Run a knife around the edge of the pan. Invert onto a countertop. Remove the pan and parchment. Flip the cake upright and allow cake to cool on a rack.

Genoise can be made 1 or 2 days in advance. Wrap well with plastic wrap and store at room temperature.

*Raspberry Puree
(makes about 1 1/4 cup)

12 oz package frozen unsweetened raspberries, thawed
2 tbsp Champagne
2 tbsp sugar (if needed)

Puree thawed raspberries in a food processor. Remove the seeds by straining the puree through fine strainer into a bowl. Stir in Champagne. Taste puree and add up to 2 tbsp sugar if required.

Puree can be made one day in advance. Store in refrigerator.
 
back to top //PART 2