Sunday, 30 May 2010

0 EASY SLOW COOKER LAMB SHANKS


the slow cooker wins another round. i love my little red slow cooker. i think it is the best 20$ i ever spent. no need for the big fancy model with the digital readout. no need for the auto timer. i guarantee when it's done you'll be there waiting.


i know we're moving into summer and everyone is is starting up with their "Lite Summer Fair", but i say, "Don't put away the slow cooker". there's just something so satisfying about throwing a few ingredients in a pot, walking away with no worries and coming home to a fabulous, no-fail meal that tastes and smells like grandma's been in the kitchen all day. pure comfort.

did i mention the clean up?...one pot.

SLOW COOKER LAMB SHANKS...easy peezy


3-4 lbs lamb shanks

1 onion sliced thick

3-5 spears fresh rosemary

8-9 peeled garlic cloves

2 carrots cut large

put sliced onion in the bottom of the crock pot.

salt and pepper the lamb shanks.

put everything in the pot.

add enough water to almost cover meat (shown above). don't fill too full.

get the rosemary tucked in so that it's not just floating on the top.

cook on low for 7-8 hours.

if you're home you might want to check it around 5 hours and flip the meat. also you might want to squeeze in a few small potatoes...there should be enough room at this time.

7-8 hours later your ready for a tried and true comfort meal

remove the meat and the veg. for serving and strain the liquid.

DON'T THROW THE COOKING LIQUID OUT. strain, let it sit and separate. refrigerate or freeze for another fabulous dish that requires a rich deep homemade broth.

Friday, 28 May 2010

0 Potted Meat...Homemade "Almost Pate"

Potted Meat...the poor mans Pate ...?

easy to make and really does taste like a rich pate, but without the Liver Factor. pack it into cute little jars for a fun, gourmet lunch treat or mold it in a terrine and slice for sandwiches and salad topping. if you're the canning type you could top it off with a little rendered fat or some clarified butter. actually it's not necessary to go through the whole canning process. if you seal the top with some type of fat, it will last in the fridge for quite a few weeks just like it's fancy French cousin "The Rillette".

the basic concept is...well cooked(boiled even) meat, seasoned, pureed and stored/packed in it's own juices. pates, of course, are a bit more complex, but this i found to be quite easy...maybe not as sophisticated, but so much easier to make and, again, no liver is involved...not that i have a problem with liver. it's one of the things with which i haven't had any experience. a while back i had a small nibble of a chicken liver and reeeeally wasn't pleased with the flavor or the lingering taste. i do, however, love braunschweiger and "real pate"...go figure. i just don't think i'm ready to cook with it yet...and as i said, it's absolutely NOT necessary for Potted Meat.

served as a spread or sliced from a terrine this is a great versatile meat course...appetizer, sandwich, snack or on a salad. i really enjoyed it in a lettuce wrap with a cornichon and a little dijon.

easy instructions...

1 lb of ground veal (lamb or pork would work well)

1/2 diced onion

good stock...i had some oxtail stock. enough to cover the meat. approx 4-5 cups. use something that pairs well with the meat you choose. real stock(not canned or cubed) seems to set-up better because of the gelatinous effect when chilled.

2 Tbsp olive oil

1 tsp oregano

1 tsp tarragon

bone marrow-OPTIONAL. i happen to have some.

bring this to a boil and then simmer for 2 hours. check to see that your liquid has not reduced below the meat.

remove from heat and strain. keep liquid.

put meat in a processor with...

1-2 tsp fresh minced rosemary

3-4 roasted garlic cloves-i always have some on hand.

1/4 cup minced parsley

S & P to taste

pulse process and add cooking liqiuid to desired consistancy. don't separate out the fat. you'll need this to help set-up the cooled finished product. i think it should be smooth, but not too creamy. spoon into vessel of your choice. if using jars you can have fun layering in other components as shown in picture above. if using a terrine...line it with foil or saran wrap and sprinkle chopped parsley on the bottom and sides. this will make for easy removal and nice presentation.

Wednesday, 26 May 2010

0 Pile of Puffs

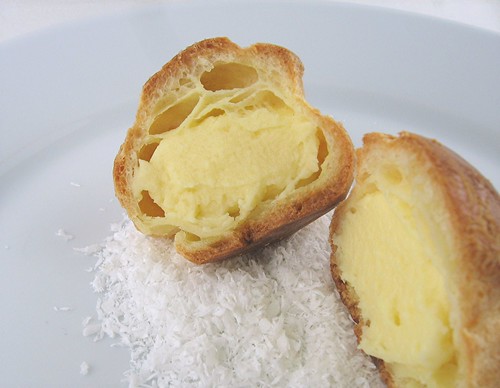
cream_puff_1


For our Daring Baker's challenge Cat of Little Miss Cupcake asked us to make a piece montée (aka croquembouche). The classic piece montée is a tall cone shaped tower of pastry cream filled cream puffs that are dipped in chocolate or caramel. The puffs are bound together with caramel to hold the cone shape.

There are 3 components: pate a choux (cream puff dough), pastry cream (to fill the cream puffs), and caramel or chocolate glaze (to "glue" the filled cream puffs into shape).

Making pate a choux is something I've done many times. You have to make sure the flour gets cooked until the dough forms a ball and there's a film on the bottom of the pot. Then it's ready for the eggs. I cheated a little and beat in the eggs using my KitchenAid stand mixer instead of by hand. The machine really helps work the dough so that the gluten will develop and hold the structure of the puff. But I've done it by hand in the past and have gotten successful puffs that way too. Using the given recipe and piping 1x1-inch puffs, I got 45 puffs which is way more than the 28 mentioned.

I didn’t really want to make a tall tower since it would be hard to transport it. So I made a sad little pile of cream puffs to photograph and keep for me and my husband. Thankfully Cat said we didn't have to make it super tall and that we're only required to make it a “mounted piece” meaning that it has some height. I know mine barely has any height and is a poor excuse for a croquembouche, but two people can only eat so much dessert. I filled all the remaining puffs, glazed them with chocolate and served them as individual cream puffs.

cream_puff_2


Even though Cat provided some recipes for pastry creams, she also gave us the freedom to use any crème patisserie we liked. I decided to make a coconut pastry cream since I was already making some for another baking project. I didn't feel like working with hot molten sugar so I chose to "glue" my puffs with melted chocolate instead of a caramel glaze. To finish them off I gave it a light dusting of finely shredded desiccated coconut just so you know that it's coconut.

So there you have it. Another Daring Bakers' challenge completed! To learn more about the Daring Bakers or to join the bakers, check out The Daring Kitchen.

The fine print:
The May 2010 Daring Bakers’ challenge was hosted by Cat of Little Miss Cupcake. Cat challenged everyone to make a piece montée, or croquembouche, based on recipes from Peter Kump’s Baking School in Manhattan and Nick Malgieri.

Continue reading...

Wednesday, 19 May 2010

0 Low and Slow Cooked Pork

i just can't seem to get enough pork lately...what's up with that ?
this delicious hunk of pork shoulder could not be easier. i know i love my pig in the slow cooker, but this really is a true pork lovers pork. plain and simple. roasted in the oven low temp...long time.
i first saw the idea/recipe HERE. many thanks to Niki and her Grand Daddy Gene. her recipe is a little bit more involved with the roast and the whole basting thing. definitely sounds really tasty-good and delicious. i'll have to try the whole recipe some time, but so far i've done this twice and i think the roast is just perfect as is without anything extra....then the left overs are like a blank canvas waiting for new ideas through the week.

let's see if i can remember these involved instructions...
i just had this for dinner and i think i'm in
a PORK COMA...OINK !

in a nut shell...SALT AND PEPPER A PORK SHOULDER...STICK IT IN THE OVEN FAT SIDE UP AT 225 DEGREES FOR 8 HOURS...DONE

for a few more details read below...
buy 1 pork shoulder...i like the one with the large covering of skin and fat
preheat oven to 225 degrees
cover a roasting pan or cookie sheet with tinfoil...double is good for easy clean-up
slice 1 large onion and make a base for the roast...optional
with a sharp knife (skin is tough) jab about 6 holes and shove in some peeled garlic cloves
salt and pepper the whole shoulder
i sprinkled a bit of cumin on the second time around-optional
rest the shoulder on the bed of onions as shown in photo...FAT SIDE UP
put in in the oven and WALK AWAY for 8 hours

THAT'S IT...DONE

slice down the crusty skin and peel back to reveal your "fall off the bone" delicious pork meat ready for anything...BBQ sauce, teriyaki, shredding, tacos, paninis or like i said...straight out of the oven. it's hard not to just start eating it right then and there...no salt, no pepper...just hand to mouth...hand to mouth...hand to mouth...
please try this sometime. it's a no-brainer, inexpensive and goes a long way.

Monday, 17 May 2010

0 Malted Chocolate Cupcakes

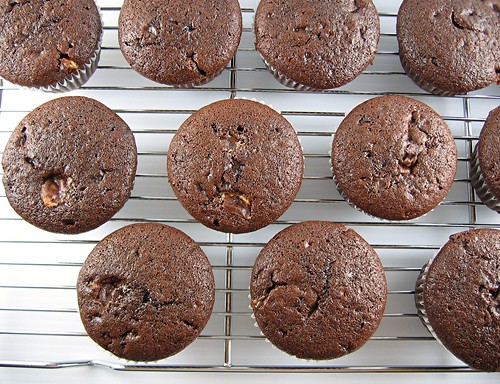
malted_chocolate_cupcake2


Even though I regularly shop for groceries about once a week, I only go to the Asian supermarket once, maybe twice, a year so I tend to stock up on necessities. But I also tend to buy some things that I might not need like that big jar of Ovaltine I bought in early 2009. For those of you who have never heard of Ovaltine it's a brand of sweetened malted cocoa drink mix. My mother used to make it for me and my brothers when we were young. It seems like it was a pretty popular drink among Asian children back then. I think I haven’t had Ovaltine in almost 30 years! When I bought that jar of Ovaltine I planned to use it to make a malted chocolate cake, but I just never got around to it. Until now.

The recipe for the cake batter is adapted from "The Sweet Melissa Baking Book" by Melissa Murphy. It's one of the best recipes for devil's food cake I've tried recently. Melissa Murphy really knows her stuff. The cake had a wonderful chocolate flavor. There are two chocolates in the batter: unsweetened chocolate and Dutch-processed cocoa. The combination really gave the cake a deep chocolate flavor. The addition of coffee enhanced the chocolate and also added moisture. The sour cream also contributed to the moisture and tenderness. The cake was moist and not mushy at all. It held together really well when sliced.

malted_chocolate_cupcake3


I made cupcakes instead of a layered cake. The addition of chopped chocolate covered malted milk ball candy to the cupcake batter is optional. Adding them to the batter seemed like a good idea at the time, but when the cupcakes were baked, if any piece of candy happened to touch any part of the paper cupcake liner it stuck like crazy. Next time I would skip the addition of malt balls to the cake batter.

Even though I added some Ovaltine to the cake batter, I'm not sure if I could detect it in the final product. But I wasn't too concerned about the lack of malt in the cake since the frosting would have lots of Ovaltine. I made a butter and confectioners' sugar frosting with a healthy dose of Ovaltine thrown in. It was sweet and malty with just a hint of cocoa. It was the perfect complement to the devil's food cupcake.

When the cupcakes were all frosted and sitting prettily on the kitchen countertop, the air was filled with the scent of malt and chocolate. The aroma was so familiar and comforting. It really took me back to my childhood.

malted_chocolate_cupcake1

Continue reading...

Thursday, 13 May 2010

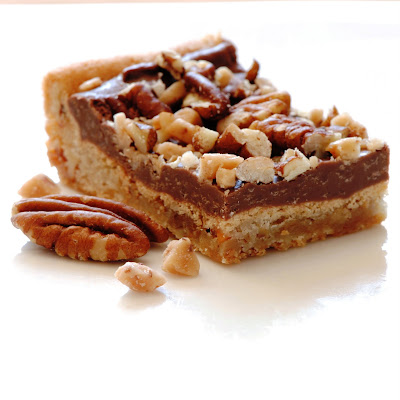
0 CHOCOLATE TOFFEE PECAN BARS ...sooo easy

these little squares are a must. SOOOooo GOOD ! so easy, so quick, no mess, not even a mixing bowl. you must try them at least once. i must warn you now...if you are one of those who refuses to use ready-made helpers...then look away now. if you are one of those "I NEVER !... " type people...then look away now. if, on the other hand, you are ...way too busy cooking real food...in a hurry...or just plain lazy...you must try this recipe. personally, i'm up for anything that tastes good and makes people love you.

made with only a few ingredients that you probably already have...well...maybe not the scary cookie dough sausage...you might have to run out with a disguise to a market where no one knows you and purchase the... shhhhh....ready-made dough. oh, come on...i'm proud to call the Pillsbury Dough Boy my friend and you will be to after trying this EASY bar recipe. so many different possibilities. change it up with some different flavor combos. i haven't had time to get back to the many ideas i have. i know peanuts and peanut butter has to be worked in somewhere...and i have a big bag of macadamias waiting for something with a little white chocolate...maybe tomorrow.


let's get on with the recipe
many many thanks to Amy at VERYCULINARY.com
Amy's original recipe is found here. i have copied it below for convenience and added notes in bold italics...just a few additions.

PRALINE CRUNCH BARS
makes approx. 20 bars (depending on who's cutting them)
prep-5 min.
total time 1 hour-ish


INGREDIENTS

1 (18 oz) roll refrigerated sugar cookie dough

1/2 cup toffee pieces

1/2 cup finely chopped pecans

1 (12 oz.) bag of miniature semi-sweet chocolate chips. i used milk choc. chips

1/3 cup toffee pieces..i must have used 1/2 cup total on top

1/2 cup rough copped pecans on top as well.


DIRECTIONS

preheat oven to 350 degrees

place cookie dough, 1/2 cup toffee pieces and 1/2 cup finely chopped pecans in a large resealable bag. knead well to combine. press dough evenly into the bottom of an ungreased 9 x 13 baking pan

bake for 12 to 15 minutes or until golden brown. sprinkle with chocolate pieces immediately after removing from oven...let stand for about 5 minutes or until chocolate has softened and melted...spread over bars and sprinkle with the 1/3-1/2 cup toffee pieces and 1/2 cup chopped nuts.

chill in freezer or fridge until the chocolate sets. cut into bars.

Saturday, 1 May 2010

0 MEGA CHUNKY VEGGIE-C SOUP

A BOWL FULL OF COMFORT.

packed with vegetables, full of vitamin C and a cure-all for what ails ya.

Veggie-C soup has been my family's "go-to soup" for as long as i can remember. i'm pretty sure it evolved from Grandma Leda's Vegetable Oxtail Soup. when i was little i was a little wary of oxtails (love them now) so my mom would make her version sans the tails...you might also recall years ago there was one of those "fad diets" called The Cabbage Soup Diet. i think it might have started back in the late 70's, or that's when my mother got wind of it. she made a huge pot of this so called "diet"soup... and everyone loved it !...not to date myself or anything, but we've been making this darn soup, in this same house, for over 35 years...scary

soup is good food...plain and simple so i like to keep this one just that...plain and simple. i can eat this every night of the week and finish the pot by myself...how boring you might say. not so. one night it's with chicken. one night it's just a side. one day it's spiced up Mexican style and another it's with Parmesan and whole wheat pasta...add some barley and some beans and get a complete protein meal. what ever you add or change there really is no wrong way to make this recipe. it's just good clean eatin'.

start with a LARGE pot...(this always seems to grow)

stock...approx. 5-6 cups...you need some good stock. homemade, of course, is best. in this house we always have at least one kind of good stock in the freezer... chicken, turkey, lamb, smoked ham hock and/or beef. if you don't have a supply, i suggest you go out and get a nice roast chicken from Costco...enjoy that for dinner and make yourself some good rich stock from that ugly ol' carcass. if you don't have enough stock to cover the veg. my choice is the little jar of "Better Than Bouillon". add a Tbsp or so of this and the correct amount of water as you go along, adding in your veg... i promise you this soup will be bigger that you think...it grows.

chose your veggies ...this is what usually goes in...

try to keep everything the same size. LARGE chunks are more fun and satisfying. this is key to presenting a beautiful bowl.

3-4 carrots

4 stalks celery

1 large onion-diced large (2 small)

1 leek-halved,cleaned and sliced

1 shallot-sliced or diced

1/2 head cabbage

5-6 cloves garlic-sliced thin

roasted garlic cloves (i always have some on hand) diced or sliced

haricots verts (sm. green beans)...a handful

1/2 head of cauliflower pieces (flowerettes)

1 red. 1 yellow bell pepper-seeded and ribbed
2 poblano peppers-seeded and ribbed

1 large can whole plum tomatoes-cut into large chunks. i do not add the remaining juice.

1 rounded tsp oregano

1 rounded tsp tarragon

a handful of fresh Italian parsley leaves

1-2 bay leaves

a pinch, dash of toss of cayenne

1 tsp Mexican chili powder

salt and pepper to taste

directions: this is a bit elementary, because it's one of those recipes that builds as you chop and add.

saute the leek, shallot, garlic and 1 onion with 1-2 Tbsp olive oil.

add stock and start throwing in your vegetables. start with the veg that take longest to cook like the carrots, celery and remaining onion. from there just chop and add. the last to go in are the cauliflower pieces and the green beans. you'll soon see how this seems to grow much bigger than you thought. at this point you might need more stock. i like to use the "Better Than Bullion" mixed with a little warm water (using the ratio given on the jar) until the veg are just covered. let this simmer until everything is just fork tender. i prefer to keep mine a little under done so as not to overcook when reheating for the next meal. i'm not a big fan of mushy vegetables that are so common in most soups. serve as is or over pasta, rice, shredded chicken, beef, pork...last night it was BBQ chicken...tonight is sauteed shrimp...tomorrow might be spicy Italian turkey sausage with white beans....mmmmm.....delicious.

i'm smellin' summer is on the way. that means bikini weather...YIKES !...i will do everything in my power to keep it clean and healthy in preparation for the dreaded BIKINI try-ons. well....with the occasional well earned treat now and then, of course.

 
back to top //PART 2