Showing posts with label low and slow. Show all posts

Thursday, 21 June 2012

0 Cured Pork Belly Roasted with Apple, Onion and Brown Sugar


PORK BELLY WINS AGAIN.

i go to the Asian market every few weeks just to pick up some fresh tofu and some chili oil...maybe a few sweets for Dad from the bakery next door...

how does that darn pork belly jump into my shopping cart every single time ? !


mmmmm...the pork belly is succulent, the bacon is crispy, the onion and gala apple are caramelized in brown sugar and pork fatty goodness...
HOW DOES ONE RESIST ?
even the nay-sayers will bow to the pork belly...
it's very hard to ruin and it is so versatile.  so many ways to cook and so many ways to present.
you can't go wrong...


THE HEART ATTACK NAPOLEON ?
pork belly stacked with brown sugar-butter sauteed apple topped with caramelized onion.  i hear the sirens approaching.  
defibrillator...CLEAR !

the 1st one was a bit small and only had skin on half...so i covered it with bacon and it was crunchy, smoky, baconie, fatty and delicious

2nd time...bigger slab with more skin/fat, no need for bacon wrap.  i used more apples and brown sugar...yumm.  these apples remained in large enough pieces to serve with the belly.


CURED PORK BELLY ROASTED WITH APPLES ONION AND BROWN SUGAR

CURING THE BELLY
i suppose this could be done in a ziploc freezer bag, but i like to use a tupperware or glass/ceramic loaf pan so that the skin is not soaking in the cure...what ever will fit the piece of pork belly you have bought.

1/4 cup kosher salt
1/4 cup brown sugar
1-2 tsp fresh ground pepper

buy yourself a 2-3 lb. slab of belly with skin...no bones
i like to wash and dry it completely with paper towels before doing the cure.
completely cover the belly with the mixture.  place skin/fat side up in non-reactive container just big enough to fit. cover and let sit in fridge for at least 24 hours. this is the all important curing process. after about 12 hrs you can pour some of the liquid out of the container. i did. 

after 24 hrs remove and wash remaining salt/sugar mixture off under cool water. dry completely. take a sharp sharp knife and cut slits through the skin but not to the flesh. i cut about every 1/2  inch or so.
if skin is removed just put some shallow slashes into the fat.

COOKING THE PORK BELLY

1 large white onion
2 gala or honey crisp apples...something sweet and crisp
brown sugar
bacon, if the belly has no skin
cut 1 large white onion into thick slices and layer the bottom of a roasting pan lined with heavy tin foil.  put pork belly on the onions...this is sort of a trivet to keep the pork off the bottom of the roasting pan.  if you want to use the bacon method then remove the skin, not the fat, from the pork belly...(some are only sold without the skin) and cover the top with the bacon strips as shown in photo.  place apple slices nice and snug around as shown in photos.  this  prevents the sides from getting too brown AND lets the apples cook in pork fatty goodness.  sprinkle brown sugar all around the sides on and around apples.

there are 2 ways to cook the belly...low and slow for the whole time...or Jamie Oliver's method.  i suggest if you are using the bacon on top you do the low and slow method so the bacon won't burn.
NOTE...i did not get a crisp crunchy skin with either method.  i was not concerned because i knew i would be refrigerating this and consuming the next day.  the skin should crisp in the pan or broiler later.  if it doesn't want to crisp up, just discard the skin and sear the fatty side before serving.

Jamie Oliver method ....put oven to "full whack" 450 F for the first thirty minutes and then down to 350 F for the next 2 hours...or until really fork tender.  this is a fabulous recipe that you might want to start with if you are unfamiliar with pork belly....straight up crispy skin roasted pork belly...delicious!

Low and slow...put in 225 F degree oven for 5-6 hours or until meat is very fork tender.  this depends on the size of your belly (the PORK belly, silly).  remove from oven and let cool as is. when cool enough, put it in the fridge for at least a few hours. this makes for easy slicing and preparing and way you see fit... and you can keep it there for the week as you whittle away at the slab.  slice against the grain and sear in a hot pan...or put a large slice in the oven to warm and then turn your broiler on to crisp the skin.

do with it what you will...
you can't go wrong with a delicious slab of apple brown sugar pork belly.

Monday, 27 February 2012

0 Tacos de LENGUA. YES..."Tongue" Tacos


WHAT ON EARTH ???

why, yes...it is a cow's tongue.


this, by far, is the most challenging item i have cooked so far.
i've cooked Pig's Tails, Chicken Feet, Turkey Tails, Pig Ears, Snouts and Trotters, just to name a few...
but the tongue has escaped me...until NOW.
i've been wrestling with the idea for quite some time and i finally took the challenge head on...so to speak.
of course, in Southern California we have some fabulous Mexican food.  lucky for us we also have quite a few fabulous Mexican/Latino markets.  but...if you're in the neighborhood of Newport Beach/Costa Mesa i highly suggest you try a tiny little place called El Toro Bravo Tortillaria for one of THE BEST AUTHENTIC MEXICAN STREET TACOS.  it's at the end of a tiny little strip mall on 19th street in Costa Mesa.  AND as the name implies, it is also a Tortillaria factory so you are guaranteed the freshest tortillas.
portions are HUGE and prices are low...well worth the road trip, but be prepared for a hole in the wall looking place and a long line at lunch time.

back to MY tongue.  after trying the Lengua at El Toro Bravo, and loving it, i decided it was time to try my hand at it.
WHOA !!! what a monstrous chunk of ugly meat.  the texture alone is enough to scare one running for the hills.  after it's cooked it gets even worse...not until you have conquered the actual peeling of the outer layer and cutting the thing up does it get any better.  when i say put your game face on I'M NOT KIDDING.

the good news is...IT'S DEEE-LICIOUS !!!


INGREDIENTS FOR COOKING THE TONGUE

1 beef tongue (3 - 4 lbs)
2 large onions
8 - 10 garlic cloves, peeled and crushed
5 - 6 bay leaves
1 Tbsp peppercorns
2 Tbsp salt
2 tsp cumin
1 heaping Tbsp Mexican oregano

FOR THE TACOS

fresh corn tortillas
pico de gallo...or fresh salsa of choice
avocado
cilantro
chopped white onion
lime wedges

COOKING THE TONGUE...

#1...put your game face on.

fill a large stock pot with water.  bring to a boil and put the tongue in for about 5 minutes.  remove tongue, discard the water and clean the pot...this is to remove any impurities.
fill the stock pot with water about 2/3 full.  add the tongue, onions, crushed garlic, bay leaves, peppercorns, oregano, cumin and salt.  bring to a boil.  reduce heat to a simmer, cover and cook for about 3 hours, until tongue is soft to the touch and fork tender.

remove the tongue from the water and cool for a couple of minutes...until is is cool enough to handle.
DO NOT WAIT TOO LONG...i was busy taking the photo and not thinking it would matter, i took my time.  it is harder to peel if the tongue has sat too long.  trust me...you do not want to spend a lot of time with the tongue in it's whole form trying to peel all the outer layer off.
i found it most unpleasant to peel skin off of a tongue...,BUT i'll admit it was kinda cool.
TO PEEL...notice the light colored skin covering most of the tongue.  using your fingers and a sharp small knife, remove the covering and discard.  there is no other way to describe this step.  you just have to experience it for yourself.
NOTE...notice the rough patch of meat where the tongue would attach to the bottom of the mouth...you may remove this if you don't like the looks of it.  i kept most of it.   mine wasn't to rough and ugly looking.  i did not want to waste any of the good edible meat.

after spending all morning and most of the afternoon with my tongue, i was over it for that day.  i took a small amount out and packed the rest away.
if not using right away....slice it in 1/2 inch, or so, thick slices, cover with strained cooking liquid and store in an airtight container.  i like to strain the broth before adding it back to the product that has cooked.

TO PREPARE FOR TACOS...reheat your slices either in a saute pan with a little oil until lightly browned or you can simply reheat in it's own juices in the microwave.
dice into small cubes, mince or you can shred...check your seasoning for salt and pepper and you're ready to build your tacos.

Mexican street tacos are pretty straight forward...FRESH TORTILLAS ARE KEY...then it's just meat, onions, cilantro and fresh salsa.  in America we tend to load them up with all kinds of other unnecessary items, but go ahead and help yourself with a little extra trimmings if you need to disguise the tongue on your first try.  work your way into it.
 i'll bet if you'll be amazed at how good a tongue could taste...
some how that doesn't sound right...

so...what do you say...

ARE YOU UP FOR THE CHALLENGE ???


Thursday, 26 January 2012

0 Braised Pork Belly... Asian style with Coca Cola


let's face it...you can't go wrong with Pork Belly.

any way you cook it, it will be delicious...it will be rich...it will be fatty.  it will be unctuous and it will be worth every melt in your mouth delicious guilty morsel you find shoveling in your mouth.   most likely you will have porcine butter dripping down your chin as you polish off your plate and find yourself wanting more.

 i have cooked quite a few pork bellies in the past year and my favorite go-to recipe has been Jamie Oliver's Crispy Skin  Roasted Pork Belly. if you have never cooked a belly before i highly suggest giving it a go.  Jamie's recipe is too easy not to try.  

this time i wanted something different.
 i wanted that soft pillow-like little nugget of meaty fatty goodness.
BINGO...a slow braise with Asian aromatics.
i was looking for something like a Red Cooking or a Chairman Mao style recipe with that caramel looking glaze, but instead i went for a simple flavorful braise.
BUT...to change things up a bit i decided to add a coca cola.  when reduced i think coca cola has a caramel effect....it worked.
did it make a huge difference?   i have no idea.  i didn't get the "mahogany" glaze, BUT i did succeed in making beautiful little porcine packages swimming in a delicious light, well rounded...almost, dare i say, 
UMAMI-ish subtle broth.


for this recipe i combined ingredients and techniques from 2 great bloggers (links below).  please check out their blogs and refer to them as i did.  being this is the first time i attempted an Asian braise with pork belly, they were quite helpful.

this is what i did for...
ASIAN STYLE BRAISED PORK BELLY with COCA COLA

2.2 lbs pork belly
1/3 cup dark brown sugar, packed
1 star anise
1/3 cup dry sherry ( you should use Shaoxing wine if possible)
1 1/2 inch(approx.) fat stub of fresh ginger sliced, thick - 5 or 6 slices
5 scallions, cut into 3 inch sticks
1 3 inch cinnamon stick
2 arbol chili, whole...optional
1/3 cup soy sauce
4 cups water
1 can coca cola

boil some water in a stock pot big enough to fit the whole slab of belly.  par boil the belly for 3-4 minutes.  this removes any impurities that might be lingering.  discard the liquid and clean the pot if using the same one for cooking.  when cool enough to handle cut into approximate 2 -2 1/2 inch squares.  tieing isn't necessary, but it looks cute and it will keep the belly pieces from separating during cooking.  tie them tight because they will shrink.
in a pot big enough to hold the pork belly pieces in one layer (i used a 5 1/2 qt. cast iron-enamel) add the brown sugar, cold water, sherry or Shoaxing wine, ginger slices, cinnamon stick, scallions, arbol chilis, soy sauce and coca cola.  STIR to combine and add the pork belly pieces, skin side down.  at this time i removed about 2 cups of the liquid because you want the liquid to just cover the pork belly.  depending on the size pot you choose you will probably need to remove some liquid...save it in case you need to add some back in during cooking.  the pork should not be just floating around in the pot.  they need to stay skin side down then later skin side up.  bring to a boil, then lower heat to a simmer, cover pan and braise for 30-40 minutes.
after 30-40 minutes, turn the pork skin side up, cover and braise for another 2 - 3 hours.  a knife should easily pierce the pork when done.

NOTE...my broth did not reduce to 1/2 as one of the recipes said.  i did not get the mahogany color on my pork belly...i was hoping for a deeper thicker braising liquid.

BUT... i did end up with a light, smooth Asian flavored broth that was a lovely compliment to the unctuous fatty pork belly nuggets.
for the broth i used a fat separator, then strained the liquid through cheese cloth...do it twice if necessary for a clean-clear broth.  check for seasoning...you might want to add a touch of salt.  your looking for savory, but with a touch of sweet.

as shown in the photos...serving it plain and simple with a bit of the braising broth really let the pork belly shine on it's own.


Thursday, 1 September 2011

0 Barbacoa Beef Cheeks - Slow Cooker Style


well i thought i better throw the dog a bone and serve you all up some MEAT
did you think i forgot about all my carnivorous friends and followers?

here, for those of you still on the fence about "nose-to-tail" cooking, is a tasty and safe introduction to a less common cut of meat.
BEEF CHEEKS......one of those illusive parts that you might be introduced to in fancy restaurants (or an authentic taco stand IN Mexico), but never see or hear about anywhere else.


i finally found some in my Mexican market here in So. California.  soooo happy...

beef cheeks are the definition of unctuous....
go ahead look it up... 

i think it's a cross between Mom's (Momacita's) all day pot roast and slow cooked oxtails...a wonderful rich beefy flavor with a little sticky gooey texture you find with the oxtails.
the recipe i found has a wonderful blend of flavors... with a hint of lime citrus and warm undertones from the cumin and oregano.  the broth was like none i had had before.  i think the fact that there were NO onions or other vegetables in the slow cooking process really set this one apart from my other crock pot recipes...

i will definitely use this base recipe again and again.


BUT i gotta tell ya...this is the ugliest, most difficult piece of meat i have ever had to butcher.

note to self and others....buy more than you need because by the time you trim away the chunks of fat and grizzle AND veins and silver skin you will have about 1/2 of what you purchased.
i suggest buying it already trimmed or ask the butcher.

luckily i knew i didn't have enough to fill the crock pot so i bought 4 large short ribs to add in.
THE SHORT RIBS WERE FABULOUS MELT IN YOUR MOUTH DELICIOUS !!!
so, by all means if you can't handle beef cheeks, or just can't find them, use short ribs or another choice of fatty meat that works well for slow cooking.


BARBACOA BEEF CHEEKS...slow cooker

the recipe calls for 6 pounds beef cheek meat
1 bought a package that read 2.65 pounds (that's all there was)...after trimming what ever i could i was left with 1 1/2 pounds so i supplemented with 4 large beef short ribs
2 tsp salt
2 tsp pepper
1 Tbsp cumin
1 Tbsp Mexican oregano (Mexican is best...get some)
2 tsp garlic powder
8 cloves garlic, peeled and smashed
1 whole bay leaf
2 whole limes
1 cup beef broth...homemade, rendered form roasted beef bones is best
2 tsp Mexican chili powder, optional
1/4-1/2 tsp cayenne, optional
i think a little heat is always necessary...

rinse cheek meat and trim away as much fat, gristle and silver skin as possible...good luck with this.  it ain't a pleasant job.  cut into large pieces.
put meat into large crock pot (i think mine is a 5 1/2 qt.) and season well with salt, pepper, cumin, oregano and garlic powder.
add bay leaf and squeeze lime juice all over (pulp is fine)
add the beef stock.
stir slightly, cover and cook on HIGH for at least 6 hours...mine was in for a little over 7 hours.
i checked on mine after a few hours and gave it a little stir.
if the meat is fork "butter" tender you're good to go.

take the meat out with a slotted spoon and strain the broth.  the broth might come in handy to remoisten the meat if necessary...and the broth might just make a delicious soup base.  shred the meat and discard any solid fat or grizzle you might have missed in the lovely trimming process.  taste and season as you see fit.  try not to eat it all yourself while shredding and seasoning...

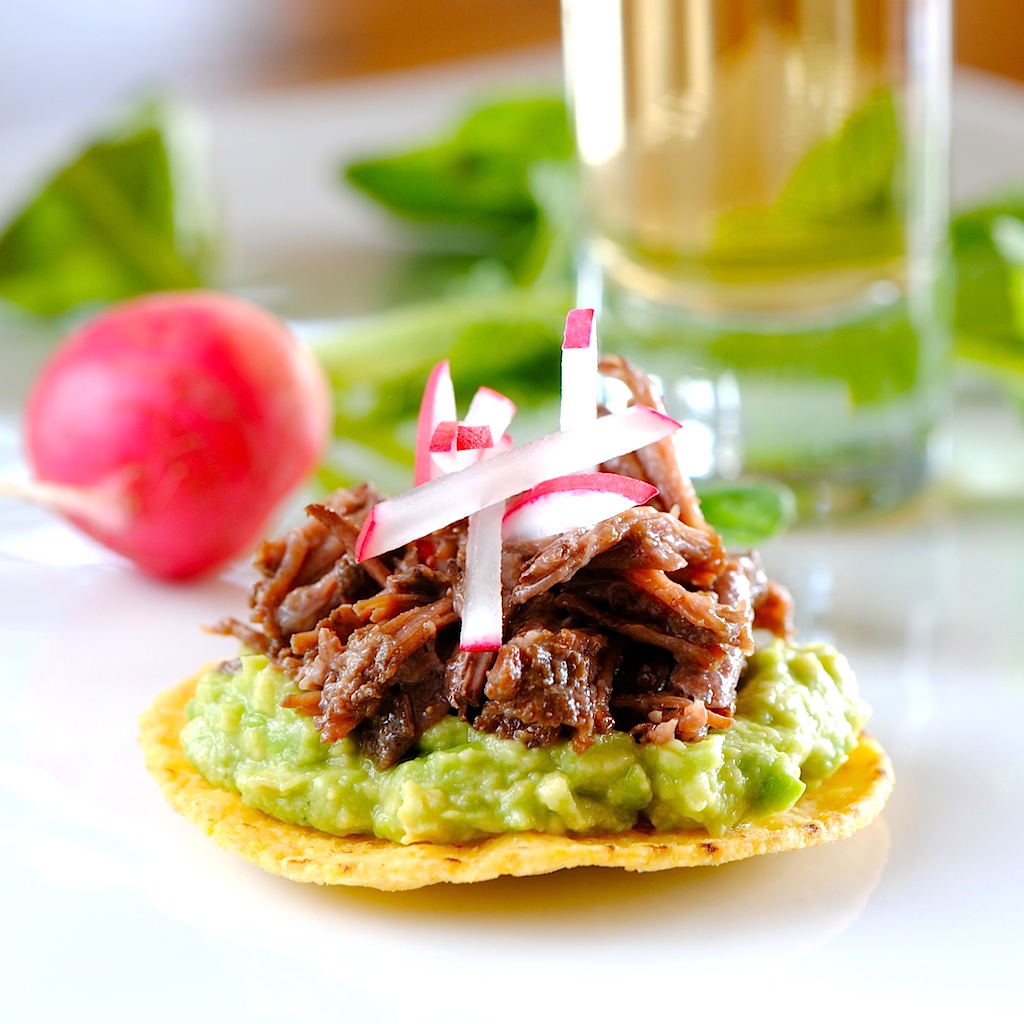
serve with your favorite tortillas, avocado, cilantro, crumbled queso fresco, fresh salsa, diced radish, etc etc etc...dress it up or just keep it simple....OR make little Tostaditas as i did for an interesting Mexican hors d'oeuvre...
maybe a fun amuse bouche for your next Mexican fiesta.

Thursday, 18 November 2010

0 MOROCCAN GOAT STEW


well, i'm so sorry that i was away for a while with my computer problems, but i was definitely still in the kitchen trying out new savory flavors and sweet treats...i have loads of goodies to post.

let me start with this MOROCCAN GOAT STEW
 as you might guess by now, i'm always on the lookout for things a little out of the ordinary.  i came across some goat at one of my favorite markets in Irvine, CA called Wholesome Foods.  if you're lucky enough to have one in your area you should check it out.  great stuff for Middle Eastern cooking.  their produce alone is worth the trip.
as i was poking around looking for something new, i saw some fresh goat shanks...not knowing what the heck to do with it, i bought it anyway...and sooooo glad i did.

GOAT IS GOOD !

i think it tastes like a cross between lamb and beef.  the texture and flavor was fabulous.  i had to add a little beef to my recipe because i didn't have quite enough of the goat the recipe called for.  i was  surprised to find that i really liked the goat much better.  this slow cooking stew was just the right way to introduce a new meat to the party. (the "party" usually consists of ME, MYSELF and I.)  i will definitely try it again.


now with goat in my fridge i went straight to google.
luck on my side, i found this fabulous recipe at Cehun Family Recipes... Recipe.Cehun.com.
with many thanks to the Cehun Family for bringing goat to my table i have copied the recipe for you below exactly.  i usually put in some notes, but this time i did exactly as the recipe was written...i suggest you do the same because it is absolutely fabulous...no changes necessary.  one thing i would like to add is that this would lend itself to any slow cooked stew meat...lamb would be wonderful...beef was great...maybe even pork.  the base of this recipe is so delicious it's worth a try with anything you choose.  i am aware that "GOAT" is not available at every supermarket.


MOROCCAN GOAT STEW


FOR THE GOAT
1 tbspn olive oil
750g goat shoulder, cut into 4-5cm cubes
1 onion, finely diced
2 garlic cloves, crushed
1 can plum tomatoes, chopped
1 cinnamon stick
30g dried apricots, roughly chopped
pinch of saffron
goat or lamb stock or water

FOR THE SPICE MIXTURE
1 tspn ground cumin
1 tspn ground coriander
1 tspn ground ginger
1.5 tspn smoked paprika
1 tspn turmeric
Half tspn ground chilli
Salt and freshly ground pepper

TO GARNISH
4 tbspn finely chopped coriander
Half-1 tspn of Harissa paste
zest and juice of half a lemon
1 tbspn honey

SERVE WITH
300gm pumpkin, peeled, chopped into 1-2cm cubes and roasted in olive oil with a little seasoning.

METHOD
Place the olive oil in a large saucepan or casserole pan and put it over a moderate-high heat. When the oil is hot, add the onion to the pan and sweat for one minute until transparent.

Place all the spice mixture ingredients in a bowl and mix together. Toss the goat in the spices so that it is well coated.
Add the spiced goat and garlic to the pan and seal the goat on all sides so that it is browned.

Stir in the chopped tomatoes, cinnamon stick, apricots, saffron and enough stock to just cover the goat. Bring to the oil then reduce to a slow simmer. Leave the goat to cook for 1-1.5 hours or until the meat is tender, stirring regularly with a wooden spoon (add more stock or water if the liquid is below the goat). (You can do this on top of the stove or in the oven. If the stew is too watery, drain off the excess liquid into a saucepan and reduce until thickened. Then return to the stew.
Stir in 3 tblspns of the chopped coriander, harissa paste (more or less to taste), lemon zest, juice and honey.
Garnish with roasted pumpkin and scatter over remaining coriander

Monday, 18 October 2010

0 WHOLE BOILED CHICKEN

BOILED CHICKEN ??? !!!...how completely boring you might say.

well, you wouldn't say that if you lived on my block while this baby was boilin'. the aromas alone were just right for the day...kinda gloomy, kinda Fall-ish, nuthin' goin' on, and mom didn't feel so great. so, what better than some good ol' Grandma style boiled chicken and clear yummy golden broth? all is right in the world when the house smells like Grandma's in the kitchen.

the trick to this beauty is to boil it whole...i mean whole...do not cut it up to fit the pot. get a pot that will fit the whole bird. i don't know why, but for some reason this will turn out the best "OLD SCHOOL BOILED CHICKEN" you've ever had. it's great right out of the pot, but with a few extra steps and a little patience you will have the best ever chicken for chicken salad and a RICH GOLDEN "GRANDMA" CHICKEN BROTH for some delicious stock or soup, like my Mega Chunky Veggie-C Soup...

Grandma's Whole Boiled Chicken

1 whole chicken
2 stalks celery
2 large carrots-unpeeled
1 med onion
4-5 cloves garlic
1 large box (24 oz.) low sodium chicken broth

wash your chicken inside and out. remove gizzards and extra bits...don't throw them out, they go in the pot as well.  put everything in a large stock pot...chicken should be breast side up... and add enough water to cover the chicken by about 2 inches. bring to a boil and then turn down to a slow simmer for about 2 hours.  after 2 hours check the chicken by grabbing hold of a leg and giving it a wiggle.  if it seems loose, like it would pull right off, then it's done.  now for the important GRANDMA TIP...don't take it out...leave everything alone to cool as is.  Grandma just left it there to cool, so that's what works best.  it will take a few hours.  this will let your bird rest in all that good broth and soak up all the yummy goodness.
when cooled to about room temp i like to break down the chicken...it practically falls apart.  i keep the main parts whole, like breast, leg, thigh, wing so they can be dealt with easier the next day or make for a nice presentation at dinner
what ever parts you have not eaten...put into a large tupperware-ish type container.
strain the broth and pour over chicken to cover.  (strain though cheese cloth to lessen the fat or use a fat separator).  refrigerate over night.  again, for some "Grandma" reason it seems the chicken is even better the next day after it has cooled in it's gelatinous brothy goodness.
the next day you'll find the most delicious moist chicken for your favorite chicken salad...and you'll have all that fabulous pure golden broth for a rainy day.             

Sunday, 8 August 2010

0 Jamie Oliver's Crispy Skin Pork Belly


there's been so much interest in pork belly in the last year you'd have to be living in a cave not to have come across it in some way or another. maybe it came about with all the talk of "nose-to-tail" or maybe people just aren't so afraid of FAT anymore. what ever it is i'm glad i was introduced to this delicious part of the pig. i never thought in a million years i would be one of those that caught the bug for this big slab of moist unctuous pork and FAT...and i mean FAT. i always considered myself more of the fish and steamed veggie type...HA HA HA...not anymore. if you can wrap it in bacon i'm all for it. pork belly is just one big slab of bacon so naturally i am a big fan.<

if you're at all curious, this is a great recipe to start with. it's so easy, so delicious and a great way to introduce pork belly to those whose are a bit sceptical. it makes a great presentation right out of the oven, but it also keeps in the fridge ready to slice for single portions and rewarm for a quick belly fix (it slices much easier after it has been refrigerated for a bit.)


.JAMIE OLIVER'S PORK BELLY ROAST
original recipe found here
i have copied it for you below with a few of my notes to follow

ingredients
• 1.5kg pork belly
sea salt (i used Kosher) and freshly ground black pepper
• 2 red onions, halved

(all else is only necessary if making the gravy
• 2 carrots, peeled and halved length ways
• 2 sticks of celery, chopped in half
• 1 bulb of garlic, skin on, broken into cloves
• a small bunch of fresh thyme, leaves picked
• 600ml water or stock
Prep time: 10 minutes
Cook time: 2.5 hours

Preheat your oven to full whack, it needs to be at least 220°C/425°F/gas 7.
Place your pork on a clean work surface, skin-side upwards. Get yourself a small sharp knife
and make scores about a centimetre apart through the skin into the fat, but not so deep that
you cut into the meat. Rub salt right into all the scores you’ve just made, pulling the skin apart a little if you have to. Brush any excess salt off the surface of the skin and turn it over. Season the underside of the meat with a little more salt and a little black pepper. Place your pork, skin side-up, in a roasting tray big enough to hold the pork and the vegetables, and place in the hot oven.

Roast for about half an hour until the skin of the pork has started to puff up and you can see
it turning into crackling. Turn the heat down to 180°C/350°F/gas 4 and roast for another hour.
Take out of the oven and baste with the fat in the bottom of the tray. Carefully lift the pork up and transfer to a chopping board. Add all the veg, garlic and thyme to the tray and stir them into the fat. Place the pork on top of everything and pop the tray back in the oven. Roast for another hour. By this time the meat should be meltingly soft and tender. Carefully move the meat to a serving dish, cover with tin foil and leave to rest while
you make your gravy.
Spoon away any fat in the tray, then add the water or stock and place the tray on the hob.
Bring to the boil and simmer for a few minutes, stirring constantly with a wooden spoon to
scrape up all those lovely sticky tasty bits on the bottom of the tray. When you’ve got a nice, dark gravy, pour it through a sieve into a bowl or gravy boat, using your spoon to really push all the goodness of the veg through the sieve. Add a little more salt and pepper if it needs it. Serve the pork with the crackling, gravy, some creamy mashed potato, nice fresh greens and a dollop of English mustard.

MY NOTES...i bought my pork belly (skin on) at a great Asian market, 99 Ranch, for about $2.99 lb. the last few i have bought were about 3- 3 1/2 lbs.

slicing the skin requires a very sharp knife. ceramic works really well...or i think you could ask your butcher to make the slices for you (read that in another post)

watch that too much salt doesn't get stuck in the slices of the skin. my first one was a bit too salty.

get that oven up to "full whack". i put mine at 450 degrees in a convection and i've tried 470 with top and bottom elements. both worked fine. just keep an eye on it and remember it still has 2 full hours of cooking to go after the 1/2 hour "full whack" stage.

i skipped all the vegetables except the onion. i used 2 large white onions sliced thick and placed them under the slab after the first hour. i think once i just put them under for the full 2 hours and i didn't have to worry about lifting up the hot belly roast in the middle of cooking. anyway you do it is fine. the star of the show is the pork belly and it will be fabulous either way.

below is what mine looked like 2 1/2 LONG hours later. i didn't do the whole gravy thing. i was just interested in the belly. since i found this recipe, i've cooked it 4 times. i think you'll find it particularly easy and oh so tasty. give it a go...Jamie is SPOT-ON with this one.


Thursday, 5 August 2010

0 CELERIAC Cabbage and Corned Beef

CELERIAC..

one of my new favorite vegetables...or is it really considered a veg. i think it might be in the "OFFAL" category of vegetables. it's not one of the most attractive items in the produce aisle. that's probably why i had to buy one and give it a go...


i would have to say the celeriac and cabbage was my favorite part of the meal, but the corned beef was excellent as well. the combo of the two was perfect. what normally would be considered a heavy St Pattie's Holiday meal turned out to be quite a light and delicious treat for a summer evening. the lightly sauteed celeriac/cabbage mixture really kept the meal fresh and clean kind of like a warm slaw salad. one doesn't usually think of corned beef except once a year, but did you consider the leftovers?...mmmm mmm mmmm...nothin' like a good homemade corned beef on bakery fresh rye when you least expect it.


WARM CELERIAC CABBAGE SLAW
1/2 celeriac-cut the outside ugly part off. cut into 1/2" or so slices so that you can use a peeler to make some nice long strips. (you can see in the photo above)
approx 1/2 head of small white cabbage-large shred
1/2 large onion french cut.(1/2 rings will do fine, but like i french cut better)
2-4 thin sliced garlic
herbs of choice or what's on hand
a small amount of cooking liquid from main dish or just some nice chicken broth
salt and pepper AFTER it's cooked


EASY PEAZY INSTRUCTIONS
saute onion and garlic in a small amount of olive oil
add celeriac, cabbage, fresh herbs if using and small amount of broth or cooking liquid. this is where i just spooned in some of the liquid from the slow cooker corned beef. you want just enough to help cook the veg a little, but not to soak or drown them. try to keep this like a warm slaw. don't over-cook. take it off the heat before you think it's done. check for seasoning. salt after it's cooks to keep it from weeping. you'll know when it done to your liking. half my family likes it a bit crunchy and the other half likes it all the way cooked...


CROCK POT CORNED BEEF
Prep Time: 25 minutes
Cook Time: 8-9 hours
Ingredients:
•6 carrots, cut into chunks
•2 onions, chopped
•2-3 lb. corned beef brisket with seasoning packet
•12 oz. can beer (non alcoholic is fine)
•2 Tbsp. yellow mustard
•1/4 cup brown sugar
•1 cup water

Preparation:
In 4-6 quart crock pot, combine carrots and onions. Rinse corned beef under cold running water and pat dry with paper towels. Place in crock pot and sprinkle with contents of seasoning mix. Pour beer over brisket and spread mustard on brisket. In small bowl mix brown sugar with water and pour over brisket. Cover crock pot and cook on low setting for 8-9 hours.
Remove corned beef from crock pot and cover with foil to keep warm if serving soon. at this point it's a bit hard to slice, but shreds great of falls into big lovely melt in your mouth chunks. i like to put it in the fridge (after eating my "fair chefs share") for a few hours or over night so that it can be easily sliced (as shown in photo)...this is truly the tasty way to cook a corned beef...no hassle and always come out prefect. it's hard not to eat half of it before it goes in the fridge, but you'll see how much easier it is to get a good slice after it's been chilled. oh...it heats up really well in the microwave, just don't over do it and you'll be fine.
warm or cold...this makes for an unlikely fabulous tasty summer meal...breakfast, lunch or dinner. i think i'll make another this week end...hmmmmmm.

Friday, 11 June 2010

0 COKE PORK in a CROCK


i beg you to try this just once.

it is absolutely the best, easiest...melt in your mouth pork recipe EVER.
i know just a little while ago i wrote about the slow roasted pork and i still think that is a fabulous way to cook a pork shoulder. this is equally as good...and just as easy. this one doesn't require the huge layer of fat that is on the shoulder and, of course, it won't tie up your oven all day.

maybe not the most beautiful pork roast picture you've ever seen, but it's the only one i could get before it literally fell apart. getting it out of the cooker in one piece for the photo was quite a task. i'll bet it's even a bit blurred from the "falling off the bone" factor.

i think the "picnic" pork roast works best for the slow cooker method. this cut is usually cheap or on sale somewhere.

directions...

3-4 lb. picnic pork roast

1 can of coke (not diet)

1 package Lipton's Onion Soup Mix

1 large onion sliced thick

sometimes the roast will come with a HUGE layer of fat on the bottom...i like to trim this just a little. the fat is necessary, but sometimes there's just too much.

layer the sliced onions on the bottom of the cooker. place the roast on top. sprinkle the onion soup mix all over the roast. pour the coke in. cook on LOW for 8 hours. if you're around while it's cooking..check it after 5-6 hours and you might want to flip it over carefully. if you're not around don't worry...it's all good.

DONE !

Sunday, 30 May 2010

0 EASY SLOW COOKER LAMB SHANKS


the slow cooker wins another round. i love my little red slow cooker. i think it is the best 20$ i ever spent. no need for the big fancy model with the digital readout. no need for the auto timer. i guarantee when it's done you'll be there waiting.


i know we're moving into summer and everyone is is starting up with their "Lite Summer Fair", but i say, "Don't put away the slow cooker". there's just something so satisfying about throwing a few ingredients in a pot, walking away with no worries and coming home to a fabulous, no-fail meal that tastes and smells like grandma's been in the kitchen all day. pure comfort.

did i mention the clean up?...one pot.

SLOW COOKER LAMB SHANKS...easy peezy


3-4 lbs lamb shanks

1 onion sliced thick

3-5 spears fresh rosemary

8-9 peeled garlic cloves

2 carrots cut large

put sliced onion in the bottom of the crock pot.

salt and pepper the lamb shanks.

put everything in the pot.

add enough water to almost cover meat (shown above). don't fill too full.

get the rosemary tucked in so that it's not just floating on the top.

cook on low for 7-8 hours.

if you're home you might want to check it around 5 hours and flip the meat. also you might want to squeeze in a few small potatoes...there should be enough room at this time.

7-8 hours later your ready for a tried and true comfort meal

remove the meat and the veg. for serving and strain the liquid.

DON'T THROW THE COOKING LIQUID OUT. strain, let it sit and separate. refrigerate or freeze for another fabulous dish that requires a rich deep homemade broth.

Wednesday, 19 May 2010

0 Low and Slow Cooked Pork

i just can't seem to get enough pork lately...what's up with that ?
this delicious hunk of pork shoulder could not be easier. i know i love my pig in the slow cooker, but this really is a true pork lovers pork. plain and simple. roasted in the oven low temp...long time.
i first saw the idea/recipe HERE. many thanks to Niki and her Grand Daddy Gene. her recipe is a little bit more involved with the roast and the whole basting thing. definitely sounds really tasty-good and delicious. i'll have to try the whole recipe some time, but so far i've done this twice and i think the roast is just perfect as is without anything extra....then the left overs are like a blank canvas waiting for new ideas through the week.

let's see if i can remember these involved instructions...
i just had this for dinner and i think i'm in
a PORK COMA...OINK !

in a nut shell...SALT AND PEPPER A PORK SHOULDER...STICK IT IN THE OVEN FAT SIDE UP AT 225 DEGREES FOR 8 HOURS...DONE

for a few more details read below...
buy 1 pork shoulder...i like the one with the large covering of skin and fat
preheat oven to 225 degrees
cover a roasting pan or cookie sheet with tinfoil...double is good for easy clean-up
slice 1 large onion and make a base for the roast...optional
with a sharp knife (skin is tough) jab about 6 holes and shove in some peeled garlic cloves
salt and pepper the whole shoulder
i sprinkled a bit of cumin on the second time around-optional
rest the shoulder on the bed of onions as shown in photo...FAT SIDE UP
put in in the oven and WALK AWAY for 8 hours

THAT'S IT...DONE

slice down the crusty skin and peel back to reveal your "fall off the bone" delicious pork meat ready for anything...BBQ sauce, teriyaki, shredding, tacos, paninis or like i said...straight out of the oven. it's hard not to just start eating it right then and there...no salt, no pepper...just hand to mouth...hand to mouth...hand to mouth...
please try this sometime. it's a no-brainer, inexpensive and goes a long way.

Saturday, 15 August 2009

0 SLOW SIMMER OXTAILS


SWINGIN' SIRLOIN !!!
as Paula Dean's husband calls it..
if you haven't tried oxtails, you're missing out. i was introduced to them when i was little by my fabulous grandma. as beautiful and reserved as she was, that never stopped her from gnawing on every bit of meat, sinew and cartilige she could get off those bones. needless to say, i was taught by the best. i really don't think i should ever eat these in public. these are home cookin' vittles anyway. doubtful you'll find these out anywhere. just fine with me. the slow cooking aroma throughout the house makes everything seem just right.
if you're feelin' up for it i'll tell ya, it's easy. cut some stuff up, put it in a pot and simmer just like you would a stew.
first timers don't be squimish...1st, trust your market and ask the butcher if they're fresh and maybe he'll pick them out for you. quite often they come packaged including a whole tail, big end to the tiny tip. these lil' nuggets shown above were a great example of some beautiful tail. bright red, white in the center and not surrounded by fat.


recipe ?...
well, like i said, it really IS just like making a good ol' stew. as a matter o' fact...just like your grandma used to make. this is the just one way of cooking them though. i think Paula Dean likes to throw them into a pyrex baking dish with some soy sauce and just a few other goodies. then cover them with tinfoil and in the oven they go for a while. hers come out finger lickin' good, of course, all sticky and tender. i have yet to try this method, but go ahead and google it, cuz i saw her make them on her show and they look fabulous.

oh,and i forgot to mention...the broth is wonderful and rich for soups and or gravies or what-not. just don't forget to let it cool after straining before putting in the fridge so that the fat will float to the top. then refridgerate and you'll be able to remove the fat easily before using again.

so...please give the ol' tail a try. it really is the most tender beef you'll be amazed
P.S. call me crazy, but i went to the Carniceria and came back with...
PIG'S FEET...1st time for everything
i'll keep ya posted. wish me luck.
 
back to top //PART 2