Tuesday, 26 October 2010

0 Looks Like A Donut

donut_1


Hostess Lori of "Butter Me Up" gave us not one, but four donut recipes to use for this month's Daring Bakers' challenge. And she let us play with any flavors we wanted. With so much freedom you'd think that I could've completed the challenge as asked. But I did not.

donut_crumb


Yes, I made donuts. But instead of deep frying my donuts, I baked my donuts. My baked donuts looked like donuts, but they didn't really taste like donuts. I mean, they tasted good, but they were not donuts. I really don't think you can call it a donut unless it's been fried. And for my baked donuts I didn't even use one of the four DB recipes provided. I used a recipe from the back of the baked donut pan that I bought. I'm a bad Daring Baker.

donut_pan
fully baked but super pale on top


But I had an excuse. I just got back from a 10-day trip to the United Kingdom and I didn’t want to deal with deep frying anything in a vat of hot oil. I just wanted to eat a huge flavorful carne asada burrito at my favorite taqueria. I just wanted to go to the farmers' market and get some much needed vegetables and fruit. I just wanted to cuddle with my cat and get over the jet-lag. I just wanted to watch the SF Giants make it to the World Series. :) That's my story and I'm sticking to it.

donut_glazed


Blog-checking lines: The October 2010 Daring Bakers challenge was hosted by Lori of Butter Me Up. Lori chose to challenge DBers to make doughnuts. She used several sources for her recipes including Alton Brown, Nancy Silverton, Kate Neumann and Epicurious.

To see the recipes provided by Lori for the challenge, just click here.

BAKED DONUTS
(adapted from the recipe that came with the Wilton donut pan)
(makes 12 donuts)


2 cups cake flour, sifted
3/4 cup granulated sugar
2 tsp baking powder
1/4 tsp ground nutmeg
1/2 tsp salt
2/3 cup buttermilk
2 large eggs, lightly beaten
5 tbsp unsalted butter, melted and cooled slightly

Preheat oven to 425°F. Spray Wilton donut pan with nonstick cooking spray.

In large mixing bowl, sift together cake flour, sugar, baking powder, nutmeg and salt. Add buttermilk, eggs and butter and beat until just combined. Fill each donut cup of the Wilton donut pan approximately 2/3 full.

Bake 7–9 minutes or until the top of the donuts spring back when touched. Let cool in pan for 4–5 minutes before removing. Finish donuts with glaze. Donuts are best served fresh.

Maple Glaze

1 cup powdered sugar
3 tbsp maple syrup
1/2 tsp vanilla extract

In small bowl, stir together sugar, maple syrup and vanilla extract until sugar is completely dissolved. If glaze is too thick, mix in a few drops of water until the consistency is to your liking. Use immediately to glaze donuts.

Monday, 18 October 2010

0 WHOLE BOILED CHICKEN

BOILED CHICKEN ??? !!!...how completely boring you might say.

well, you wouldn't say that if you lived on my block while this baby was boilin'. the aromas alone were just right for the day...kinda gloomy, kinda Fall-ish, nuthin' goin' on, and mom didn't feel so great. so, what better than some good ol' Grandma style boiled chicken and clear yummy golden broth? all is right in the world when the house smells like Grandma's in the kitchen.

the trick to this beauty is to boil it whole...i mean whole...do not cut it up to fit the pot. get a pot that will fit the whole bird. i don't know why, but for some reason this will turn out the best "OLD SCHOOL BOILED CHICKEN" you've ever had. it's great right out of the pot, but with a few extra steps and a little patience you will have the best ever chicken for chicken salad and a RICH GOLDEN "GRANDMA" CHICKEN BROTH for some delicious stock or soup, like my Mega Chunky Veggie-C Soup...

Grandma's Whole Boiled Chicken

1 whole chicken
2 stalks celery
2 large carrots-unpeeled
1 med onion
4-5 cloves garlic
1 large box (24 oz.) low sodium chicken broth

wash your chicken inside and out. remove gizzards and extra bits...don't throw them out, they go in the pot as well.  put everything in a large stock pot...chicken should be breast side up... and add enough water to cover the chicken by about 2 inches. bring to a boil and then turn down to a slow simmer for about 2 hours.  after 2 hours check the chicken by grabbing hold of a leg and giving it a wiggle.  if it seems loose, like it would pull right off, then it's done.  now for the important GRANDMA TIP...don't take it out...leave everything alone to cool as is.  Grandma just left it there to cool, so that's what works best.  it will take a few hours.  this will let your bird rest in all that good broth and soak up all the yummy goodness.
when cooled to about room temp i like to break down the chicken...it practically falls apart.  i keep the main parts whole, like breast, leg, thigh, wing so they can be dealt with easier the next day or make for a nice presentation at dinner
what ever parts you have not eaten...put into a large tupperware-ish type container.
strain the broth and pour over chicken to cover.  (strain though cheese cloth to lessen the fat or use a fat separator).  refrigerate over night.  again, for some "Grandma" reason it seems the chicken is even better the next day after it has cooled in it's gelatinous brothy goodness.
the next day you'll find the most delicious moist chicken for your favorite chicken salad...and you'll have all that fabulous pure golden broth for a rainy day.             

Thursday, 14 October 2010

0 Asian Duck Rillettes

 
the Asian flavors along with Chinese roasted duck really make this rillette different and put a little twist on a charcuterie favorite. i think i've found an easy way to accomplish a great tasting fancy treat without alot of time and effort. 
my secret trick is a Chinese style roasted duck.  i can not pass one of these up when i visit my favorite Asian market...99 Ranch.  it's like going to Costco and not getting the $4.99 roasted chicken.  these things are fabulous. all done, cooked and crispy, moist and ready to eat $14.99...amazing.  that's pretty darn good considering the normal price of a whole raw duck can be around $20.00-$30.00 bucks.

this is a quick shortcut to Duck Rillettes and  fairly easy, well... you might say alot easier than the typical duck rillette that requires the whole confit situation.  done properly a rillette takes days and loads of expensive $$$ duck fat.
  this can be done in a few hours.

ASIAN STYLE DUCK RILLETTES
what you'll need...
start with a whole roast duck. i get mine from an Asian market in Irvine called 99 Ranch.
break it down...legs, thighs, wings,  neck and head, etc...i have the deli man do it for me, but let him know you don't want it chopped up Chinese style.  i like to save the breast meat for myself, but throw the skin and fat into the pot.
2 onions, peeled and cut in quarters
3-4 smashed garlic cloves
2-3 stalks of lemongrass, white part only, bashed
2 inch piece of ginger, peeled and cut into rounds
2 jalapeno peppers halved
2-3 star anise
A few sprigs of cilantro
A few stalks spring onions (I used about 3)
Whole black peppercorns approx. 10 - 15
1/4 cup soy sauce
2 Tsp brown sugar
small jars with airtight lids...or ramekins if you will be eating within a week or 2

in a nut shell this is what you're gonna do...
put everything in a large stock pot and bring to a boil...then to a slow simmer for about 3 hours.  take the duck out and strain the stock.  don't use cheese cloth... you want to save as much fat as possible.  let the stock cool and separate.  let the duck cool enough so you can remove the meat from the skin and bones.  pick or fork the meat apart into small bits, by hand works best ( kinda weird, but it should resemble tuna out of the can). add a little of the stock into the bowl of meat until it is moist.  give it a good stir.  taste test time...check for seasoning.  fill little jars with your meat mixture...make sure there are no air pockets.  i released the air pockets with a fork.  you might need to add a little more stock if your meat mixture is not moist enough...flatten the top a little but leave enough room for a 1/4 inch of fat to cover the meat.  put your jars with meat mixture in the fridge for about 20 min.(this helps the layer of fat stay on top instead of soaking though the whole mixture).  remove from fridge and put the all important yummy layer of duck fat on top.  use a spoon with care or a baster to cover the meat with the pure fat that has separated and floated to the top of your cooled stock.  1/4 inch should do the trick.  you want a good seal.  close with airtight lid and refrigerate. if sealed well with the layer of fat you can save them for weeks in the fridge.  save the stock for a rainy day.  the flavor is outstanding for a quick Asian style soup.  (for example...my Duck Duck Soup)

when ready to eat, bring to room temp and enjoy.  i really like to serve this with some pickled ginger and sesame crackers.  give this a try..it's just a little labor intensive, but so rewarding when you open up your little homemade jar of charcuterie goodness.

Monday, 11 October 2010

0 PUMPKIN PIE OATMEAL BAKE


baked oatmeal...PUMPKIN baked oatmeal even better.
this one is fantastic.  it's not only delicious, but it's full of protein and good carbs to get your morning started right and keep you going through the day.  i've made this one quite a few times and it seems to be a big hit.  i found the original recipe posted HERE at Inn Cuisine.com  many many thanks to Sandie for this great find. 
the first time i made it as the original recipe states...wonderful.  then i thought i would take Sandie's advice and make it my own.  i always try to sneak a little extra protein in my breakfast foods so i added some vanilla whey protein powder.  if you've ever cooked with protein powder you know it can be a hit or miss.  just one scoop added here works really well, but if you don't have any don't worry...i also exchanged splenda for the sugar, eggbeaters for the real eggs and used skim milk only...came up with a protein packed, low fat, waist-friendly delicious breakfast treat.


on with the recipe...don't be alarmed at the sight of cottage cheese in the ingredients.  there's a reason why it's not called "Cottage Cheese Oatmeal Bake"...would you have read this far?  sounds weird, but you would never know it's in there.  i happen to love cottage cheese, but others might not be so keen at first bite.

BAKED PUMPKIN OATMEAL
please check out the original and other great goodies by Sandie. 

1 3/4 COOKED multi-grain oatmeal (or 2 c. if not using 1/4 c. wheat bran)
1/4 c. wheat bran ( see above note)
1 Tsp flax
1 cup pumpkin puree
1 cup cottage cheese
1 cup fat free milk
1/2 cup egg beaters OR 2 eggs
1/4 cup slpenda
1 scoop vanilla whey protein powder
1/2 tsp pumpkin spice
1/2 tsp cinnamon
approx 1/4 tsp fresh grated nutmeg
1/2 tsp vanilla (or 1 tsp if not using maple extract)
1/2 tsp maple extract

preheat oven to 325 F degrees.  coat 2 qt. baking dish with oil of your choice...i used coconut oil.

first let your oatmeal cool down a bit.  then in a large mixing bowl blend everything in an electric mixer until smooth.  pour into prepared 2 qt. baking dish and place in 325 F oven (i have my convection at 320 F.).  bake for approx. 1 hour or until edges are golden brown and center is set.  i start checking mine after 45 mins. because i vary the ingredients  with different flavor combos...
let it cool a bit and serve...
it's great hot or cold...or what i like to do is bake it on a Sunday and refrigerate over night.  it will cut into nice squares for easy reheating through the week.  serve with some maple syrup OR better yet...have you met the GINGER PEOPLE?...the ginger syrup is fabulous!...everything the ginger people make is fabulous.  the ginger syrup, some fresh berries and a little Greek vanilla yogurt is my kinda "power-up breakfast"...YUM...it's gonna be a great day! 


Thursday, 7 October 2010

0 Apples and Plums

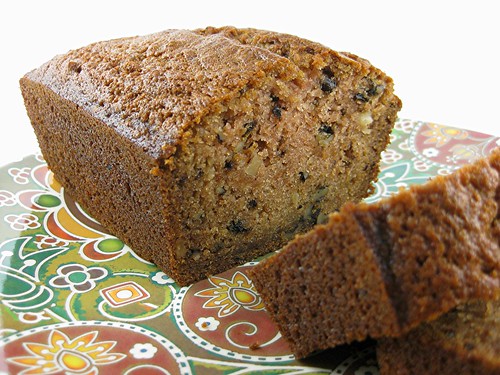
applesauce_quickbread


Apples

The local apple season typically begins with the floral and crisp Gravenstein apples showing up at the farmers' market around mid-August. Four weeks later the Gravensteins are all gone, but that's when the season really kicks into high gear. Every Saturday at the Ferry Building farmers' market during apple season, I can find no less than 25 different varieties of just harvested apples. Most are heirloom varieties. Every characteristic you would want in an apple can be found: tart, sweet, floral, spicy, herbaceous, winy, tropical, good for baking, cooking and eating out of hand.

Last weekend I picked up all kinds: Spitzenburg, Bramley Seedling, Cinnamon Spice, Connell red, Mutsu, Hawaiian, Winesap, Kino's Orange Red, Idared. I wish I could've brought home more, but my husband and I can only eat so many apples in a week.

apple_bramley


My original intention was to make some applesauce with my bounty, but the apples were all too fresh and delicious to not grab and eat. So I didn't have any left to make my applesauce, but that didn't stop me from making this applesauce quick bread. Whether you use store bought applesauce (like I did this time) or make your own batch of homemade goodness (like I had originally intended), this quick bread, like the name implies, is so simple and easy to make.

Plums

It's a little strange to be writing about plums and apples in the same post since plums are typically a late summer fruit and apples are definitely an autumnal treat. I am quite sad that the summer stone fruit season is over, but I am very happy that autumn and the apple season is here.

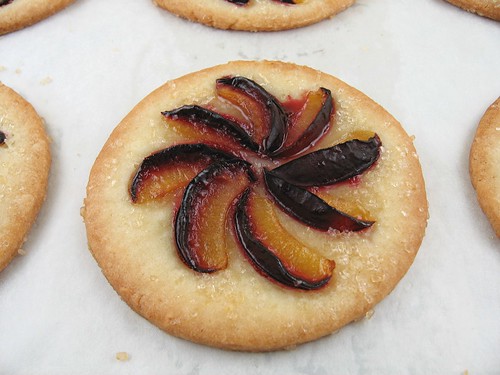
When I was at the farmers' market a couple weeks ago, I found some tiny blue damson plums. Damson plums are normally used for making jam but I decided to use them in a "tart/cookie". For my "crust" I used the sugar cookie dough that I had leftover from the last Daring Bakers' challenge since the sugar cookie dough that we used was pretty much a pate sablee (sweet tart dough).

I cut my rolled cookie dough into 3-inch rounds and fanned out slices of the damson plums. I sprinkled them with some turbinado sugar and then baked them at 350 until the edges were lightly golden brown. It was a lovely way to use up the rest of the cookie dough and to celebrate the last of the summer plums.
blue_damson_plum_2

blue_damson_plum_1


Continue reading...

Monday, 4 October 2010

0 The Silky Chicken or Black Chicken

THE ELUSIVE BLACK CHICKEN
aka THE SILKY

this is a rare bird indeed!
well, on my hunt for the "out-of-the-ordinary" i came across this lovely(?) looking creature...YIKES! can i just say YIKES again.  i must say.......this one finally stumped me.  stymied...as you might know i'm pretty adventurous with foods.  i'm no Andrew Zimmer, but i like to go for the strange stuff.  i find a good challenge and give it a go...this one got me.  i still ask myself why?...it's just a chicken, right?...well...not so much.

#1...always remember to read the fine print on the package..."head and feet intact" AND it has FIVE TOES instead of four!. i missed that part. as the thing thawed and started to unfold, and i DO mean unfold...this small little wrapped up bird was over 2 feet stretched out. AND IT"S BLUE !!!!!...you can imagine what i was thinking. i can handle alot of things, but this one was definitely high on the scale of "what the heck am i gonna do with this?" and "what was i thinking?" BUT, curiosity still had the best of me.

#2...investigate and research what your strange product is all about. i found a few sites with recipes for soup...i thought great! a new twist on an old favorite, chicken soup. not so much. as i read further, after purchase, i found that the black chicken is most used for Chinese medicinal purposes...mainly for sick people, pregnant women or just after giving birth. it's a very lean bird, does not necessarily produce a tasty unforgettable unctuous broth...and i don't really fall into one of the needy categories.

#3...keep your game face on. anyone walking in on you dismantling this black (blue) bird will think you are in need of some help...serious help...i don't mean with the soup...

so what do i do ?...i decided to wing it, of course...(again, sorry about the bad pun).
the easiest recipe i found was HERE at  eating club Vancouver by fellow bloggers ts & js.  they call it Mama's Silkie Chicken or "Dyong Kwe".  this recipe seemed easiest to tackle due to the short list of ingredients.  please visit their site for an easy and quick step by step (with photos) to see how Mama does it.
i didn't have a few of the ingredients so i just went with the recipe i use for Duck Soup found HERE.  it sounded pretty similar with Asian style flavors and such.  i thought if the flavors were basic and normal i might be able to salvage a meal or at least a good stock out of this deal....not so my friend.  after thawing, washing and the obvious photo session...i was not so enthused about the out come.  still i went ahead and threw everything in the pot and hoped for the best.  the best never came...the blue skin turned an unappealing limpy blackish grey and the flesh was unlike any chicken i had ever seen.  hmmmmm...not so good.
next, i thought to myself... get the photo of the finished product, make it look pretty and appealing and maybe it will seem more appetizing.  not so my friend...my "Mama" always warned me that looks can be deceiving...definitly correct when it comes to food photography.  the photo looked great and i was ready to give it a try, but like i said...this one stumped me. i removed the blackish grey skin that i just knew i was not going to be able to eat, to unveil the tough, lean flesh that was streaked with black...and i mean weirdly streaked with black.  at this point (hours from the start of this little journey) i had to give up for the day...throw in the towel...raise the white flag.   i strained the broth and threw everything into a tupperware for a second chance at it some other time. 
that second chance hasn't come up yet...it's in the freezer right now.  i didn't have the heart to toss it. 
i can't let this one get me.  I WILL EAT THE BLACK CHICKEN.  not today, not tomorrow...but...
I WILL NOT LET THIS BIRD WIN !!! 

 
back to top //PART 2