Saturday, 24 December 2011

0 Merry X-mas from me and my Ginger Peeps to you and yours


IT'S JUST NOT CHRISTMAS 'TIL I BITE THE HEAD OFF A GINGERBREAD MAN !


i hope you all have a delicious and wonderful feast where ever you find yourself this holiday.

thanks everybody for following along with all the fabulous comments.  i love it when i get feedback after a tested recipe or new information on something you've done different or even better!.  when i see a new follower or get a new comment on my emal it absolutely makes my day and keeps me going out there to find new and fun recipes to bring to the table.


MY FAVORITE "GO-TO" GINGERBREAD MAN RECIPE...
nothing fancy...classic taste and they hold up very well for days and days.
from good ol' Betty Crocker
if you don't have a tattered old three ring binder of Betty's recipes somewhere in your library of cookbooks...then you can find the recipe  HERE at Betty Crocker's website.

these little guys and gals AND piggies are definitely a labor of love, but well worth the giggles as you are decorating and the huge smiles you'll get giving them away.

i hope you put her recipe in your files for next year's holiday treats.


Wednesday, 21 December 2011

0 Tamale Fusion...A savory and sweet success.


TAMALES  TAMALES   TAMALES...

'tis the season for TAMALES

fist time out of the gates with the tamales and i think i did alright..
maybe i bit off more than i could chew, but i made 3 different tamales... shredded Asian duck with lightly sauteed Comice pears in tarragon...then i made some with pulled pork smothered in Mexican Red Sauce (Red Sauce Recipe found here), Hatch Chilis and queso fresco...then to round out the trio i made sweet tamales with apples and sultana raisins sauteed in butter, brown sugar and cinnamon and topped with toasted pecans...WHEW that's a mouth full.  i'm tired just thinking about it.  they were all fabulous.


there really is nothing like a fresh tamale right out of the steamer.  i can't remember the last time i had one, but it was probably packaged or frozen or brought home and reheated.

once a year at this time our good long time friend, Lupe,  brings us "REAL" authentic Mexican Tamales...and i say real because she was born in Mexico and her mother taught her how her mother taught her and so on and so on...
below is a quick photo of the loot that Lupe brought to us on Saturday night...
i must state that Lupe's Tamales ROCK !...experience definitely shows in flavors and texture.
  
making them yourself is so rewarding and like i said...fresh from the steamer these tight little packages are unbelievably delicious.  it really isn't rocket science (when you take a few short cuts like i did) and they ARE a little labor intensive and tedious....BUT well worth the effort.


above is the shredded Asian Duck.
if you would like to know how i prepared the duck meat please refer to an earlier post i did on Asian style Duck Rillettes...just go as far as shredding the duck to bite size pieces.  i sauteed the Comice pear with a little butter, brown sugar and dried tarragon...then added fresh tarragon before wrapping.  this needed a little sauce to go with it.  my first thought was Sriracha (Asian HOT sauce)...but i think i could have been more creative.


above is the sweet tamale filled with 2 kinds of apples (Granny Smith and Yellow Delicious) sauteed in butter, brown sugar, cinnamon and nutmeg...with a few chopped toasted pecans.  i mixed a bit of sugar into the masa.  serve with whipped cream, ice cream or as i did with a little maple syrup for breakfast...YUMMM !

i have no real written recipe, BUT i do have...
A FEW GOOD HELPFUL HINTS AND SHORT CUTS...
from a first time tamale maker.

1.  buy prepared masa made for tamales.  find a real Mexican market or tortillaria near you.  i found mine at El Matate.  go in the morning, it's still warm in the bag.  now that's fresh.  try not to fall for anything pre-packaged.  the fresh will come in a big plastic bag and hopefully still warm, but definitely moist and mooshy.
2.  make your stuffing/filling the day before...or pull from your freezer like i did with the pulled pork and Mexican Red Sauce.  you don't want to do all this in one day...trust me, the tortilla assembly and cooking will be enough for one day.  i did, however, make the sweet tamale stuffing that day...quick and easy.  like making your favorite apple pie filling.
3.  if you can't deal with the corn husks, try wrapping them in parchment squares.  they aren't as cute and authentic, but it does the trick.  i think you can also purchase pre-cut tamale wrapping paper.  i would have bought a package had i known, but i'm glad i went with the husks on the first time out.
4.  when wrapping, make sure they are totally covered and your husks haven't split.  the filling WILL squish out during cooking.
5.  you can use string instead of corn husk strips to tie them up...this is not an easy task using the husk strips.

6.  if you don't have a proper tamale steamer, use your pasta strainer or vegetable steamer at the bottom of your stock pot.  i used a large vegetable steamer insert, as shown above, and had to lay my tamales flat instead of the traditional upright cooking method.
7.  you need to have them sit a coup[e inches from the bottom and not touch the water.
also...you need enough water to be able to steam for 1 hour.

8.  these can be wrapped ahead of time and cooked before serving.  they will take approximately 1 hour to steam.
9.  they keep well in the fridge for a quick meal and i suppose they can be frozen as well.
10.  reheat in the microwave wrapped in a damp paper or cloth towel to keep moist.


Friday, 16 December 2011

0 Old Fashioned Ginger Bread


this deep dark moist ginger molasses cake screams...

HELLO HOLIDAYS...

I'M EATIN' SWEETS AND I DON'T CARE !!!


yes, there are many ginger bread recipes out there...i think i looked at them all.  i had intended to bake good ol' Betty Crockers' ginger bread because i think it's always a classic when found in the tattered old 3 ring binder recipe book that i use as my tried and true recipes....
BUT then i fell on this recipe by a fellow blogger from London.  well, anything from "across the pond" goes over well in this house full of Anglophiles.

you must visit Marie Rayner's post about this wonderful cake...The English Kitchen
she explains how she came about this recipe and calling it "THE WORLD'S BEST"...
she came up with the recipe after years of trying many many ginger breads and finally through trial and error she tweaked this one to perfection.  it's a "no-fail" recipe if followed to the "T".  i did as suggested and the cake turned out absolutely delicious,

i know everybody probably has their favorite ginger bread cake recipe that their Grandmother used to make at X-mas, BUT you really should try this one just for kicks

YOU CAN NEVER HAVE TOO MANY WORLD'S BEST CAKE RECIPES IN YOUR ARSENAL...


WORLD'S BEST GINGER BREAD CAKE
copied for your convenience below

1 1/2 tsp ground ginger
1 1 /2 tsp cinnamon
1/4 tsp ground cloves
8 1/2 ounces of plain flour (2 cups)
2 1/4 tsp baking powder
1/4 tsp salt
10 fluid ounces of boiling water (1 1/4 cups)
2 fluid ounces of dark treacle
4 fluid ounces of Golden Syrup
(you may use 6 ounces of mild molasses instead (3/4 cup)...I USED MOLASSES
3/4 tsp baking soda
6 Tbsp butter, softened
5.6 ounces of dark brown sugar (3/4 cup, packed)
1 large egg at room temp.

preheat oven to 350 F.  butter and flour a 9 inch square baking tin...set aside
I USED AN 8 INCH SQUARE AND FILLED 1 SILICON MUFFIN CUP

add the treacle and syrup, OR molasses to the boiling water along with the baking soda.  set aside and let cool to room temperature.

cream together the butter and brown sugar until light and fluffy with an electric whisk (i used the paddle attachment).  beat the egg with a fork and then beat it into the butter mixture a little at a time.  whisk together the flour, spices, baking powder and salt...set aside.  On low speed add the cooled water syrup (or molasses) mixture to the creamed mixture.  stir (low speed mixer w/paddle attachment)in the dry ingredients only to blend.  pour into the prepared baking tin.

bake for 30 to 40 minutes, until well risen and the tops springs back when lightly touched, or a toothpick inserted into the center comes out clean.  i always do the toothpick test.

this cake is fabulous on it's own, but Marie suggests serving with a Spiced Lemon Sauce (found here with the original)...sound divine, BUT i was lazy and didn't have a lemon in the house so i simply went to the cupboard and whipped out some caramel sauce.  oh boy...that worked !


Sunday, 11 December 2011

0 Giada's Parma Carrot Cake


this unassuming simple looking cake is...

SIMPLY DELICIOUS !

a new favorite carrot cake is on your horizon...trust me


this is a carrot cake like i have never tasted...not too too sweet like a lot of carrot cakes.  you can actually taste the sweetness from the carrots.  the pine nuts give it a buttery texture, you get a hint of fennel and the lemon just wakes everything up.  all those flavors combined create this very unique dessert.


i caught this on the Food Network show, "the Perfect 3".  Ina Garten and her perfect Classic Chocolate Cake, Paula Dean with her Red Velvet Cake and then there was Giada De Laurentiis with this interesting Parma Carrot Cake that caught my attention.


i DO love carrot cakes but sometimes they can just be over powered by spices, stringy carrots and cloyingly sweet with cream cheese frosting.  when i saw her adding fennel seeds and pine nuts i immediately pushed the record button and googled the recipe.

this is a definite winner and a "must-try" recipe.  the cake is versatile...can be baked in different vessels and served any way you choose.  serve as a star quality dessert or a simple tea cake...enjoy for breakfast brunch or snack...a warm frothy cappuccino or just a spot of tea...
IT'S DELICIOUS ON IT"S OWN !


PARMA-STYLE CARROT CAKE
recipe courtesy Giada De Laurentiis
i have copied it for you below with my slight changes in italics

2 1/2 cups all purpose flour...i substituted 1 1/4 white whole wheat flour
1 Tablespoon baking powder
1/2 tsp ground cinnamon
1/2 tsp salt
1 cup pine nuts (about 6 oz.)
1/2 cups sugar, plus 1/2 cup sugar...
NOTE...i mixed 1/2 cup splenda with 1/2 cup sugar and separated that.
also...on the show Giada did not separate the sugar.  she creamed the butter and the 1 cup sugar.  i did as the written recipe, so either way will work.  no need to separate...
1 tsp fennel seeds
1 lemon zested and juiced
2 cups peeled, shredded carrots (about 6 carrots)
1/2 cup mascarpone cheese
1/2 cup (1 stick) butter, softened
5 eggs
powdered sugar for garnish

preheat oven to 375 F
in a medium bowl stir together the flour, baking powder, cinnamon and salt.  set aside

place the pine nuts, 1/2 cup sugar and fennel seeds in a food processor and pulse to mince the nuts.  add lemon zest, lemon juice and the shredded carrots.  pulse to mince the carrots.  add the mascarpone cheese and pulse until cheese is incorporated

in a large bowl, using a stand mixer, cream together the butter and remaining 1/2 cup sugar.  add the eggs one at a time, until well combined.

add the carrot mixture to the butter mixture and stir until combined.  add the reserved DRY ingredients in 3 intervals and stir until just incorporated.

place the mixture in a slightly greased and floured 8 x 10 by 2 dish
NOTE...i used a 9" springform pan.  2 loaf pans might work well for serving as a sliced tea cake.  on the show Giada used some star shaped baking paper molds.

bake for 55 - 60 minutes...golden brown on top and toothpick comes out with a slight crumb.
let the cake cool for 1 hour, then lightly dust with powdered sugar.

i let the remaining cake sit out over night, then refrigerated it.  this cake keeps well for at least a few days.  bring to room temp before serving.  (great treat for breakfast).


Thursday, 8 December 2011

0 Chocolate Malt Cake

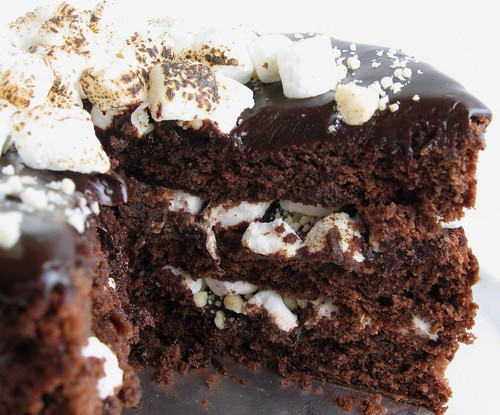
chocolate_malt_cake_1


I absolutely loved reading Christina Tosi's Milk Bar cookbook. I loved reading about the development of her recipes as well as the process of creation through necessity. I will use much of the information as inspiration for my own experiments in the kitchen.

The book was like a glimpse into the mind of a sugar-fueled pastry savant. I actually read this cookbook from cover to cover. I read the forward and introduction. I read all the head notes, side notes and foot notes. I read through a lot of the recipes too. The book is organized into sections based on what Tosi calls "mother recipes".

Even though the mother recipes are not complicated, the sheer number of different components that can go into making any final completed dessert can be a bit overwhelming.

This chocolate malt cake is a perfect example of using multiple components to create a final product. Making milk crumbs to go into the berry and cream cookies was just one tiny step beyond making cookies without the milk crumbs. Making the oatmeal cookies from scratch to grind for the crack pie crust was just one tiny step beyond using commercial cookies to grind for the crust.

This chocolate malt cake has many tiny steps. Chocolate brownie-like cake layers are soaked with malted chocolate syrup, and then layered with a malt-fudge sauce, milk crumbs and toasted miniature marshmallows to create an over-the-top mess of sweetness. Thank goodness Tosi is fine with store-bought commercial marshmallows otherwise I would've made marshmallows from scratch too.

chocolate_malt_cake_2


I made this cake (all the components and the assembly too) in one afternoon which may have contributed to feeling overwhelmed. But many components can be made ahead of time which is what I should have done. I forgot to add the Ovaltine to the milk crumbs so they are a bit pale. My cake layers sunk in the middle and it was hard to cut my finished cake into neat slices. But most of Tosi's desserts are not about the way they look. It's about the taste and a childlike sugar addiction!

This cake was sweet. And chocolaty. And malty. And totally excessive which can be a good or bad thing. I actually felt a little gross after eating a small slice. But I tend to get that way when having too much Ovaltine or other malted milk products. But if you're into this kind of thing (the sweet-chocolaty-malty-excessive part not the feeling gross part) then I suggest trying it out.

Alpineberry note: I actually made this cake using a recipe on the Bon Appetit magazine website before the Milk Bar cookbook was released. So the recipe below varies from the one in the Milk Bar cookbook.

chocolate_malt_cake_3

Continue reading...

Friday, 2 December 2011

0 Francois Payard's Flourless Chocolate Walnut Cookies


few words to say about these cookies except...

WOW...CHOCOLATE WHAM !

the best compliment in the world came from my ever so  fabulous chocoholic mother, who just so happens to be my greatest 'constructive' criticizer...

at first i hear nothing...silence.  then...

"hmmmm...this tastes like one of those $5.00 cookies"


these little, or rather large, gems have been around the block a few times and i have made something similar a while back, BUT i have never used this recipe and exact method...and i made sure i used grade A fabulous Dutch cocoa powder.  well worth the trip to the culinary store (SLT) to get the good stuff.


like i said...few words.  not only do i implore you to add these to your holiday treat list, BUT these are so easy to make, they are a huge chocolate lovers dream AND a big hit for those GLUTEN-FREE peeps that often have to miss out on a good thing.

a few quick notes...
do not over beat.  this should be a little runny, gooey and sticky.
when taking them off the parchment...peel them as though you are peeling an annoying sticky price tag off.  these DO stick to the parchment a bit...so don't be in a rush with the spatula. 
these keep well if completely cooled and stored in an airtight container.  do not stack.  i put a double piece of parchment in between the layers and was very careful not to put one directly over the other.
they get chewier the second day, but still have a crisp to them.


FRANCOIS PAYARD'S FLOURLESS CHOCOLATE- WALNUT COOKIES
recipe found here and copied for your convenience below

2 3/4 cups walnut halves...i only had about 2 cups
3 cups confectioner's sugar (powdered sugar)
1/2 cup plus 3 Tbsp. unsweetened Dutch-process cocoa powder
1/4 tsp salt
4 large egg whites, room temp.
1 Tbsp (TABLESPOON) pure vanilla extract
i also added 1/3 cup chopped dark chocolate...GOOD for extra WHAM factor.

preheat oven to 350 F. to toast your walnuts.
lay your walnuts out on a sheet pan and toast your walnuts, approx. 9 minutes.
(i did them in my Breville Smart Oven on # 2)...watch them closely.
let the walnuts cool and coarsely chop.  set aside.
position racks in the upper and lower thirds of the oven and...
LOWER THE TEMP. to 320 F.
in a large bowl, or on low in a stand mixer,  whisk the powdered sugar, cocoa and salt followed by the chopped walnuts.  while whisking, turn your speed to medium and add the egg whites and vanilla extract.  beat until just combined.  DO NOT OVER BEAT OR THE BATTER WILL STIFFEN.  
spoon the batter onto parchment lined cookie sheets.  Francois says 12 evenly spaced mounds...i got 8 per tray (2 trays) and did a second baking with 4, making 20 total.  as you can see mine were fairly large.  
bake them for 14 - 16 minutes until the tops are glossy and lightly cracked.  shift the pans bottom to top and front to back halfway through to ensure even baking.
slide the parchment paper with the cookies onto 2 wire racks and cool cookies completely before attempting to remove. 
as stated above...don't rush to use a spatula.  these will be semi stuck to the parchment.  peel the parchment slowly from the bottom of the cookie.
store in airtight container.  do not stack without parchment or something in between.
i know they will disappear quickly, but i kept a couple aside and the 3rd day they were still outstanding.


Monday, 21 November 2011

0 Low Fat Pumpkin Bread w/Chocolate Chips


YUMMMMM !!!!

this might be my favorite pumpkin bread so far.
moist, dense, full of flavor AND it's low calorie-low fat...

until you invite PEANUT BUTTER TO THE PARTY
then it's outta this world delicious !!!


one nice thick slice is very satisfying for a quick breakfast, light afternoon snack or a safe answer to the midnight munchies.  a healthy treat for any time of the day.
on it's own the nutrition count is quite low compared to full fat, full sugar loafs.
1 loaf cut into 10 slices is  138 cal, 5.2 fat, 21 carbs and 3.5 protein per slice and 1/10th is a very thick slice.

try adding different things...i've made this 3 times already...the last one i made was with crystallized ginger instead of chocolate chips.  i LOVE ginger and peanut butter together...the chocolate was fabulous, but the ginger might be my
favorite.


you would never know this is a "healthy" Pumpkin Bread, but it is...so go ahead and try it with some peanut butter...trust me...you can still feel slim and healthy about it.  with all the goodies coming our way this season, it's nice to have a little less guilt about something so delicious.


LOW FAT PUMPKIN BREAD w/CHOCOLATE CHIPS
(many thanks to Gina and please visit her site for original recipe and comments)

11/2 cups pumpkin puree
3/4 cups AP flour
1/2 cup white whole wheat flour
1/4 cup granulated sugar
1/2 cup splenda
1 tsp baking soda
2 tsp pumpkin pie spice mix
1/2 tsp nutmeg...if using fresh ground, i suggest a little less
1/4 tsp cinnamon
1/4 tsp salt
2 Tbsp vegetable oil
2 large egg whites
1 1/2 tsp vanilla extract
baking spray
1/2 oz. pepitas
60 grams (approx. 1/4 cup) mini chocolate chips

preheat oven to 350 F.  spray a 9 x 5 inch loaf pan with baking spray
NOTE...i baked mine in a convection oven at 330 F degrees for 47 minutes

in a medium bowl, combine flours, sugar, splenda, baking soda, pumpkin spice, nutmeg, cinnamon, and salt with a whisk and set aside.
in a large bowl mix the oil, egg whites, pumpkin puree and vanilla, beat at medium speed until thick and well combined.
add, on low speed, dry mixture to wet mixture in 3 batches, scraping sides in between just until combined.  stir in chocolate chips...DO NOT OVER MIX

pour into loaf pan, sprinkle with pepitas and bake for 50-55 minutes, or until toothpick inserted in center comes out clean 


Tuesday, 15 November 2011

0 Trotter Terrrine with Roasted Chicken


not your basic head cheese, but visually something very similar.  

maybe it's just the fact that it's meat held together by gelatinous broth..or maybe it's just that i used pig parts that are out of the norm,  but this was far more palatable than the sliced head cheese you've been afraid of since childhood AND a little more pleasing than snout, tongue  and jowls...
quite tasty i must say.  of course, i did run out and buy me some REAL head cheese.  not bad, but i wanted something a little more friendly...AND i didn't want to mess with all those various head parts.  i wanted easy...i wanted to enjoy the whole thing...lord knows no one else was going to have any...
what a bunch of pansy palates!

(above is store bought head cheese...not so scary at all)

TROTTER n' ROASTED CHICKEN TERRINE

recipe?...there really isn't much of a recipe to convey, BUT here goes...

cut to the chase...you're going to make stock from the trotters.  the trotters are necessary for the stock because that is the glue or gelatin that holds the terrine together.
you may make your stock any way, flavor, you please, but this is my usual method...

...photo above is purely inserted to let you know what you will be dealing with...

GOOD BROTH FOR TERRINES AND SOUPS

you'll need 2 full TROTTERS, cut in half to make 4 pieces...they are usually sold cut in half
1 yellow or white onion
couple stocks of cut celery
couple cut up carrots
5 -6 smashed cloves of garlic
1 bigTbsp Mexican oregano
2 tsp cumin
1 tsp Mexican chili powder
1 tsp coriander
fresh pepper
salt when you're almost done reducing
water, or water and chicken stock, to cover...go ahead and use a can or 2 of chicken stock with the water if you have it...i might have used 1/2 and 1/2.
don't over fill.

bring to a boil and then to a slow simmer.  simmer for at least 3 hours.  the pig's feet skin should be falling off the bone and very fork tender.
check water level during cooking to make sure feet are still covered.
remove trotters and strain broth through very fine strainer...i suggest cheese cloth as well.  you want this broth to be very clean.  let broth cool and then refrigerate so that the fat will rise to the top for easy removal.
let your trotters cool to the touch...now you need to go through every bit and remove any small bones.
put all the trotter meat (skin) into a container with a little broth and refrigerate until ready to use.

ASSEMBLY
roasted chicken...just go out and buy one...(can you spell "COSTCO")
cut or torn into big bite size pieces...i think i used about 1/2 a chicken
remove fat from broth container while it's cold...should pop right off the top.
warm the broth until it is liquid...TASTE TEST your broth...add a little more salt and pepper.  terrines always need a little extra flavor.
warm the trotter meat to loosen it up and cut into large pieces (or small if you don't want to really see them)
lightly spray a medium glass loaf pan
add meats to the loaf pan...you can layer if you'd like, but i just put it all in evenly dispersed.  you want to get a little something in every bite...pack it quite full.
then pour in your trotter broth.
i wanted my terrine to look packed so i pressed the meat down with another loaf pan and some soup cans.  you might find that more meat will fit in.  don't press too hard or you will have an over-flowing mess on your hands, but hard enough as to close the gaps between the meats.
put in fridge to cool and completely set.  this shouldn't take long...a couple of hours.
remove from loaf pan by slipping a knife around the edges and inverting onto plate.

slice and enjoy...this will keep for at least 5-7 days.

as far as any kind of serving suggestions?...i don't really know what you would pair this with.  i gobbled it up mostly by the slice, but served along with other cut meats and or some charcuterie type faire i think would be nice.  maybe some cornichons and a little Dijon or slap it between some bread and call it a "soup sandwich"...
any way you serve it you will enjoy it with a sense of pride knowing
you tackled the TROTTER


Monday, 14 November 2011

0 Bourbon Chocolate Bundt Cake

whiskey_bundt_glazed


Today is National Bundt Day. November 15th was first designated as such 5 years ago by Nordic Ware, a U.S.-based kitchenware company best know for their Bundt ™ pan. For the past 3 years Mary, The Food Librarian, has celebrated by making 30 bundts in the 30 days leading up to National Bundt Day. It's an impressive feat and I am amazed by how many different bundt-shaped pans she owns. It's quite a collection!

She asked her readers to join the fun by making a bundt of our very own. I decided to booze it up and make a bourbon-soaked chocolate bundt cake using a recipe I found in the New York Times. The recipe calls for 1 cup (250 ml) of bourbon or any other whiskey. That seems like a lot of alcohol and you can definitely taste it, but I don't think it's too much. I'm not at all a drinker and I thought it was the perfect amount of bourbon to go with the dark chocolate cake.

whiskey_bundt_batter


And what makes bourbon even better? Luxardo cherries of course! I jazzed up the cake up by drizzling it with a Luxardo cherry glaze. This cake is not quite breakfast food. Some people at the office were still drunk at lunch time. I'm only slightly kidding. :)

makersmark_luxardo

Continue reading...

Friday, 11 November 2011

0 Baby Bella, Shiitake Mushroom Soup...(non dairy)


move over pumpkin...there's a fungi in town...
(sorry, i get carried away.  i'll just stop there with the bad puns)

but really...isn't everybody talking about pumpkin or butternut squash soup for the holiday?...

how predictable...change things up a little.


this creamy unctuous soup is so delicious.  rich deep flavors but very light on the palette.
no cream and very little fat.


the key ingredients here are the roasted garlic and some homemade roasted chicken broth
and the key utensil is an immersion blender 

trust me, take the time to roast the garlic...
 eat a roasted chicken this week and make some good broth.  chicken broth from a roasted chicken carcass is like liquid gold.  i always have some on hand in the freezer.  
and... go out and buy yourself an immersion blender.
your soup will be tasty and your puree-ing world will be forever changed.


in a nut shell...roast garlic, saute mushrooms and aromatics, whiz it up with some broth and serve.


BABY BELLA SHIITAKE CREAMY, yet non-dairy, SOUP

3 oz. Baby Bella (Crimini) mushrooms
30 grams dried Shiitake mushrooms
1/2 medium onion
1/2 shallot 
3-4 cloves roasted garlic
approximately 4 cups of chicken broth or vegetable broth...home made is best, but...
2 cans  (15 oz.) low sodium chicken broth will be fine (more or less depending on how thick you like your soup)
NOTE...i used 1 whole can and about 1 1/2 cups homemade chicken broth...
vegetable broth works very well with this for a pure vegetarian version
2 Tbsp olive oil
1 tsp dried tarragon
1 tsp dried thyme
salt and pepper to taste

FIRST...before you do anything...roast your garlic.  i like to roast mine whole with the top sliced off and drizzled with olive oil inside.  wrap in tinfoil.  oven at 370 F and it should take about an hour.

meanwhile, rehydrate your dried mushrooms as the package instructs if using dried.  saute your veggies in about 2 Tsp olive oil (maybe less if possible).   do not salt your veggies while sauteing.  you can add your tarragon and thyme in when they are almost done.  when everything is done and mushrooms look yummy and golden transfer to a sauce pan (3-4 quart works for me).  reserve a few mushrooms for garnish.  squeeze the water from the rehydrated mushrooms and chop them up a little and add them with the roasted garlic cloves to the pot.  add chicken broth, a little less than you think you might need because you don't want your end product to be too thin.  bring to a boil then lower to a simmer.  when everything has been heated through take off the stove and get your immersion blender in there and blend away...blend it to the texture you like.  i like it creamy.  you might need to add more broth at this point (heat through if you add more).  when you have it just right check for seasoning...salt and pepper to your liking.  i like the base creamy, then i add a few whole reserved mushrooms or use as garnish.
reheat just before service.  this soup can be made ahead and keeps well for a few days.

NOTE..the fresh thyme is for presentation and photos only.  i found when eating the finished photographed bowl of soup i didn't care for the pieces of thyme interrupting the smooth creamy texture...you be the judge.


Sunday, 6 November 2011

0 Berry and Cream Cookies

berries_and_cream_cookies


I guess I've been in a Christina Tosi mood lately. She's the pastry chef at Momofuku's Milk Bar in New York City and her Milk Bar cook book was just released in late October. I made Milk Bar's amazing crack pie recently (using the LA Times' version of her recipe not the recipe in the Milk Bar book which is slightly different) and her kitchen sink cookie, the compost cookie, remains one of my favorite go-to recipes. Then I saw Christina Tosi's blueberry and cream cookie recipe on Martha Stewart's site and I had to bake some right away. (BTW, the blueberry and cream cookie recipe in the Milk Bar book is different from the Martha Stewart one I used here.)

Tosi was inspired to make a cookie that tasted like a blueberry muffin and I have to agree that the dried blueberry version really does taste like the top of a blueberry muffin. The muffin top is the best part of the muffin, don’t you think? I think it's the addition of the milk crumbs. Even though the extra step of making the milk crumb streusel seems fussy, I think it's really the key to making this cookie taste like a muffin.

milk_crumbs_after_baking


I've made these cookies using only dried blueberries and another batch using a mix of dried blueberries, cherries and strawberries. All photos in this post are from the mixed berry batch.

berries_and_cream_cookies_dough


Instead of making 14 very large cookies like the recipe states, I usually make about 4 dozen small cookies since I have a lot of mouths to feed. It's all about portion control. I might have assumed that 14 very large cookies would have encouraged people to share since a single cookie is quite large, but they still take one whole cookie. If it's big, they take one. If it's small, they take one or maybe two. Even if they took two cookies there would still be 24 servings instead just 14.

If you have fewer mouths to feed or if you keep company with people who like to share, I recommend making them super large like the recipe states especially if you want cookies that have soft centers and crisp edges. It's hard to get that texture when the cookies are portioned out into 48 small ones. Even so, the small cookies are still really, really good.

berries_and_cream_cookies_balls

Continue reading...
 
back to top //PART 2