Saturday, 26 March 2011

0 Meringue Coffee Cake

meringue_coffee_cake_3


The March 2011 Daring Baker’s Challenge was hosted by Ria of Ria’s Collection and Jamie of Life’s a Feast. Ria and Jamie challenged The Daring Bakers to bake a yeasted Meringue Coffee Cake.

Even though it's called a coffee cake it does not contain any coffee (unless you want to use coffee as a flavoring then it would be a coffee coffee cake). It's also less of a cake than it is a bread. But if a bread contains enough butter, eggs, milk or sugar, I guess it can be called a cake. Regardless of its name, you can call it delicious.

meringue_coffee_cake_2


The yeasted dough was a breeze to handle. After kneading, it was smooth and not at all sticky. After it had risen and was ready to be filled, the dough offered no resistance to the rolling pin. In fact, I didn’t even use a rolling pin for the second half of my dough. I just patted it out into a rectangle.

meringue_coffee_cake_filling


At first the meringue seemed like an unusual addition, but the meringue acted like a neutral binding layer between the dough and the ingredients in the filling. Upon baking, the meringue had melted and soaked into the bread leaving behind a hint of sweetness and allowed the filling to shine through. I filled mine with five spice powder, walnuts and chocolate chips.

The only tricky part was to roll it up jelly roll style and then into a ring without squeezing out any of the filling and meringue. I also needed to be sure the seams were well pinched so all the filling and meringue stayed inside.

meringue_coffee_cake_seam
meringue_coffee_cake_shape


For my first ring I cut slits in the shaped dough after the dough's second rise, but the cutting seemed to deflate it a bit. So for my second ring, I cut the slits immediately after I had filled and shaped it and let it do its second rise already cut. No deflation here.

meringue_coffee_cake_slash


As much as I like the sweet filled bread, after tasting it I knew that this dough would be equally good in a savory application. After my office's weight loss challenge ends next month and I can allow myself to indulge a bit every once in a while, I am definitely going to use this dough with ingredients like cheese or pork.

From the feedback I received, it seemed that this cake had a nostalgic quality to it. Quite a few tasters mentioned that it reminded them of something their grandmothers baked. That's the best compliment that I could receive.

Thanks to Jamie and Ria for a lovely and versatile recipe. Please check out what the other Daring Bakers created by heading over to our kitchen.

meringue_coffee_cake_1

Continue reading...

Thursday, 24 March 2011

0 Caldo de Camaron Seco


Caldo de Camaron Seco

what a fabulous soup i have found!

it was pretty much be accident...as are many of the "out of the ordinary" things i come across. last week i was shopping at my favorite Mexican market, Northgate in Santa Ana, to get the correct/authentic caramel sauce for my Flan Cake.  i needed Cajeta de Leche as the recipe called for.  just in case you missed the post on "The Flailed Flan Cake" here's the link...so sad...so very sad...
anyway.....as i entered the market the impulse buys caught my eye (i'm a sucker).  they had a large display with these packaged up dried shrimp.  i had seen them many times before here and Asian markets.  "i wonder what the heck you do with these?" i asked myself.  i thought they must be some Mexican treat or for some fabulous special occasion recipe if they have them all out on display...
they're ugly salty dried up old shrimp...i HAVE to buy them...i'll find out what to do with them later.


well, as far as i'm concerned...I HIT PAY DIRT!

these ugly pale shriveled up little critters make the most incredible broth for this soup.  i can't describe the flavor, but it's FABULOUS.  the shrimp add a whole new layer that makes it taste rich and deep and totally authentic Mexican.  a friend said she was transported back to her vacation in Puerto Vallarta.  i'll take that as a compliment...thank you very much.


the recipe is fairly easy, but just a little time consuming.  the shrimp need a pre-soak, a little broth time and then you have to remove the head, legs and tails off of EVERY single little shrimp that goes in the pot, but it's well worth it.  you also have to make a real Mexican Red Sauce that requires steeping, pureeing, straining and sauteing the chills...again...well worth it.  i make red sauce all the time...it's not that big of a deal.  it's great for so many things...pork, chicken, turkey, beef etc...the Red Sauce recipe and instructions i use are found HERE, but i always add a few extras like cumin, oregano, 2-3 adobo chiles and adobo sauce.


i found this delicious soup recipe by googling "what to do with dried shrimp, Mexican".  i thought about going with an Asian recipe, but i was in the Mexican mood...you know the Flan Cake and all...it was going to be a Fiesta!...
the soup?...incredible !  
the flan cake?...don't ask...

CALDO de CAMARON
i made a few changes, so please check the link for the original and her comments...she has loads of great Mexican goodies

1/2 pound of Mexican dried shrimp
2-3 oz dried Guaillo chiles...i also used a few New Mexico Chilies
1 Tbsp Mexican oregano
1 ripe tomato, diced
3 garlic cloves
2 bay leaves
1/2 small onion, roughly chopped
1 tsp cumin
1/2 tsp cayenne...optional
3 carrots, sliced
1-2 diced potatoes are supposed to be added, but i chose other veggies...
2 celery stalks sliced
a handful of green beans
1/2 head small cauliflower
1 more tomato, diced
1/2 onion, sauteed...(this was a good addition)
1 jalapeno, sliced or diced...optional
2 Tbsp oil
limes and cilantro for garnish

FOR THE SHRIMP
cover the shrimp with cold water and let them sit for 10-15 minutes.  drain the shrimp, rinse them and place them in a medium pot.  cover the shrimp with 5 cups of water and bring to a simmer over med. high heat, then turn down to a slow simmer for 10 minutes.  strain the broth reserving both the broth and the shrimp.  allow to cool.
once the shrimp have cooled remove the heads, tails and legs.  Pati (original recipe blogger) suggests you keep the body shell on to add a little crunch to the soup, so that's what i did.  
FOR THE RED SAUCE...
remove the stems and seeds from the chiles and place them on a hot "comal".  i do not own a "comal" so a hot skillet works just fine.   toast lightly until they change color a bit...jus about 10-15 seconds per side.
place the chiles, tomatoes, garlic, onion, oregano, cumin, cayenne in a saucepan and cover with water.  bring to almost  boil and turn down to a slow simmer for 15 minutes.  get your stick blender out and puree until smooth...or use your regular blender or processor...i highly recommend getting a stick blender!
over medium heat add 2 Tbsp oil (olive is good) to a large soup pot.  strain the chili puree over the oil.
NOTE...use a regular strainer and push all the goodness through.  you should have just the tough bits left in the strainer.
add your cumin and cayenne if using.  simmer the sauce for 10 minutes over medium heat allowing the sauce to season and thicken.
FOR THE FINISHED SOUP
add the shrimp, broth, carrots, green beans, jalapeno, 1/2  sauteed onion to the chili puree and let simmer for 10-15 minutes until carrots are tender...also add in the cauliflower towards the end because you don't want it to fall apart.

serve the soup with wedges of lime, chopped cilantro and some fresh diced jalapeno.

this is great as is, but also fabulous over rice...or add a few more veggies of your choice.  i like my soups thick with goodies.  the original only called for carrots and potatoes, but i wanted to add a bit more...maybe not as authentic, but good and good for ya.
   

Tuesday, 22 March 2011

0 The Failed Flan Cake...there will be a rematch!


i was soooo looking forward to this dessert.  i've had it in my "to-do drawer" for months.  yesterday i finally felt in the mood for the challenge.  i had it all planned out.  Dad would LOVE it!...friends and family would devour it and ask for more!...i could make a chocolate one next "The Coco Flan"...mmm...YUM!...i would take BEAUTIFUL pictures of it...whole, in all it glory, sliced..the perfect wedge or maybe just the perfect  bite on a beautiful silver fork...and all timed just right for the "magic hour"...


the recipe sounded easy enough, although i had my doubts... 3 cans of milk, 3 whole eggs AND a whole cake mix into ONE bundt pan?  the worst i thought could happen was  little over-flow into the baine marie.

nope...no problem there.  everything looked great out of the oven.  the cake part looked perfect and golden brown.  


great...all i had to do was wait for it to cool, then into the fridge and wait for it to "set up"...
WELL,...SET UP ?... IT DID NOT !!!

i was so excited to unleash this masterpiece that i enlisted my mother to come in and witness the event.  thank goodness i did.  i flipped the cake over onto the cake dish with no problem.  i heard the ever so lovely sound that one hears when the cake has properly released itself from the pan.  here, i was worried that it was gonna stick....
i wish i could have had the camera ready for what happened next... 

a TSUNAMI OF UN-COOKED...UN-SET, UN-DONE sploosh of eggs, evaporated and condensed milk.  the cake plopped down on the plate and the milky mixture proceeded to run out all over.  dish towels came flying out of nowhere in a failed attempt to stop the wave of sticky mush.  panic set in...it was heading for the floor.  i quickly moved the whole monstrosity to the sink and let her rip.  not only was this a total visual horror, but it was absolutely a gooey INEDIBLE mess. 
i've had miss-haps before, but usually it can be saved in some way.  i hate to waste things and this puppy wasn't really cheep.  not that it broke the bank or anything, but i did drive all the way to my favorite Mexican market in Santa Ana to get the proper caramel,  Cajeta de Leche...AND out in the pouring rain to get the stupid cake mix AND to another market because i only had 1 can of evaporated milk.

so...any one out there feel me ???!!!
i know as bakers and cooks we all have our bad days, but this one was a doozer...a total let-down.  luckily i had something else brewing on the stove that came out better than fabulous...an unexpected delicious savory something.  sometimes "savory saves the day".  i made some Caldo de Cameron.  who knew some dried up old salty shrimp would upstage the fabulous dessert i had planned ???  this authentic Mexican soup totally made up for my cake disaster.  i'll post about it as soon as possible because it's a new favorite.

 SO...as you can see in the photo below, the whole thing ended up in a big baggie and was quickly and quietly taken to the garage where it would hopefully be forgotten...

well...i have not forgotten and 

I WANT A REMATCH !!!
this cake will not win!  i WILL attempt this cake again!


by the way...no fault to the original poster on this one...i know i had to be at fault here some how...
maybe my baine marie wasn't hot enough?...maybe it should have been in longer?...maybe the milks should have been pre-heated?...who knows, but i think i'll try a different recipe next time...
and there WILL be a next time!

Thursday, 17 March 2011

0 "Clean out the drawers" Granola Bars


"Spring has sprung"
well...at least the clocks have changed...this also means Spring cleaning is on the way.

i decided to start out with something easy and just clean out one of the over flowing baking drawers.  what do you do with bits and bobs of chips, nuts, seeds, banana chips, dried fruits and various smidgens of left over goodies...?
throw as much of it as you can into a Healthy Granola Bar


you might even call these...
Everything but the Kitchen Sink Granola Bars


i must admit, this one batch didn't really make a dent in the messy drawer of baking goodies i have, but it DID help...and i know every baker out there has one or two of these drawers i'm talking about...right?...for these yummy, crunchy bars i like to use the base recipe i found a few years ago by Alton Brown.  i have radically made changes to the original recipe, but you might want to check the link.  as a matter of fact i pretty much make these from memory and just throw things in until it looks right.  thank goodness granola bars are very forgiving.  they all turn out delicious.

i make granola bars at least twice a month.  the most requested, and my favorite, is the ELVIS GRANOLA BAR (found here)
this one has peanuts, banana chips and BACON...sometimes dipped in melted peanut butter chips.
this combo is a must try!


the recipe for these bars might be a little hard to write, but i'll try to give an idea of what goes in.
like i mentioned, the base recipe is found HERE from Alton Brown.

start with a 9 x 13 baking pan, buttered or sprayed and lined with parchment.
pre heat oven to 350 F.
spread oats, seeds, nuts (if not already roasted) wheat germ, wheat bran on a cookie sheet and bake in oven for 15 minutes...stirring occasionally.
remove from oven and turn oven down to 300 F


in the meantime...
on the stove in a smallish pot melt together

1/4 cup packed brown sugar
1 oz butter
3 Tbsp peanut butter or almond butter
1 tsp vanilla extract
1/3 cup honey
1/4 cup maple syrup
1/2 tsp kosher salt...(if your nuts are not salted)
stir until completely incorporated and dissolved.  set this aside and rewarm if necessary when ready to add to large bowl of dry goodies.

dry ingredients...put in a large bowl
this is where it's your choice, just try to equal the basic amount in each category...such as oats/cereal, seeds and nuts, dried fruits, healthy stuff and extras like chips of any kind.  for the spices...you can always taste test.
my Granola Bar ingredients usually go something like this...

1 1/2 cup old fashioned rolled oats
1/2 - 1 cup brown rice cereal or rice krispies
1/2 cup fiber one cereal
1/2 cup seeds...pumpkin and or sunflower
1 cup roasted, lightly salted nuts...virginia peanuts, almonds, walnuts, pecans whatever
1/4 cup wheat germ
1/4 cup wheat bran
2 Tbsp flax
1/4 cup crystallized ginger
1/3 - 1/2 cup dried cranberries or other dried fruit
throw in some banana chips or choc. chips or peanut butter chips if you have them...and or BACON
spices...equaling 1 1/2 teaspoon-ish
1/2 tsp cinnamon
1/4 tsp fresh grated nutmeg
1/4 tsp ground ginger
sometimes a dash of cardamon
sometimes a little cayenne for a kick in the pants


pour the melted ingredients over the dry in about 3 batches stirring in between...you want a nice even coating.  put everything into prepared pan and spread out evenly.  press down...i say,  PRESS DOWN!  this is key to the bars holding together.
put in 300 F oven for 25-30 minutes until golden brown.  after your first batch you will see that less time makes a softer bar and more time makes a crunchy bar...i prefer CRUNCHY.
remove from oven and let cool completely.
TO GET NICE CUT SQUARES...cut them while they are still in the pan with a very sharp knife.  these will keep for at least a week if you keep them air tight.  i like to wrap them individually in wax paper or parchment and a tight baggie.

my mother always says try the original recipe first then you can play with it however you see fit...
so...if you're into some good granola bars you could go ahead and try Alton's recipe first, but i thought it needed more goodies.  don't be afraid to throw whatever you have in that drawer into the mix.  like i said...
GRANOLA BARS ARE VERY FORGIVING
and always delicious!


Friday, 11 March 2011

0 Apricot Almond Oat Bars


since my last post about the "Turkey Tails" was sooo long, i'll get through this one quickly.

i found this recipe while watching some Giada De Laurentiis show in the wee hours of the morning.  while half asleep i heard "healthy" and i heard "oatmeal".  two things i'm always looking for in a good morning snack.  well, i would NOT really consider this a "HEALTHY" recipe with a cup of butter and a cup of brown sugar, but they DO have a good amount of oats, almonds and i used whole wheat white flour...so all is not too too bad...some people would actually call this a "health bar".

the photo above was taken about an hour after baking...yummy, sweet jam gooey-ness with the crunch from the almonds, but kind of squish when you cut them into bars...even with a very sharp knife.

the photo below was taken after refrigerating to set.  i find this makes for cleaner cutting when they are chilled

APRICOT ALMOND OAT BARS
for original check the link.  i made just a few changes that worked quite well.

FILLING
1 13 oz jar apricot jam...i used Bonne Maman Apricot Preserves
8 10 dried apricots diced into 1/4 inch pieces (about 1/3 cup)

CRUST
1 3/4 cup whole wheat white flour
1 cup packed brown sugar
1 tsp cinnamon
1/4 tsp cardamon
a few grates of fresh nutmeg.  maybe a little less than 1/4 tsp
3/4 tsp sea salt
3/4 tsp baking soda
1 3/4 cups old fashioned oats
1 cup coarsely chopped almonds
1 cup unsalted butter...melted
1 egg room temperature...beaten
1 tsp vanilla extract

preheat oven to 350 F.  spray or lightly butter a 9 x 13 inch metal baking pan and line the bottom and sides with parchment so it over hangs on 2 sides for easy removal

in a small bowl mix together the jam and the diced apricots.  set aside.

for the crust...in a large bowl (i did this in my electric mixer.  whisk or paddle works well) mix  together the flour, sugar, cinnamon, cardamom, nutmeg, salt and baking soda.  stir in the oats and the almonds.  add melted butter, egg, and vanilla.  mix until incorporated.

using a fork or clean fingers, lightly press 1/2 dough mixture into the bottom of prepared pan.  try to make it so there are no holes.  using a spatula, spread the filling over the crust, leaving 1/2 inch border around the edge of the pan.  cover the filling with the other 1/2 dough mixture and gently press to flatten.

bake until light golden brown, about 30-35 minutes.  cool for about 1 hour.  cut into bars and store in airtight container or refrigerate.
NOTE...as i stated above, i like to refrigerate to set them a little before cutting.  this makes for a nice clean cut and they don't squish down and get all messy.


OH...WOOPS!  did i forget to say these are DELICIOUS !!!


Tuesday, 8 March 2011

0 Turkey Tails...Braised and Roasted


TURKEY TAILS...

it might be the last thing over the fence, but...

it's the best bite on the bird.

they're so delicious and so easy to prepare, but extremely hard to find more than one at a time...
and that ONE is usually attached to your Thanksgiving bird.


 back in Sept. '09 i posted about BBQ Turkey Tails...  well, i'm still eatin' tails and i thought i'd share this easy way to prepare them without going out in the cold and lighting the grill.  they're boiled, (or "braised" if ya want to get fancy) for a few hours while you're hanging around the house and roasted 'til they get plump, golden, sticky with glaze and absolutely unctuous !...i find this way they are even more succulent and delicious.  they are addicting...really.  i get all my friends and family to join the Turkey Tail Club.  some just can't wrap their head around the idea.  too bad, they aren't in the club!  some people are amazed and some are on the fence...no pun intended.  mostly it's just fun for me to watch the person, their reaction and see if they ask for another.

come on..you're a bit curious aren't you?...
i'm not kidding...if you can get a hold of some of these babies please try them.  the conversation alone is worth the small effort...besides you'll end up with some delicious broth if all else fails.
and they're CHEAP!!!


TURKEY TAILS...Braised (boiled) and Roasted

WHERE TO FIND THESE LITTLE NUGGETS???
 i'm lucky to have a store here in So. Cal called Gelson's that serves fresh roasted turkey everyday at the deli.  they, for some odd reason, keep the tails and package them up and put them up for grabs in the poultry section, about 6 per package runs about $1.50...i'm always curious...who the heck knows about these tails?  is there someone else out there that loves these things as much as i do?...if your market sells fresh roasted turkey, go ahead and ask what they do with the tails.  maybe some lucky guy in the back gets the best bite everyday...maybe he'll share.  otherwise, just ask your butcher where you might find some...if anything, both of you will get a good laugh out of it.

PREPARATION
short version...boil them in good flavorful stock for 3 hours, marinade for a few hours, then glaze and roast 'til sticky and golden brown.
more explicit directions...start these like you would any good stock or broth.  i'm always making stock with a roasted chicken carcass from Costco so i throw it all into the pot with a quartered large onion, a few celery stalks, a couple of carrots, 4-5 smashed garlic cloves, bay leaf, Mexican oregano, fresh rosemary sprig, a dash of cayenne, a tsp of cumin and some fresh ground pepper.  water to cover by an inch or 2...or better...throw in some homemade stock from the freezer or a can or 2 of store bought stock and water to cover.
NOTE...remember...your end product is not only the turkey tails but a delicious broth as well.
bring to a boil, then down to a slow simmer for about 3 hours.  check your liquid level a few time to make sure they are covered.
after about 3 hours, remove the tails from the pot.  strain your lovely broth and save for a rainy day.
NOTE...here's an odd thing.  sometimes there is a little feather membrane piece that is protruding from the top of the tail.  pull these out while they are warm...don't freak out.  there not always there and if they are it's 1 or 2 at most.
let the tails cool.  while cooling,  smother them in your favorite marinade/glaze.  the one i like best is by Soy-vay.  the Hoisin Garlic Sauce, but any tasty marinade/glaze will do.  you want them to rest and soak up the flavor.  anywhere from 1-3 hours is fine...i leave my in the fridge sometimes over night.
preheat oven to 370 F
place tails on aluminum covered (easy clean up) cookie sheet or roasting pan.  put in the oven and keep an eye on them.  you'll need to turn them and glaze them to get good and sticky.  time varies, but i have found about 30-40 minutes in total works well.

EATING A TURKEY TAIL
they not only look odd, but they ARE odd.  
this is one of those "GO FOR IT" instances where you just have to take in a huge bite to get the whole unctuous effect.  there's no nibbling here.  you need to bite the whole side off one side of the tail bone.  i wish i could demonstrate...it's kinda hard to explain.
another way to go is to remove each side off the bone with a knife, but still you must stick a whole side in your mouth...i promise you.

i'll stop now...geez, this is one of my longer posts.  i just get so excited about the strangest things.

so...ask yourself...

are you willing to join "THE TURKEY TAIL CLUB" ??? !!!


Monday, 7 March 2011

0 Dreaming

pumpkindonutmuffins_pile


I realized that I was pretty cranky when I wrote my previous post. I blame it on my diet. I'm participating in a New Year's weight loss challenge at the office. We're in week 8 right now and even though I'm doing fairly well - there are 20 participants and I am currently in the top 3 overall "losers" - I am constantly dreaming about food. In the beginning I was dreaming about pizza from Flour+Water, but now I am dreaming about dessert.

Being on a diet and living in one of the best food cities in the country has been tough, but I guess dieting is tough no matter where you live. Over the past two months I've learned to adjust my eating habits. I've always had fairly decent habits. I eat lots of vegetables and fruits, very little processed/packaged foods, and 98% of the time my drink of choice is plain water. I always bring my lunch to work and my husband and I only eat dinner out 2 or 3 times a month. But my portion size was out of control and desserts were hard for me to pass up. So instead of changing what I eat, I've just changed how much I eat. Before I put any food in my mouth, I always stop and ask myself if it's worth using my limited daily allotment of calories on it.

I can still have a 4505 Meats cheddar bratwurst when I go to the Ferry Building, but instead of eating the whole thing, I will eat a third of the bratwurst and none of that delicious bread that it comes nestled in. On the bright side, I can have all the sauerkraut I want. And that 4505 sauerkraut is definitely yummy enough to make me almost forget the other two-thirds of the bratwurst. I've survived Chinese New Year celebrations, fried chicken and cream biscuits at Prospect, and a pasta tasting at Perbacco.

You would think that I could make things easier on myself if I stopped baking during the weight loss challenge. But asking me to stop baking is like asking me to stop breathing. I just cannot survive without it. And I have been baking a lot lately. Most of it's been tempting, but not blog worthy. I've been able to resist the florentine cookies and lemon mousse cake I made for the Daring Bakers' challenges as well as the chocolate cake I made for Valentine's Day. I usually take one or two bites of what I make just for quality control purposes. Have you ever had just one bite of chocolate cake? It's really, really hard to stop after just one bite. But I did. And that's how it's been for weeks.

pumpkindonutmuffins_sugary


But my resolve is starting to wane. And it's all because of these damned pumpkin donut muffins. Damn the internet for bringing these to my attention. Damn Martha Stewart. Damn. Damn. Damn.

These baked pumpkin donut muffins are so hard to resist. They are insanely good. Baking them in a miniature muffin pan gives them the appearance of donut holes which adds to their appeal. They are moist and spicy with that lovely crackly sugar coating.

One bite and I was hooked. I could not stop at just one bite. One bite turned into 2 into 4 into 10. I ended up eating two whole mini muffins. And, yeah, I know, those calories are not going to hurt me, but in the long run every calorie adds up. I guess it just means that I have to stay on that treadmill a little bit longer.

pumpkindonutmuffins_moist


Although I am now constantly dreaming about these pumpkin donut muffins, they are way too dangerous for me to make again. However, the recipe is too good to keep to myself. So bake 'em at your own risk.
Continue reading...

Sunday, 6 March 2011

0 Chicken Terrine with Bacon and Sun Dried Tomatoes


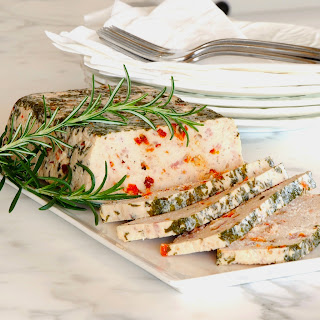
terrines are great. they usually come with some fancy name or some fancy ingredients, but alot of them are just a glorified cold meatloaf.  you can put just about anything in a terrine.  i made this one quite a while ago and forgot to post about it.  this was my first attempt at what i thought was going to be a big "challenge"...not so.  it was easy.  i just tend too make things more involved than necessary.  since this lovely specimen, i have made quite a few "Terrines"...a few weeks ago i made a "Trotter" Terrine with Roasted Chicken that i will be posting about soon..DELICIOUS! and i've made a few Pate De Campagnes that could be considered a type of terrine...also DELICIOUS !

you can fancy your terrine up for a party or you can simply slice it up for a snack or a packed lunch.  they keep very well because they're packed tight and don't contain any ingredients that spoil easily....great for sandwiches or paninis and a fabulous addition to any salad

photo above is my ultra professional gourmet-way of the pressing process...
no need for some fancy terrine press.  just a meatloaf pan, a piece of foil covered cardboard to fit inside and some heavy stuff that will weigh it down.  might look kinda funny sitting in the fridge and you have to make some room, but it doesn't take but a little while and it's well worth it.
since this was my first terrine i thought i'd go to the basics...that means google "easy terrine recipe"...

you'll never guess who popped up...and not just once....
BETTY CROCKER!
yes sir-ie...good old Betty C.
if your interested in trying out a terrine for the first time, i'd suggest this one.   it's safe, has no weird ingredients (like liver or other odd parts), it's easy and pretty much all done in your processor.  i added bacon so that was another step, but i always have bacon on hand...so should you. hee hee

CHICKEN TERRINE
with BACON AND SUNDRIED TOMATOES
adapted form Betty Crocker (original found HERE)

1/4 cup chopped parsley
1 1/2 lb. boneless skinless chicken breast halves
2 Tbsp chopped shallots
1 Tbsp fresh chopped thyme
1 Tbsp fresh chopped rosemary
1 Tbsp olive oil
1 tsp salt...maybe a little more
2 egg whites
5-6 slices cooked bacon cut into pieces
5-6 chopped sundries tomatoes...depends on the size

heat the oven to 350 F.  line the loaf pan, 8 1/2 x 4 1/2 inches, with aluminum foil.  sprinkle parsley in the bottom of the pan.
remove fat from chicken.  cut chicken into 1 inch pieces.  place chicken into food processor.  cover and process until coarsely ground.  add remaining ingredients except sun dried tomatoes and bacon.  cover and process until semi smooth or until your liking.  mix in sun dried tomatoes and bacon.  spread into pan
cover pan tightly with aluminum foil.  bake for 1 hour.
NOTE...i'm pretty sure i used the bain marie method
remove foil and bake for 20-30 minutes or until meat thermometer reads 180 F in the center.  cover and let stand for 1 hour.
pour out remaining liquid after it has cooled.  refrigerate for at least 3 hours.
NOTE...this is when i put the weights on and press it.  i don't know if this is totally necessary, but it ensures a nice tight loaf for better slicing..
when cooled invert and remove from pan and remove foil...VOILA...your "Terrine"


Tuesday, 1 March 2011

0 Nutella Chocolate Fudge with Dark Chocolate Sea Salt Ganache


make any day "NUTELLA DAY"
these are such a hit and so easy to make.  
i've made this kind of quick and easy fudge before, BUT never with Nutella. 
i must say...the Nutella sends it right over the edge.  


AND smothered with more chocolate?
GET OUTTA HERE!

PURE NUTELLA CHOCOLATE LOVERS DREAM


the fudge by itself was unbelievable.  so if you want to just whip this up by itself...do it now!  you won't be sorry.  i just thought i would pretty it up a little with a smothering of dark chocolate ganache and a little roasted hazelnut.

oh so very happy to find this recipe on Foodgawker a while back at Cake Duchess who adapted the recipe from Cookin' Canuck who , in turn, adapted it from a Giada De Laurentiis recipe...i'm out of breath...  don't ya just love sharing recipes and seeing them evolve?  i noticed it was the same easy fudge instructions i had used before, only this used Nutella and peanut butter...sounds even better.  quite a while ago i made "The Easiest Truffles Ever" .  this basic fudge recipe is nice because you are guaranteed a smooth fudge, no worries about any sugar crystallizing and it's pretty effortless to throw together.  please DO give it a try, and put your own twist on it...see what you come up with.  
of course, the first thing that comes to my mind is BACON !!!


NUTELLA CHOCOLATE FUDGE
with CHOCOLATE GANACHE and SEA SALT
adapted from Cake Duchess and Cookin" Canuck
(for originals click on links)

butter and parchment for 8 x 8 pan
1 (14oz) can sweetened condensed milk
1 tsp vanilla extract
8 oz high quality bittersweet (60% cacao) chocolate chips or pieces
1 cup NUTELLA, room temperature
3 Tbsp peanut butter (optional)
3 Tbsp unsalted butter, room temp., cut into 1/2 inch pieces
sea salt...approx. 1/2 tsp

grease the bottom and sides of 8 x8 pan with butter.  line with parchment, leaving a 2 inch over hang on both sides for easy removal.
in double boiler combine the sweetened condensed milk, vanilla, chocolate, nutella, peanut butter and butter.
stir the mixture until the chips or choc. pieces are all melted and the mixture is smooth...approx 5-7 minutes
scrape the mixture into the prepared pan, spread the top smooth and even with spatula and sprinkle with sea salt..(or salt after ganache)
if you choose to smother with yummy ganache...wait until fudge is completely cooled.
GANACHE
1 to 1 ratio works well
4 oz good dark chocolate
4 fluid oz heavy cream
warm your cream to almost boiling...almost.  pour cream over chocolate chips or pieces and stir until smooth
 i happen to have some left over from another recipe so i can't say exactly how much i used...
BUT...you can NEVER have too much ganache.  left overs are easily made into truffles
OR just eaten with a spoon !!!

pour the warm ganche over the fudge still in the pan. let fully set in the fridge.  remove from fridge and sprinkle sea salt SPARINGLY...
NOTE...I USED A LITTLE EXTRA SALT FOR THE PICTURE.  don't over do it.

 
back to top //PART 2