Showing posts with label protein. Show all posts

Monday, 11 July 2011

0 Vanilla Berry Chai Jello Treat


Stained Glass Jello Dessert made healthy...

i know, i know...we've all seen this one before.  commonly known as stained glass jello, but i bet you haven't tried this version.

it's lo-cal, lo-carb...no fat...NO GUILT...

it's FULL OF PROTEIN...and IT'S FUN !!! 


you see this type of jello dessert a lot in the Mexican markets, but it's usually made with sweetened condensed milk and sugary jello......and i've seen many recipes on the Internet all cute and colorful.  here's an example that i found at Mexicanfoodsandmore.com... BUT all the fun colors and flavors of jello are the pre-sugared ones and i don't see myself eating sweetened condensed milk in solid form anytime soon.

so i had a "light bulb moment"

why not use my vanilla protein drink as the milky base and use sugar-free jellos...
better yet...infuse different tea flavors into the colored jellos.
i dug out the Knox gelatin packets i had in the back of the pantry, put my lab-coat on and went to work.

the results have been delicious.  friends love the cute little squares i dole out and it's always a great conversation piece....
"where'd you get that?...what is that?...how'd you make that?...can i have some?..."
always followed by a big smile and a few giggles


this post is not so much a recipe as it is an idea,...
but i have put the ingredients for the treat i made shown in the photos.  you can see how flavors can easily be changed to suit what you have available.  i found that Worldwide Vanilla Pure Protein 21g or 35g protein (found at Trader Joe's) works well for the base and the Isopure (looks like this) Blue berry flavor worked well with it's icy blue color AND it added 40 more grams of protein to the batch.  look for Isopure at a nutrition store.  you could also try Gatorade G2 Icy Blue Berry or something else colorful.  i DID find that Gatorade wasn't as flavorful...Crystal light has some great flavors...cherry pomegranate is great


EASY PROTEIN JELLO TREAT

8 x 8 glass pyrex dish for finished product
2 cups vanilla protein drink
1 lrg box black cherry sugar free Jello (makes 8  1/2 cup servings)
16 oz of ice blue G2 Gatorade
OR 16 oz of Isopure Blueberry Protein drink
OR another flavor sugar free jello, 1 box
1 - 2 Chai tea sachet
dash cinnamon, cardamom and nutmeg, ginger

let me suggest a link to a GREAT blog post here at The food Librarian.  Mary has some fabulous photos and perfect instructions on making stained (broken) glass jello.  for an easy protein version, just substitute the condensed milk with the vanilla protein drink...NOTE...DON'T USE WATER...bloom your gelatin in 1 cup cold protein drink then heat in the microwave until completely dissolved then add the other cup protein drink and proceed.
use sugar free jello for the colors.
if you want to get creative or expand your flavors see below...

use chai ice tea for the water when making your colored boxed jello

also i like to add a small (small!) dash of cinnamon, cardamom, ginger and nutmeg to the vanilla protein drink.

if you are using another liquid, such as the Isopure Protein juice, Gatorade or what ever...use 2 gelatin packets for 2 cups of liquid....bloom your gelatin in 1 cup cold liquid for 5 minutes, give it a stir then heat in microwave until dissolved.  no need to boil, but don't walk away 'cuz it can over flow...not good.  stir...when completely dissolved add the other cup liquid and stir...pour into flat dish then refrigerate until completely firm.  cut into cubes....

 and again, refer to this great post/link, The Food Librarian, for finishing the project...i would write it all out, but Mary explains it so well and this would just get too long.

i'm sure you get the drift...it's not rocket science....
although you should win a prize for making it to the end of this post.

go wild with some fabulous flavor combos

i think i'll try something with chocolate protein drink?... next week when i'm done with this one.

Sunday, 24 April 2011

0 Mocha 'spresso On-The-Go Jello


forget those 5 hour energy drinks that cost a fortune.  make yourself some Espresso jello cups for those inconvenient times you need a pick-me-up.


i love these things...my friends love these things...you will love these things.  i think i've already made about 5 batches and i'll make more tomorrow.


i got this idea from Nicole at The Galley Gourmet.  in the post titled "Sunday Dinner" she had this fabulous photo of Chocolate-layered Espresso Jellies.  her recipe sounds absolutely delicious and a perfect end to a fabulous Sunday Dinner.


i, on the other hand, don't throw too many lavish dinner parties...none, if truth be known, so i came up with this easy Mocha 'spresso On-The-Go idea.  how much fun would it be to whip an espresso shot out of your brown bag lunch?...or pass these out at your next tailgate party?  try this for an afternoon pick-me-up or an after dinner guilt-free treat.  these are pretty guilt-free...just a little shaved dark chocolate never hurt anyone.


MOCHA'SPRESSO JELLO TO GO

below are the instructions for the way i have been making it, but of course, there are many many variations.  have fun with it...

makes 4 1/2 cup servings
1 packet of plain gelatin (7g per packet)
1/4 cup cool water
3-4 shots of espresso (equal to 3/4 cup)...HOT-reheat if you have to
1 cup vanilla protein drink (milk would probably work, but the protein drink is creamier, extra flavor, less calorie and low carb...Muscle Milk or Pure Protein are good)
sweetener to taste
(a splash of no sugar Hazelnut or Irish Cream sweetener is great.  i use Davinci's)
dark chocolate bar for shavings

NOTE...whatever espresso/protein drink/milk/water combo you use your goal is to end up with 2 cups of liquid. this can be like a straight up espresso shot or a flavored latte.  you want the liquid to taste as you would a favorite coffee/espresso drink, but a little more rich.  most friends liked the one with a little more latte flavor, but the straight up espresso was brilliant, if ya ask me...

pour 1/4 cup cool liquid (milk, protein drink, water) into a 2 cup pyrex measure.  add the gelatin packet and let the gelatin bloom for about 5-10 minutes.  stir it so that it doesn't clump up.  if it clumps, use a fork or spoon to mash clumps...a few little clumps are okay.  
pour your hot espresso into this gelatin mixture and stir until the gelatin has completely dissolved.  do a taste test...is it sweet enough?...remember this is a treat.

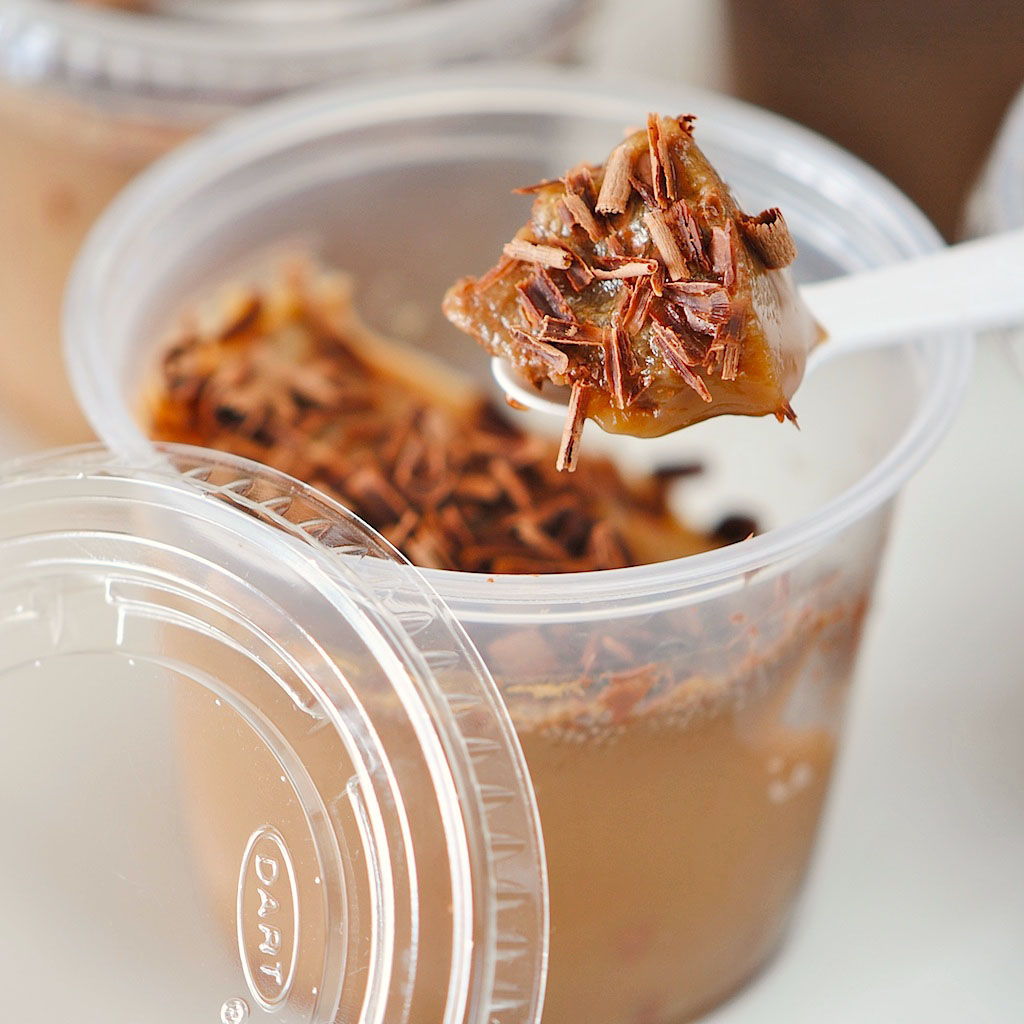
shave a little chocolate into the vessel of choice.  i got these little toss aways at Smart and Final.  reusable tupperware would be more green of me, but i never get them back and people tend to throw those away. i reuse these as much as possible.

pour the mixture in the cups and refrigerate until firm...takes a few hours

shave some more chocolate on top and you're ready to go...ANYWHERE

A POWERFUL LITTLE PICK-ME-UP TREAT !


Sunday, 10 April 2011

0 SKYR...Homemade Icelandic Yogurt


just look at those curds!
SKYR CURDS...
i love making yogurts and cheeses.  for some reason it's like baking bread.  i don't know why, but the smell of fresh yogurt right when you open the pot or while it's hanging in the fridge... gets me every time.  even when i'm having a bad day yogurt makes me happy.  if i've accomplished NOTHING in the day, at least i know i'm making yogurt...and it's gonna be good!
well, as promised, here is the SKYR recipe i use.  i should first state that i have not ever had "REAL" Skyr.  you have to go to Iceland to have "REAL" Skyr and i have no immanent plans to rush off to Iceland in the near future so i can only liken mine to the store bought here in America.  in any case if you haven't heard of SKYR...it is an Icelandic dairy product resembling Greek yogurt, but thicker and with a very slight cheese tang.  some say it's not a yogurt at all.  it actually IS a cheese.  the process of making it is like yogurt, but it calls for Rennet, a cheese making ingredient and the incubation doesn't seem to be as temperamental.


the important thing is you have to have skyr to make skyr.  luckily it seems to be growing in popularity.  like Greek yogurt, it is high in protein, low or NON fat and low in carbohydrates.  also a great way to get in some calcium.  the only brand i have seen around the markets is called Siggi's Skyr
if you can't get ahold of some Siggi's i read some other recipes that say buttermilk or other  live active culture yogurt will do, but there is something in real skyr that these don't have.  try high end markets or health food stores to find Siggi's


i've got this skyr thing down...you can too.  as i mentioned, it seems to be a lot easier than plain yogurt and the incubation is not as precise.  i get these beautiful curds every time.  i just can't help myself from taking a picture or calling someone into the kitchen to admire my curds... don't they just glisten in the sunlight?...okay...okay...enough already !!!


so you've seen the pictures of how the curds look after you cut them...above is a photo of the pot all wrapped up in 3 towels.  tightly wrapped and cozy.  i leave it this way for about 12 - 16 hours.  i didn't notice a difference in the end product if it sat 10 hours or once i left it for 18 hours...woops...still turned out great. i should mention i live in Southern California where the weather is not too extreme.  my house doesn't really get higher than 75 or lower than 55 degrees.

just below is a photo of the skyr before cutting the curds.  it should look like a solid mass with a little visible whey.


the photo below is a beautiful shot of the bottom of the heavy stainless steal pot after removing the Skyr for straining.  i wanted to add this photo in to show that this scalded looking bottom is OKAY !...
just a reminder...DO NOT scrape or stir down to the bottom of your pot.  it will not hurt your batch unless you scrape it into your finished product.

again...DO NOT be alarmed if you have a little scalding at the bottom.  of course you CAN prevent this by standing there and continuously stir while it comes to temp.  i prefer to set the pot on the LOWEST heat and walk away for an hour, hence the little bit of scalding.  this works for me, but i can't guarantee it will work with your equipment.
FYI...this should clean out very easily with a little soaking


just above is a beautiful photo of the professional straining method i have come up with for the fridge.
IMPORTANT...make sure you have a big enough container underneath to catch the whey dripping...could get ugly  


RECIPE and INSTRUCTIONS TO MAKE SKYR
i found 2 good, easy recipes for skyr.   one is at Recipezaar by Charlotte J and another was in a forum called The Icelandic Weather Report by a poster named Bigbearok.
below is kind of a combo of the two.  this works every time for me.  check the links to see if you would like to follow one of their recipes and instructions by the book.

MUST HAVES...
4 quarts (1 gallon) non fat milk...NOT ultra pasteurized
 Siggi's Skyr, or another brand if you can find it
Rennet...i use liquid rennet (vegetable base)
or...1/2 Rennet tablet dissolved in a little cold water
good thermometer
good quality stock pot, stainless steel
towels for wrapping up pot
cheese cloth or a big square of muslin works better
a large strainer

make sure all of your utensils are CLEAN.  heat the milk slowly up to 195 F degrees.  be careful not to burn the bottom.  slow heating, a heavy stainless pot and stirring will prevent this.  when it reaches 190-195 degrees, turn off and cool to 110 F degrees.  mix about 3-4 Tbsps of your starter (Siggi's or other live active culture yogurt) with a couple of Tbsp of the warm milk (one at a time) in a small cup until it seems combined and pourable.  add this mixture to the warm milk and stir being careful not to scrape up any milk solids that may have formed at the bottom of the pot.  now add the Rennet...i use 7-8 drops for 1 gallon if milk..again...stir carefully.
cover your pot and wrap it in 2-3 towels all cozy and leave it on the counter.  one recipe says to let it sit for 24 hours...another says 12 hours...and another says 5 hours...i let mine sit for 12-16 hours.  i have seen no difference in a few hours here or there.
uncover and take a peek.  it should be a pretty solid mass and there should be some visible whey (yellowish liquid).  if it still looks and acts like a pot of milk...something has gone wrong.

if all has gone well it is now time to cut the curds...
as shown in numerous photos above and obviously my favorite skyr step.  i don't know if this is completely necessary, but some recipes call for it AND i like the way it looks.  i think it helps the curds separate from the whey while straining. next, line a large strainer with a couple of pieces of cheesecloth OR i like to use a piece of thin washed muslin.
slowly spoon the curds into the lined strainer until all is in.  let this sit for an hour or two while most of the whey drains from the curds.
TIP !...i use the inside of my salad spinner for the strainer.  a regular pasta colander doesn't seem to work as well.  you need a strainer that will really allow the whey to drip otherwise it will take forever.
when it looks as though the dripping has slowed...gather the four corners, tie and hang from a wooden spoon (or something) over a sauce pan to catch the whey.  i like to move this to the fridge, but i suppose it can be done on the counter if it's not too hot.  a cool, well ventilated room is fine.  this should take a few hours.  your end result should be firm and a bit dry around the edges of the cloth...kind of cheese-like..i like mine a little thicker than commercial Greek yogurt, but not as thick as cream cheese.
remove from the cloth into a large bowl and stir or whisk until smooth.  one time mine was so thick i had to use the Kitchenaid mixer and whisk it up to creamy goodness...again...it was  delicious.
flavoring is up to you.  stir in a little honey and vanilla extract...i use a few packets of splenda and one vanilla bean...or i stir in some vanilla whey protein powder to taste....a couple of times i added some honey, vanilla bean AND fresh finely chopped ROSEMARY...YUM !
NOTE...the consistency should NOT be grainy like cottage cheese...stir or whisk until smooth.  if it is too thick you can stir in some of the whey or beat in a little cream and sugar for a richer, sweeter treat.

i hope my long instructions don't turn you away from trying to make your own skyr.  it really IS EASIER than it sounds.  once you get it down i bet you'll enjoy it more than regular or Greek yogurt. here are a few more links that i found helpful.

Jo's Icelandic Recipes
European Cuisines
Recipezaar...Icelandic curds
Wikipedia-Skyr
Icecook...Icelandic Cooking Recipes and Food


Sunday, 19 September 2010

0 Alton Brown's Protein Power Bars

AS SEEN ON TV !!!

i'll admit, i was watching Alton late the other night. usually i just can't wrap my head around some of the stuff he makes. does anyone remember the deep fried turkey episode?...where he rigged up this whole elaborate ladder pulley system to safely drop the turkey into the vat of hot oil? he just goes a bit overboard on his explanation and method of cooking things that really needn't be so involved. BUT, this episode on homemade protein bars caught my attention.

i'm always on the hunt for a tasty homemade protein snack and i've tried a quite a few...some (most) are...hmmm...let's just say...AWFUL. i think the worst so far was one i found in a bodybuilding forum comprised of raw oats, protein powder, peanut butter and egg whites. the end result was something like particle board.
i'm happy to report that this one is actually tasty. it's moist, satisfying, filling, sweet, a little crunchy, keeps well and is a handy, healthy snack for anytime of the day. i tried a few out on my friends and they too were amazed that this handy, sweet snack bar was actually good for you.

so...i've copied the recipe exactly for you below so you can check out the ingredients. the list is looooonnngg. i thought is sounded a bit involved, like everything he does, but i found the ingredients interesting...i never would have thought to add a whole block of tofu in for protein AND moisture.
you can find the original recipe HERE at Foodnetwork.com for a printable version

Alton Brown's Protein Bars 2005

Ingredients
4 ounces soy protein powder, approximately 1 cup..i used vanilla whey protein powder
2 1/4 ounces oat bran, approximately 1/2 cup
2 3/4 ounces whole-wheat flour, approximately 1/2 cup
3/4-ounce wheat germ, approximately 1/4 cup
1/2 teaspoon kosher salt
3 ounces raisins, approximately 1/2 cup
2 1/2 ounces dried cherries, approximately 1/2 cup
3 ounces dried blueberries, approximately 1/2 cup

2 1/2 ounces dried apricots, approximately 1/2 cup
1 (12.3-ounce) package soft silken tofu
1/2 cup unfiltered apple juice
4 ounces dark brown sugar, approximately 1/2 cup packed
2 large whole eggs, beaten
2/3 cup natural peanut butter
Canola oil, for pan

NOTE...i used used 1 1/2 cup total of dried blueberries, diced-dried apricots and approx 1/4 cup crystallized ginger, diced
AND 2 Tsp. flax seeds

Directions
Line the bottom of a 13 by 9-inch glass baking dish with parchment paper and lightly coat with canola oil. Set aside. Preheat the oven to 350 degrees F.

In a large mixing bowl, combine the protein powder, oat bran, wheat flour, wheat germ, and salt. Set aside.

Coarsely chop the raisins, dried cherries, blueberries and apricots and place in a small bowl and set aside.

In a third mixing bowl, whisk the tofu until smooth. Add the apple juice, brown sugar, eggs, and peanut butter, 1 at a time, and whisk to combine after each addition. Add this to the protein powder mixture and stir well to combine. Fold in the dried fruit. Spread evenly in the prepared baking dish and bake in the oven for 35 minutes or until the internal temperature reaches 205 degrees F. Remove from the oven and cool completely before cutting into squares. Cut into squares and store in an airtight container for up to a week.

Monday, 6 September 2010

0 Lemon Poppy Protein Cake

this little unassuming cake is not just your usual lemon poppy seed cake. not only is it light and moist and delicious..it's THE BEST "protein cake" recipe i have come across as of yet...and i must say i have tried quite a few...bars, puddings, cupcakes, cookies, cakes, etc...ALOT! most cakes using protein powders come out dry or mealy or just plain awful, but this one is surprisingly good. friends i tested it on asked for the recipe...doubt they'll ever make it themselves, but nice to know they wanted it again.
if you're looking for something a little more healthy to start your day, a nice afternoon pick-me-up snack or a great light after dinner treat this is definitely worth the try. i used a 9 x 13 dark pan with parchment and made 16 servings. the approx. nutritional count (per 1/16th serving) 85 calories...8g protein...7.5 g carb...and a couple grams o' good fat from the coconut oil.
LEMON POPPY SEED PROTEIN CAKE
adapted from askGeorgie.com ...original recipe found here

• Cooking oil spray
• 1 1/3 cups white whole wheat flour (or gluten free flour)
i subbed in 1/3 cup almond flour
• 2 scoops vanilla whey protein powder
• 1 cup Splenda granulated or 2/3 cup sugar
• 2 tablespoons poppy seeds
• 2 teaspoons baking powder
• ½ teaspoon baking soda
• ½ teaspoon salt
• 2 teaspoons lemon zest
• 1½ cups nonfat plain Greek yogurt
• ¾ cup unsweetened applesauce
• 1 tablespoon canola or macadamia nut oil...coconut oil
• 2 ½ teaspoons lemon extract
• 2 eggs...i used EGGBEATERS

1. Preheat oven to 325°F. Coat a 9×13″ pan thoroughly with cooking oil spray.
2. In a large mixing bowl, combine flour, whey, Splenda, poppy seeds, baking powder, baking soda, salt, and zest; stir to mix.
3. In a separate large mixing bowl, stir together yogurt, applesauce, oil, lemon extract, and egg. Add dry ingredients to wet ones, and stir just until uniformly moistened. Pour batter into pan.
4. Bake 25 minutes or until toothpick inserted in center comes out clean. Do not over bake. Cool 5 minutes before slicing. To keep moist, wrap each bar in plastic wrap and store in refrigerator or freezer. Microwave briefly to reheat.
this saves very well. i kept it in the fridge for a few days and it was great, although it's SUPER good and moist the day of....isn't everything?

Thursday, 8 July 2010

0 Scotch Eggs...Not Scottish at all...

SCOTCH EGGS...

not Scottish at all ??? then why are they call Scotch Eggs ?!!! they were actually invented by the famous London department store, FORTNUM & MASON in 1851 and they were originally wrapped in SCOTCH Beef...just a fun little foodie fact i found at Wikipedia.

i don't recall where i first saw these and got the bee in my bonnet, but i knew i had to try them. i'm all about a good full protein breakfast and quite often i have to eat it on the go. these are perfect...and so dang CUTE as well.

so easy to make. i chose the easiest route. basically you cover a hard boiled egg in your favorite sausage, dip that in some breadcrumbs and bake 'till the sausage is done. there are so many variations out there with more involved meat recipes, but why go there when there are so many wonderful fresh handmade sausages at your favorite markets. Bristol Farms has an incredible selection. their Chicken Apple Sausage with chunks of granny smith is so delicious as well as the Chicken Jezebel and Spicy Italian Turkey. my first batch was made with good ol'Jenny-O's Spicy Italian Turkey Sausage found at most major markets. so... fancy sausage or packaged store bought, these are easy, fun, portable, ADORABLE and kids will love them.


i chose to bake these. i'm not a fan of deep frying YET. i like to leave that to the professionals. deep frying scares me a bit and since i don't do alot of it (YET), the oil would be a one time use. seems like a waste. then there's the pain of getting rid of it, not spilling it, letting it cool enough to pour it back into the container you were hopefully smart enough to keep and finally throwing away some perfectly good frying oil. i must admit, i think i secretly would love to fry more things. i kind of wish i could have a mini fryer in the kitchen. shhhhhhh.

SCOTCH EGGS
loosely adapted from Recipezaar #69970...

Ingredients
1 lb chicken, turkey or pork Italian sausage
4-5 large eggs, hard boiled (not too large)
flour (just a little to coat the eggs)
1 large egg
2 cups fine dry breadcrumbs (i used Panko). you don't need to use the whole 2 cups!!
Directions
1. remove meat from casing. one large sausage should cover 1 egg (a little less than 1/4 lb). use your judgement. i made 5 scotch eggs from a 1lb package of Jenny O Turkey Sausage for the first batch.
2. roll the eggs in flour. (this helps the meat stick to the egg)
3. wrap each egg evenly in a portion of meat, being sure they are covered completely. roll it around in your hands a bit to ensure even sausage coating.
4. beat the remaining egg in a small bowl
5. dip each egg/sausage ball in the beaten egg then coat thoroughly in breadcrumbs.
6. optional...chill for one hour...or don't...i didn't.
7. bake until golden brown on a cookie sheet (line with tin foil for easy clean up) at 375°F; about 30 minutes. mine took about 35 minutes.
these keep really well in the fridge for a few days. just warm in the microwave. i like to slice in half and eat like an apple...on the go. of course, you could fancy these up for a fun brunch treat. they make for such a cute presentation with the surprise egg inside.

 
back to top //PART 2