Thursday 30 August 2012

0 Goat Cheese Pound Cake


yesss...another pound cake
but not your typical pound cake.
this one is heavy, smooth and dense...
with a 1/2 pound of goat cheese.

the recipe comes from Westfield Farms.  they know their goat cheese.  that's all they do.  they make award winning goat cheese.  check out their list of cheeses.  boy, would i like to get a hold of one of those Classic Blue Logs?!  maybe i'll have to visit their farm sometime...

in my opinion...this one might be on the brink of a perfection as far as texture goes.  mind you it's a bit heavy, but i side on heavy dense smooth tight crumb.
this is definitely dense.  all that creaminess from the goat cheese holds this together with a wonderful smooth texture.
if you're one of those that like a lighter more delicate cake...?   this is not for you.
i do, however, hope you give it a try.  friends and family were pleasantly surprised.  some were a little sceptical when i said "goat cheese" and "pound cake" in the same sentence, but presented as a little sandwich with some homemade jam for a tester ?...
they loved it...

the goat cheese is faint...just a whisper, but it's there...personally, i was hoping for more of a shout because i love goat cheese.  i love goat yogurt.  i love goat as in Moroccan Goat Stew...as a matter of fact i have some homemade goat cheese hanging in the fridge right now.  i wish i would have been able to use it for this cake...maybe next time.
maybe "next time" the  goat cheese will be from my own goat in the back yard...


so many ways to serve a pound cake, but this one is perfect with
fresh fig, a drizzle of honey and maybe a dollop of fresh whipped cream which i didn't have on hand...deeelish. 

i actually made this cake with a new jam in mind...sweet and savory fig shallot was my goal, but i just couldn't find enough good figs to save my life.  i'll try the farmer's market next weekend, but time is running short on fig season.


GOAT CHEESE POUND CAKE

8 oz. goat cheese
3/4 lb. butter
2 cups sugar
pinch of salt
1 1/2 tsp lemon zest
1/2 lemon juice, about 1 1/2 Tbsp.
2 tsp vanilla bean paste
6 eggs
3 cups flour

put the cheese, butter and eggs out to get to room temperature.
preheat oven to 325 F degrees.
butter and flour  your choice of cooking vessel
i used 2 medium loaf tins plus 3 silicone cupcakes.  the recipe calls for a 10 inch tube pan

cream the goat cheese and butter in a stand mixer.  add the sugar, salt, lemon juice, zest and vanilla.  beat until the mixture is very light.  add the eggs, one at a time and beat until the mixture is light and fluffy.   reduce the speed of the mixer to low and add flour, beat until just mixed.  spoon batter into a 10 inch tube pan...or i used 2 medium loaf pans.
bake for 1 1/4 hour...mine took 55-60 minutes in the loaf pans and 20-25 minutes in the silicon cupcake molds.  remove cake from oven and let sit for 5-10 minutes.  remove from pans and let cake cool completely.  as i like to suggest...let the cake rest for 1 day, but if you've got TWO...then dig into one while it's a bit warm...maybe you'll enjoy the whole thing, but you'll have a spare for another day.


made 2 medium loaf pans and 3 silicon cupcake molds...not shown

Thursday 23 August 2012

0 Garam Masala Nectarine Jam


HELP...farm fresh fruits are on their way out.

i've had so much fun canning this summer, i don't know what i'll do without all this beautiful fruit to chose from.  i know... here in So. Cal. we have all the fruits and veggies we could ever ask for all year 'round, but it's just not the same when you know it's been sitting in a warehouse getting ripe before it hits the store.

nectarines have always been one of my favorite.  when i found out they are full of pectin and perfect for for jams and jellies i knew this would be a good one.
AND you don't need to peel them as you do peaches...the pectin is in the skin.
TIP....don't pick the ripest fruit.  at least 1/2-3/4 of your fruit should be firm...maybe even a few nectarines could be considered "not ripe".  pectin fades when the fruit gets ripe.

Garam Masala is a fabulous warm blend of spices mostly used in Indian and Middle Eastern cooking.  it usually includes coriander, chili, cumin,  cinnamon, cloves, mustard, black pepper, nutmeg, cardamom.   as i've mentioned before Garam Masalas can vary in flavors.  you can find it at some specialty stores like Savory Spice Shop or markets such as Mother's Market, Whole Foods or i get mine at a great Middle Eastern market called Wholesome Choice.  the one i use is by Sadaf, called Garam Masala Seasoning.

i absolutely recommend trying this jam...
it's better than plain old peach and it will be a pleasant surprise in the pantry on a cold winters morning...i promise.


Garam Masala Nectarine Jam
adapted from Food.com by Kathy228

6 cups nectarine, diced WITH peels
3 cups sugar
4 Tbsp lemon juice
zest from 1 lemon.  i use a potato peeler, then cut the strips into very fine slivers
1 Tbsp (a little over) garam masala
1 tsp almond extract

wash and sterilize your jars.  i put mine in the oven at 210 for 20 minutes then turn the oven as low as it will go until ready to fill jars.  hot jam must go into warm jars.
put 1-2 small plates in the freezer for your plate test.
start your huge water bath stock pot so it will be ready when it's canning time.

put all ingredients in a large heavy stock pot and start on low.  when your sugar has dissolved and liquid has seeped from nectarines you can raise the heat to medium high.  get a good simmer going, actually a mild boil.  stir softly so as to keep an even heat all around and no hot spots on the bottom.   when temperature reaches about 215 F add your garam masala and extract.  stir that in, softly...and do a taste test.  i always have to say be very careful with the taste test...it IS scolding HOT...and add a little more flavor in if needed, but don't over power the nectarine.  at 220 F degrees do a plate test.......skim any obvious foam off at this point.   when  it has reached the wrinkle stage on your plate test remove from heat and ladle into sterilized jars.
process in water bath for 10 minutes.

if you are new to canning check out Food Safety Site.com


this jam was exceptionally good slathered over the Cardamom Vanilla Bean Pound Cake i posted about just a few days ago.  i haven't tried it with anything savory yet, but i bet it would be fabulous paired with a crispy skinned duck of some sort.  maybe a dipping sauce for some egg rolls?...hmmm


Friday 17 August 2012

0 Vanilla Bean Cardamom Buttermilk Pound Cake


buttery soft
fabulous texture
tight crumb
flawless appearance
fan favorite

POUND FOR POUND...THIS ONE'S A WINNER

except this one is a 1/2 pounder

8 oz butter...8 oz flour...8 oz sugar
almost 8 oz eggs
and a few other essentials.


like i've said before...i don't think there is a bad pound cake...butter, sugar, flour and eggs is all you really need for the classic pound cake.   this one is almost true to the old school measurements, but has a few extra ingredients.  the vanilla cardamom combo is subtle and delicious.  be careful with cardamom...it is very easy to over do it...it can get perfumie and overwhelm your baked goods. 

this is not the last of the pound cakes you'll see this month... 
i have a few up my sleeve and i'll just keep making them, one after the other.
the problem IS...no one in this house is as fond of "the pound cake" as i am.  
i think my fondness of pound cake is bordering on obsession. 

i consider the cake a blank canvas.  not only is it a good showcase for homemade jams.  it goes with anything and can be transformed into anything.  from a quick breakfast bread to a beautiful trifle...tucked in a school lunch or served at the big soiree.

i DO have a couple important suggestions for maximum enjoyment of your favorite pound cake...

of course a slice warm out of the oven is fabulous with the delicate inside and crunchy exterior, but i like to...
let the cake rest over night.
cut the cake chilled for nice clean sharp slices.
let come to room temperature.
or to really wake up the flavors...
lightly, i say lightly, butter and saute each piece as if you were making a grill cheese sandwich...

HEY !!! not a bad idea...

GRILLED CHEESE POUND CAKE SANDWICHES ???!!!

i know it's been done...no new idea is ever a NEW idea...but...
how about a sweet rosemary pound cake ...grilled with brie and granny smith apples or a nice crisp Bosc pear...YUMMM !
to be continued...


VANILLA BEAN - CARDAMOM 
BUTTERMILK POUND CAKE
slightly adapted from Jennie's Kitchen

8 oz butter, softened
8 oz, sugar
8 oz, flour
1.2 tsp salt
1/2 tsp cardamom
3 large eggs, room temp.- slightly beaten
1 whole vanilla bean, scraped
my vanilla bean was quite dry so i added 1/2 tsp vanilla paste
 1/3 cup buttermilk, room temp.

preheat oven to 325 F degrees.  butter a 9 inch loaf pan.
whisk flour, salt and cardamom in a medium bowl and set aside.
combine eggs, vanilla bean seeds and buttermilk, set aside.
in a stand mixer fitted with paddle attachment, beat butter and sugar until light and fluffy.
add half of the flour mixture and mix on low until just combined.
pour half the egg mixture and mix again until just combined.
repeat with remaining flour and then egg mixture.
do not over mix.

scrape batter into prepared pan and bake for 70 - 75 minutes or until deep golden brown and toothpick or metal skewer inserted comes out clean.

again...let your pound cake rest for a day.  i always chill my cakes for easy slicing.  serve at room temp...
then store the cake in the fridge.  leftovers?...when ready to serve...slice chilled out of the fridge, give it a light saute in a hot skillet with just a brush of butter.  the middle stays soft while you get a good light brown crisp on the outside.


i just noticed that the picture above looks as thought the heavens opened up and this fabulous cardamom cake appeared...maybe it did,  this cake is THAT good.


Wednesday 15 August 2012

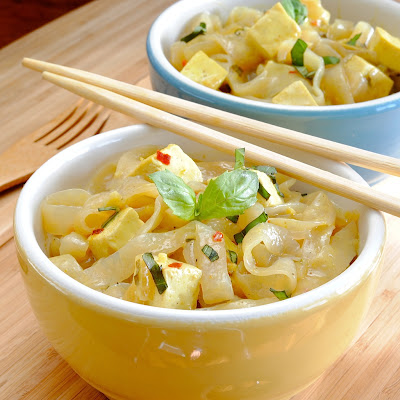
0 Thai Coconut Curry Sauce with Fresh Tofu and Konjac Noodles


healthy fresh tofu and clean Konjac noodles in a light flavorful Spicy Thai Coconut Curry Sauce.

a delicious alternative to a meat and pasta meal.
the sauce is easy and can be made ahead of time.  the tofu...fresh is best if you can find it.  the noodles. however,  are a bit different and unusual.  they are Konjac noodles made from yam flour.  this is a great dish for the non wheat people and those watching the ol' waistline.  a huge serving is under 200 calories and you'll still have room for dessert.  personally, i like it because i eat so many pork products and fatty weird stuff along with my addiction to the Mexican bakery... i have to throw in a healthy light dish every now and then.
the noodles are quite good, but like tofu...pretty flavorless on their own.  they need a good sauce.  i find this coconut curry does just the trick.


fresh tofu (photo above)...way better than packaged....still warm, soft and fragrant like a fresh loaf of bread.  even my mother, a non-tofu lover, said she really liked it....well, maybe that's a stretch.  it only costs about $1.99,  probably twice the size and tastes much better that regular packaged tofu.
i get mine at 99 Ranch Market in Irvine, CA.  if you've never been and you're in Orange County/So. California i highly recommend finding one.  great resource for all Asian goods.

Konjac noodles...aka YAM noodles
a little slippery, very long, no distinct flavor...but a great filler, no wheat, almost no calories, no carbs , fun to eat and a great vehicle for many different sauces.  Konjac noodles come in angel hair and fettuccine cuts as well as blocks and cute little knotted bundles.  check out the nutritional info below...amazingly low on everything.


THAI COCONUT CURRY SAUCE
makes about 1 1/2 to 1 3/4 cups sauce

1/2 medium onion, diced small
1 full Tbsp fresh ginger or, fine dice
1 large clove garlic, fine dice
2 tsp olive oil
1 tsp sesame oil
2 tsp madras curry powder (yellow kind)
1/2 tsp red pepper flakes (more can be added later)
3/4 - 1 cup chicken broth, if canned use low sodium
1 cup coconut milk...i use "lite" coconut milk
1 Tbsp soy sauce
juice from 1 wedge lemon
3" piece of lemon grass...
(smashed then tied together with a string so that it won't come apart and get stringy in the sauce.)
2 tsp lemon zest
4-5 large basil leaves...chiffonade (thin ribbons)
more red chile flakes to sprinkle.

in a medium sauce pan lightly saute onion, garlic and ginger in olive oil and sesame oil until translucent
add chili flakes and curry powder and saute until fragrant...2 minutes 
add tied lemongrass, chicken broth, coconut milk, soy sauce and lemon juice.
bring to a soft boil then to a simmer
simmer and stir a little for about 5 - 10 minutes.
taste for seasoning...a dash more soy?  pepper flakes?
simmer longer if you want it thicker.

if using these Konjac noodles...
noodles must be washed/rinsed well, drained then pat dry as much as possible.
tofu should be drained and slightly pressed to release some of the moisture...then it can be lightly sauteed first in separate pan or just simmered in the sauce.

this is a great sauce to toss with any noodles -YAM NOODLES (shown in photos), shirataki (tofu noodles), udon or even angel hair.
simmer some tofu, fish or chicken in sauce.  if using fish or chicken simmer until cooked through.  then mix with noodles.  i have never cooked the chicken in the sauce...i use already cooked roasted chicken from Costco.
OR just toss with steamed vegetables.
next time i think i'll simmer some talapia in the sauce...oh how i wish i had a sous vide.

NOTE...the sauce freezes well.  it just needs a good stir as it heats through. it will thicken and reduce with stronger flavors.  freeze just the sauce...not the noodles or tofu in the sauce....the noodles get funny after freezing.

Monday 13 August 2012

0 Raspberry Lemon Thyme Jam


best get on the move if making Raspberry Jam
these gems are going up up UP $$$

raspberries are one of my favorite fruits. i wish i could have them year 'round, but they get so darn expensive and i feel guilty buying them too often during winter,

BUT...now i have jam
beautiful bright red sparkling raspberry jam


this jam is pretty straight up bright raspberry with a zing of lemon and just a hint of something herbalicious.  the lemon thyme isn't all that noticeable, but it does give a note of something extra.  with my limited experience, i have found when using fresh herbs it's best to put in more than you think...i always wish i would have used a little more.  maybe adding some  dried in as well, might up the herb flavor a bit, but when fresh is available in the garden...i must use fresh.
be careful...there is a fine line when adding herbs and spices to jam.  it's too easy to over do it and ruin the fruity flavor so make sure you do your taste test.  i have found the canned jars that have been sitting for a few weeks taste different, maybe better than the ones that were just refrigerated.
i guess it will take a little more than one season of experience.
i haven't opened a jar of this for a few weeks so...
 maybe the thyme has had time to infuse a little more?...we'll see.

now...get jammin'


RASPBERRY LEMON THYME JAM

2 1/2 pounds fresh raspberries
3 3/4 cups sugar
3 Tbsp lemon thyme...maybe a little more if using lemon thyme? regular thyme might be more potent
1 vanilla bean, scraped
zest from 1 lemon, peeled with a potato peeler and cut into very thin slivers
juice from 1 lemon

sterilize jars and lids.
place a couple of small plates in the freezer for plate testing.
start your huge pot for the water bath canning process.
wash raspberries gently and let drain as much as possible.  i line a cookie sheet with paper towels and put berries in a single layer to dry a little.
peel lemon with a potato peeler in long strips and then cut them in to very fine slivers.   you can use a microplane, but i like to see and taste a snappy zing of lemon.  place everything in a large, high sided stainless steel heavy bottom pot...might foam up so high sides prevent overflow.
start on low until sugars dissolve and mixture becomes more liquid.  turn to medium boil and stir gently until 220 degrees...might be 15-20-25 minutes.  do not walk away.  stir gently every now and then.  DO A PLATE TEST.  skim off any foam that you can, don't get to obsessed with this.  if your plate test is good...ladle into sterilized jars remove any air pockets and process in a water bath for 10 minutes.

as i've said before...i am no canning expert, this is my first year.  i have produced quite a few delicious jams and preserves, but i have not tested their shelf life over a few months.  i hope to have loads to give as X-Mas gifts...we'll see...so far so good.
please refer to websites with all the "how-to's".
here's a great place to start...Canning 101, the basics by Simple Bites


above is an example of the lemon slivers i suggested in the recipe

Saturday 11 August 2012

0 Guinness Extra Stout Caramel Sauce


are you a caramel freak ?...

grab your keys
go buy the Guinness
make this caramel sauce !!!


sometimes the best things happen on the way to the destination...

my goal, or destination, was sweet red cherry preserves swimming in malty Guinness syrup.

i ended up with this incredible extra stout vanilla maple caramel sauce

i looked around for Guinness reductions and found quite a few. most were for "dipping" sauces or for savory applications like beef, steak, lamb, pork, ribs etc... they didn't quite sound like what i was looking for...i didn't quite know what i was looking for !  one found HERE at Key Ingredient.com is meant for dipping Irish Soda Bread...a simple reduction of equal amounts of Guinness and sugar...YUMMMM!   and another found HERE has balsamic and honey...sounds tasty...might try that one, but i'm a little tired of balsamic at the moment.

so...with that in mind i poured the whole bottle of Guinness Extra Stout in the pot with some brown and white sugar.  fascinated by the foaming and bubbling, i stirred and stirred, tasted and re-tasted...Vanilla!...needs vanilla to mellow out the bitter taste.  still bitter...hmmmmm....Maple syrup?...that did it.

friends and guinea pigs were so mesmerized by this glistening amber pot of gold that ideas started to fly.  strawberries?...pretzels?...brownies?...milk shakes?...BBQ ribs?...ice cream sundae?...caramel cappuccino?...frappuccino?...chocolate?...BACON ?

A BIG SPOON ?... 

enough said...make the sauce !


GUINNESS EXTRA STOUT VANILLA CARAMEL SAUCE
i will preface this with...
i have only made this once and it was incredible.  i pretty much made it up as i was going...or at least i haven't seen any recipes like it for you to refer to.  so bear with me on the instructions.
basically you are just reducing the ingredients down to a caramel consistency.

1 large bottle (1 pint 6 oz.) Guinness Extra Stout
1/4 cup brown sugar
3/4 cup granulated sugar
3 Tbsp maple syrup (might want more, but don't hide the Guinness flavor)
2 tsp vanilla bean paste, or 1 scraped vanilla bean.  i used  paste


start with a large heavy bottom pot...large because this will bubble up quite a bit...a lot.
add Guinness, sugars and maple syrup.  start on low until sugar dissolves.  bring it up to medium and reduce, reduce, reduce.  stir, stir, stir...this will help prevent burning and keep the foaming up to a minimum.  i suggest you keep a watchful eye.  when it starts to thicken, add the vanilla paste.  do a taste test.  at first mine was a little too bitter so i added the maple syrup...check yours to see if you might need more than i have suggested.  keep cooking and stirring until it gets to a caramel texture.  be careful not to let it burn.  when it coats your spoon, it should be done.  let cool to room temp.

NOTES...i never refrigerated my jar...i carried this around and gave spoonfuls away the next day.
I DID make the Caramelized Sweet Cherries that i will try to post about soon.
my point is...this could get really hard if refrigerated.
AND...what is left in the jar has turned a little more syrupy, darker, with crystallization on the sides.  still delicious and great for a "dipping sauce".
SO... i do not know the shelf life or stability of this, but IT'S DELICIOUS !


Thursday 9 August 2012

0 Spicy Sweet Savory Pickled Cherries


PICKLED CHERRIES YOU ASK...???

WELL...PUCKER UP !!!
THESE BABIES PACK AN AMAZINGLY POWERFUL FLAVOR PUNCH.

THEY ARE ADDICTING.


i don't know how i got this idea that i HAD to make pickled cherries. i just wanted a way to enjoy all these beautiful cherries all year long.  i googled around and found a few recipes, but the vinegar thing was throwing my off.  i knew if i tweaked the recipes a bit i would have to give it a try.  i had no idea how these would turn out, but it was an unbelievable surprise when i opened the first jar...

upon first bite i was a little wary...WHAM! the vinegar wakes up your taste buds...then the spice slaps you upside...the rosemary kicks in and you're left with this amazing flavor sensation that leaves you wanting more.  one of those flavor sensations that makes you wonder...
"why haven't i tried anything like this before?"...

BECAUSE PICKLED CHERRIES SOUND WEIRD.
they ARE weird......weird in the best way.

i've only served them with cheese and crackers. creamy savory cheese calms the sweet heat and pairs well with the tart tangy vinegar.  maybe prosciutto, salami, or pate de campagne?...
any charcuterie platter would be proud to have these as an addition.
there are so many other possibilities. one friend put them in a salad and another chopped them and put them in black rice with a nice glazed salmon.
so far i find myself eating them right outta the jar.

these are a must try.  canning isn't necessary.
like i said, i was hoping to have cherries for the winter, but these aren't gonna last until then.
follow recipe, let them cool, then refrigerate and wait for a few days before opening...if you can wait that long.


SPICY SWEET SAVORY PICKLED CHERRIES
many thanks to Tom at Tall Clover Farm
for his "how-to"s and a great starting point.
this recipe made 4 pint jars and 3 half-pint jars with a few left over.

3 pounds of firm sweet cherries...i used 1 lb. Rainer and 2 lbs. Bing
for the brine...
2 cups white wine vinegar
2 cups white vinegar
1 cup water
1 1/2 cups white sugar
1 cup brown sugar
2 tsp peppercorns
2 tsp red pepper flakes...1 tsp will be okay for the normal heat seekers.
1 tsp chipotle powder
1/2 tsp ground cumin
3-4 whole cloves
3 sprigs fresh rosemary
5 smashed cardamom pods
1/2 vanilla pod split open
extra stuff for the jars...
NOTE...you can stuff them with these extra goodies if you want.  you need to make sure these things have been boiled for a short time in the strained brine if you are canning...C-note at bottom
6 - 8 chili arbol...or long thin dried chili
6 nice rosemary sprigs
3 vanilla pods, split and halved to make 6 pieces
a few cardamom pods if you want.

wash cherries..you can choose to leave stems (trimmed to 1/2 inch) and pits in or remove stems and pits...i tried both and found the pitted were obviously easier to eat, and they also filled the jars a little better.  the non-pitted ones, however are cuter in the jar and a little more attractive and rustic for a nice charcuterie platter.
in a heavy bottom sauce pan add all brine ingredients.  heat on a low simmer for 5-10 minutes.  things should be getting very fragrant.  turn off heat and let steep for 30 minutes.
meanwhile, fill STERILIZED JARS with cherries.  fit as many as you can without squishing them too much.  leave 1 inch head space.  also put a few extra items like rosemary, chili arbol, vanilla pod, in down the side of the jar....NOTE...i am not sure about food safety on these additions if they have not been boiled...so you could just evenly distribute the ones that steeped in the syrup.
strain syrup with cheesecloth.  save the rosemary sprigs, cardamom pods and vanilla for the jars.
bring the temperature back up to hot.
pour syrup into jars over cherries leaving 1/2 inch head space.
NOTE...be careful.  DO NOT pour hot liquid into cold jars.
screw on sterilized lid.
process in hot water bath for 10 minutes.
OR...screw on lids, let come to room temperature and refrigerate.

try to wait 2-3 days before trying. they pack quite a spicy wallop, but seem to mellow out a little on the heat factor after a week or so.


NOTE AT THE BOTTOM...i am not a canning expert.  please take care in canning properly for food safety.  here is a good place to start if you are new to canning or a little unsure.


back to top //PART 2