Saturday 25 November 2006

0 Almond Madeleines

almond madeleine 2

My apologies for such a short post today, but I'm dashing off to another Thanksgiving dinner tonight. As I've mentioned before, I like simple base recipes where I can easily change the flavorings. I used my meyer lemon madeleine recipe as a starting point and turned it into an almond madeleine. I replaced some of the flour with almond meal, omitted the lemon zest and added a bit of almond extract. I promise I'll have a proper post next time!

Almond Madeleines
(makes 12)

2 large eggs
1⁄3 cup superfine or baker's sugar
1⁄4 tsp salt
1⁄2 tsp vanilla extract
1/4 tsp almond extract
1⁄3 cup all-purpose flour, sifted twice after measuring
3 tbsp almond meal (or finely ground almonds)
4 tbsp (1⁄2 stick) unsalted butter, melted & cooled

Preheat oven to 375°F. Generously butter and flour 12 molds in a madeleine pan.

In the bowl of a standing mixer, combine eggs, sugar and salt. Beat on medium speed until pale, thick and fluffy, about 4-5 minutes. Mix in vanilla and almond extracts.

On low speed, mix in the sifted flour and almond meal until just incorporated. Using a rubber spatula, gently fold in the melted butter until blended.

Fill each mold almost completely full. Bake the madeleines until the tops spring back when lightly touched, 10 to 12 minutes.

Cool in pan for 2 minutes. Remove madeleines from pan and allow them cool completely on cooling rack.

Sunday 19 November 2006

0 Chocolate Hazelnut Tartlets

PH Choc Hazelnut Tart 1


I first heard of the legendary Pierre Hermé when he made an appearance on Martha Stewart's television show back in the late 90s. At the time, I had no idea that he was the "Picasso of Pastry". I can't remember what dessert he made with Martha, but I do remember downloading the recipe and trying to make it myself. (After some internet searching today, I'm pretty sure the dessert was a carioca.)

So with youthful enthusiasm, I was determined to make the carioca for a party. Of course I was a spectacular failure. I tried to make hot sugar syrup (caramel) in a cheap Revere pan for the chocolate mousse portion of the dessert. Needless to say, the sugar burned very quickly in the thin-bottomed pan and just seized up. Boy, was it a big pain to clean the pot after that!

I salvaged what I could so it wasn't a complete loss. I still used the genoise I made earlier and then whipped up a simpler chocolate mousse (sans caramel) with my chocolate and heavy cream. I layered coffee soaked genoise rounds with my simplified mousse and topped it all off with chocolate shavings. My friends were very impressed with the dessert and had no idea about my failed attempt.

I've come a long way since then. My pastry and baking skills have improved over time and I have a gorgeous and very functional set of All Clad pots and pans. Heavy-bottomed pans are pretty important when making caramel.

For a long time I assumed that all of PH's recipes were too complicated and difficult to recreate at home. But I now realize that the carioca I decided to make was fairly advanced. Definitely not something for a novice baker (which I was at the time and probably still am). So when I finally purchased Dorie Greenspan's English translation of Chocolate Desserts by Pierre Hermé last month, I thought I would start with something simple like the chocolate hazelnut tart.

The recipe for the sweet tart dough makes enough for four 9-inch tarts. According to PH, making a smaller quantity would increase the chance of overworking the dough. The dough came together quickly and easily in my stand mixer. It takes almost the same amount of time to make enough dough for four tarts versus just one tart, so why not make more? It's always nice to have extra tart dough ready and waiting in the freezer.

I did make some minor changes. For the tart dough, I used ground unblanched almonds instead of the blanched ones called for in the recipe. I think the crust would've been a bit more refined with the blanched almonds, but I was too lazy to blanch my almonds. Instead of making one 9-inch tart in a straight sided tart ring, I made four 3-inch fluted tartlets. For the filling, I used half a cup instead of one cup of hazelnuts. One cup seemed like too much for four tartlets. However, the recipes I posted below are per PH's book.

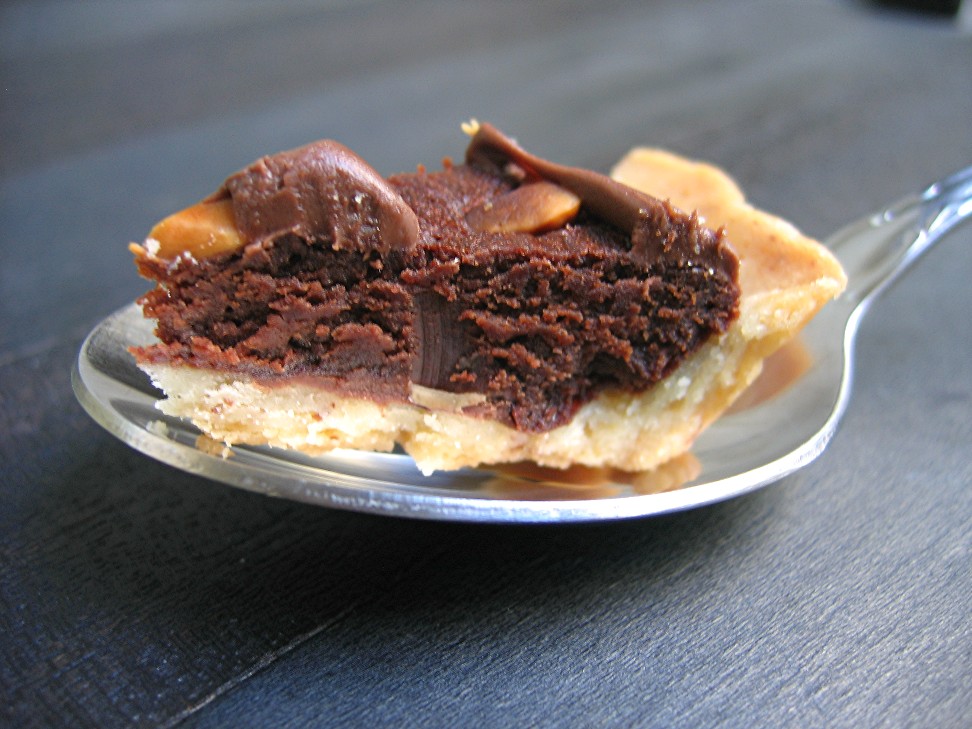
Although my tartlets didn't really turn out like the photograph in the book, it was still quite delicious. My husband thought it tasted like an elegant, grown up version of Ferro Rocher candy. I'm looking forward to trying other PH recipes now. Maybe I'll even try making that carioca again.


Chocolate Hazelnut Tart

1 fully baked 9-inch tart crust (see recipe below)

2/3 cup chocolate hazelnut spread (Nutella)
4 3/4 ounces (140 g) bittersweet chocolate, finely chopped (PH uses Valrhona 56%)
3 1/2 ounces (200g) unsalted butter
1 large egg, stirred with a fork
3 large egg yolks, stirred with a fork
2 tbsp granulated sugar
1 cup hazelnuts, toasted, skinned and cut into large pieces

Preheat oven to 375F.

Spread chocolate hazelnut spread over the bottom of the cooled crust.

Melt chocolate and butter in separate bowls either using a double boiler or the microwave oven. Allow both to cool until just warm to the touch.

Gently stir the egg into chocolate. Try not to beat air into the mixture. Then, a little at a time, gently stir in the egg yolks and then the sugar. Stir in the melted butter.

Pour chocolate-butter mixture over the chocolate hazelnut spread in the tart crust. Scatter the hazelnuts over the top.

Bake until the filling loses its shine and the center is still a bit jiggly, about 11 minutes. Cool for 30 minutes before serving.

Sweet Tart Dough
(makes enough dough for four 9-inch tarts)

10 ounces (285 g) unsalted butter, softened at room temp.
1 1/2 cups (150g) confectioners' sugar, sifted
1/2 cup (100 g) finely ground blanched almonds
1/2 tsp salt
1/2 tsp vanilla extract
2 large eggs, at room temp.
3 1/2 cups (490g) all purpose flour

In the bowl of a stand mixer, beat butter on low speed until creamy. Mix in sugar, ground almonds, salt, vanilla and eggs. On low speed, add flour in 3 or 4 additions and mix only until the dough comes together (a few seconds).

Gather dough into a ball and divide dough into 4 pieces. Flatten each piece into a disk and wrap in plastic. Each piece is enough for a 9-inch tart. Allow the dough to rest in the refrigerator for at least 4 hours and up to 2 days before rolling. You can freeze the dough for up to 1 month. Thaw the frozen dough for about 1 hour at room temperature before rolling.

On a lightly floured work surface, roll the dough to about 1/16 to 1/8 inch thick. Carefully transfer the dough to your pan, gently easing it into the bottom and sides and pressing it into place. If the dough tears, patch it with extra scraps of dough.

Chill in the refrigerator for 30 minutes.

Preheat oven to 350F. Line the chilled crust with a piece of parchment or buttered foil and fill with pie weights, dried beans or rice.

Bake crust until lightly colored, about 18 to 20 minutes. To fully bake the crust, remove the parchment and pie weights, and continue to bake until golden, another 3 to 5 minutes.

Allow crust to cool completely before filling.

Sunday 12 November 2006

0 Vanilla Cupcakes

vanillacupcake nutellafrosting2


A little announcement...

We're doing some home improvement so I won't be baking (or posting) for the next week. In the meantime, I'll leave you with my miniature vanilla cupcakes with Nutella frosting.

~.~

Every baker needs versatile recipes that can be adapted and used in a pinch. When it comes to cupcakes, I like using the same base cupcake recipe from the triple ginger cupcakes I posted last month. I simply omitted the ginger, spices and lemon and increased my vanilla extract. I frosted these with an American style vanilla buttercream with a tiny bit of Nutella mixed in. (I apologize for not posting a recipe for the frosting, but I don't have the exact amounts I used. I sort of threw it together until I liked the flavor and consistency.)

Vanilla Cupcakes

4 ounces (1 cup + 3 tbsp) sifted cake flour
1/4 tsp salt
1/4 tsp baking soda
1/8 tsp baking powder
6 tbsp (3 ounces) unsalted butter, softened at room temp.
2/3 cup granulated sugar
1 1/2 tsp vanilla extract
1 large egg
1/2 cup sour cream

Preheat oven to 350F. Line 30 wells of a miniature cupcake pan with paper cupcake liners.

Sift together cake flour, salt, baking soda and baking powder. Set aside dry ingredients.

In the bowl of a stand mixer, cream the butter and sugar until light and fluffy, about 2 minutes. Add vanilla extract and beat for 1 minute. Scrape down the sides of the bowl. Add the egg and beat until smooth, about 1 minute.

Using a rubber spatula, fold in one-third of the flour mixture. Fold in half of the sour cream. Repeat ending with the last third of the flour mixture.

Fill the prepared wells of the mini muffin pan approximately three-quarters full. Bake until light golden brown and cupcake springs back when lightly pressed, about 16-20 minutes. Cool in pan for 5 minutes then transfer to cooling rack. Allow cupcakes to cool completely before topping with your favorite frosting.

Tuesday 7 November 2006

0 Espresso Cookies

espresso cookie bk


I love coffee and I love espresso. I guess you can say I am an addict. Although on most days, I’ll only drink about 8 ounces of coffee. But on those especially trying mornings, I will forgo the coffee and have a latte with 2 shots of espresso (flat with soy milk, please). And I’ve been having a lot of those mornings lately. But it’s nothing that a little-bit-o-latte-love can’t cure! (And, yes, I know this is some form of self-medication.) Needless to say, putting espresso into a cookie is a very exciting proposition. (And no, I’m not excited because of all the caffeine. Well, maybe just a little.)

This espresso cookie is my idea of cookie perfection. I love the sandy texture and the pure flavor of the espresso. It might be somewhat strong for the coffee shy and not sweet enough for those with a super sweet tooth, but those are major pluses in my opinion.

There’s nothing flashy about this espresso cookie. There are no bells and whistles. But that’s the point. It’s straightforward and sophisticated, like that perfect little black dress in your closet. Black can be a bit harsh sometimes, but there’s no denying that the dress is elegant and classic. Just like this cookie.

espresso cookie

Espresso Cookies
(adapted from Fine Cooking)
makes 28 cookies


4 ounces (1 stick) unsalted butter, softened at room temp.
1/3 cup lightly packed light brown sugar
1 tsp espresso powder dissolved in 2 tsp water
1 tsp finely ground espresso beans
1 1/4 cups all purpose flour
pinch of salt

Cream the butter and sugar until well blended. Mix in the dissolved espresso powder. Add the ground espresso beans, flour and salt and mix until dough comes together.

Turn the dough out onto a sheet of plastic wrap. Use the plastic to help form the dough into a log about 7-inches long. Wrap in plastic and refrigerate at least 6 hours and up to 3 days.

Preheat oven to 350F. Cut the chilled dough into 1/4-inch slices and arrange on parchment lined sheet pans. Bake until the tops look dry and edges just start to brown, about 12 minutes.

~*~
PS: This would be a nice addition to a holiday cookie swap.
~*~

Monday 6 November 2006

0 Cherry Walnut Streusel Coffee Cake

cherry walnut streusel cc2


Despite the name, a coffee cake typically contains no coffee. They are sweet cakes often served with coffee or tea and eaten for breakfast or brunch. Some are yeasted and some are not. Since I am still a yeast virgin, this is of the latter persuasion.

This coffee cake is perfect any time of year since it’s made with dried fruit and nuts. I used dried cherries and walnuts but feel free to experiment. Dried cranberries with pecans or maybe dried pineapple with macadamia nuts would be nice combinations too.

My favorite part of this coffee cake is the streusel topping. From the German for "something strewn together", this streusel is most definitely thrown together and very easily too I might add. Brown sugar and nuts bound by flour and butter form a cookie like topping for the coffee cake. And since I used a muffin pan to make miniature coffee cakes, each one has it's very own cookie top with lots of crispy edges.

cherry walnut streusel cc3

Miniature Cherry Walnut Streusel Coffee Cakes

Streusel topping
1/2 cup all purpose flour
1/2 cup packed light brown sugar
1/2 cup coarsely chopped walnuts
2 1/2 ounces (5 tbsp) unsalted butter, cold and cut into small pieces

Batter
2 1/2 cups all purpose flour
1 1/2 tsp baking powder
1/2 tsp baking soda
1/2 tsp salt
4 ounces (1 stick) unsalted butter, melted
1 1/2 cups granulated sugar
2 large eggs
1 cup yogurt*
1/2 tsp vanilla extract
1 1/2 cups dried cherries
1 cup coarsely chopped walnuts

Preheat oven to 350F. Line with paper liners or butter and flour 24 (4-ounce capacity) wells of a muffin pan.

To make streusel topping

Mix flour, sugar, and walnuts in a bowl. Add the butter and, using a pastry blender or your fingers, cut or rub in the butter until coarse crumbs form. Place streusel in freezer while making the batter.

To make batter

Sift together flour, baking powder, baking soda, and salt. Set aside.

In a large bowl, whisk butter, sugar, eggs, yogurt, and vanilla until smooth. Add flour mixture and mix until just incorporated. Gently fold in cherries and walnuts.

Divide batter evenly among the 24 wells. Sprinkle each generously with the streusel topping.

Bake until tops are golden brown, about 20 minutes. Cool in pan for 5 minutes then transfer to cooling rack.

*I used Greek style honey yogurt but plain yogurt is fine too. Also, you can use sour cream instead of yogurt.

cherry walnut streusel cc1

Thursday 2 November 2006

0 Luscious Lemon Bars

meyerlemonbar1


I'm ashamed to admit it but I am a lemon bar snob. I'm not proud of it. Well, maybe the word snob is a bit harsh. Let's just say that I have very strong preferences when it comes to lemon bars.

I prefer a delicate, buttery crust with a slight "snap" to it. And the crust should never be more than half the overall height of the lemon bar. I don't want to chew endlessly on an overly thick and, inevitably, tough crust. Or even worse, mash my way through the gummy mess of an underdone crust.

I prefer a dominant lemon flavor untainted by the milkiness of cream, evaporated or condensed milk. It should be just tart enough to make my mouth pucker a teeny bit. Don't get me wrong. A creamy lemon confection has its place in my dessert kingdom, but not in the form of lemon bars. Sorry, milk, but tart is king.

I prefer my lemon filling to be smooth and soft, but not runny. When the filling hits my tongue it should be luscious. Overcooking the filling will turn the lemon bar into a sponge. No one wants to eat a lemon flavored sponge, least of all me.

I prefer my lemon bars dusted with confectioners' sugar. But not so heavily dusted that exhaling will shower the table (or your neighbor) with sugar.

And finally, I prefer to eat my lemon bars with a fork. That's not snobbish, is it?

meyerlemonbar2

Lemon Bars
(makes one 8-inch square pan)

Crust:
1 cup all purpose flour
1/2 cup confectioners' sugar
1/8 tsp salt
4 ounces (1 stick) unsalted butter, cold and cut into 1/2 inch pieces

Filling:
2 large eggs
1 cup superfine or bakers' sugar
2 tbsp all purpose flour
1/8 tsp salt
2 tsp finely grated lemon zest*
1/4 cup freshly squeezed lemon juice*

Preheat oven to 350F. Butter and line an 8-inch square pan with parchment paper.

To make crust:
Combine flour, confectioners' sugar and salt in the bowl of a food processor. Add butter and pulse until the mixture is pebbly. Press evenly into the bottom of your prepared pan. Bake until lightly golden, about 18-20 minutes. Set aside crust.

To make filling:
In a medium bowl, whisk together eggs, sugar, flour and salt. Whisk in lemon zest and juice until well combined. Pour over crust (it's okay if crust is still hot). Bake until filling is just set, about 15 to 18 minutes. Cool completely before serving. Dust with confectioners' sugar if desired.

* Note: I use meyer lemons (because we have a tree in our garden). Meyer lemons are less tart than the Eureka lemons found in the supermarket.
 
back to top //PART 2