Friday 28 January 2011

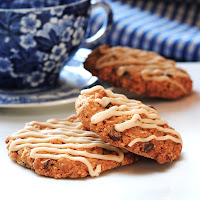
0 Another Great Oatmeal Cookie made with BACON FAT

i know...you might be over all this bacon fat overload, BUT this is definitely another WINNER.  people raved about it...begged for another.  these are quite different than the other cookie i posted about called the Depression Era Oatmeal Cookie.  that one is crunchy and hearty, while this one is the perfect balance of crunchy outside and chewy inside...great for sandwiching with some yummy maple frosting
i found this incredible recipe while searching for uses for all the bacon fat i have accumulated.  it's at Serious Eats, posted by Amanda Clark.  please check out the original post HERE.  she talks about how she came up with the idea for this unbelievable cookie creation.  she played around with it alot and came up with the perfect ingredient combo for the bacon flavors to really shine while keeping the crunchy outside-chewy inside texture of the classic lunch-box cookie.  my hat's off to Amanda for this one, for sure!

OATMEAL CHOCOLATE CHIP COOKIES made with BACON FAT !!!
i adapted the recipe slightly, but the original is found at

1 cup, plus 2 Tbsp bacon fat room temp.
1 1/2 cups sugar
2 large eggs
1 tsp vanilla extract...i added 1/2 tsp maple extract with 1/2 tsp vanilla
4 1/2 tsp molasses
4 1/2 tsp honey
 1 1/2 cups AP flour...i used white whole wheat flour
1 tsp baking soda
1/2 tsp salt 
1/2 tsp cinnamon
dash powdered ginger
and a few grates of fresh nutmeg
3 cups oats...i use old fashion oats
1 1/2 cups bacon...approx 1 regular package
1 cup raisins, choc. chips or nuts...i use mini choc. chips.   2nd batch was toasted pecans
preheat oven to 325 F.  
mix fat and sugar until creamy and light...(this will not get quite as creamy as butter)
NOTE...as i stated in my other bacon fat cookie post, i like to refrigerate the fat after cooking the bacon so that it solidifies...then let it sit out for a bit before creaming with sugar.
add eggs one at a time, beating after each.  add vanilla, molasses and honey and beat to incorporate.
in a separate bowl combine all dry ingredients...flour, salt, baking soda, cinnamon, ginger and nutmeg.  add dry mixture to wet mixture slowly until just Incorporated.
now...add the oats, bacon chunks and what ever extra goodie you choose and mix until just distributed evenly...don't over mix.
drop the dough by heaping Tablespoons onto parchment lined cookie sheet, leaving 1 1/2 - 2 inches for cookies to spread.  bake for 10 - 12 minutes, rotating tray if necessary.


Wednesday 26 January 2011

0 Lemon Mousse Cake

lemon_mousse_1


This month's Daring Bakers' challenge was hosted by Astheroshe of the blog accro. She challenged us to make a biscuit joconde imprime to wrap around an entremets dessert. A joconde imprime is a decorative design baked into a light sponge cake providing an elegant finish to desserts/torts/entremets/ formed in ring molds. Entremets is an ornate dessert with different layers of cake and pastry creams in a mold. The joconde imprime is the outside cake wrapper of the entremets dessert.

lemon_mousse_4


The only requirement this month was to learn the technique of the joconde imprime. We could make any size or shape entremets and we were allowed to fill our entremets with anything we liked. When the challenge was revealed to us in the DB private forum, I was quite excited to try my hand at something so beautiful. Those fancy decorated cake-wrapped desserts in patisseries have always fascinated me. I just assumed that it was difficult and best left to the professionals.

At first glance making an entremets seems intimidating. And I won't lie. There are many steps. But each step was not difficult at all.

The cake wrapper is made of two different cake batters - the decor paste and a sponge. The decor paste is spread thinly (or piped out) onto a silicone lined sheet pan and a design is made in the paste. I made diagonal stripes using a cocoa decor paste. The lines are a little crooked and unevenly spaced since I was doing it free hand.

joconde_paste


To make sure the design isn't disturbed, the designed paste is placed in the freezer to harden a bit before pouring the sponge cake batter over it. Gently spread out the sponge cake batter evenly without disturbing the decor paste design.

joconde_batter


After it has baked and cooled slightly, turn it out of the pan. Let it cool with the decorated side up. My cake is sitting on a powdered sugar dusted sheet of parchment paper on a wire rack. The powdered sugar helps prevent the undecorated side of the cake from sticking to the parchment and the parchment keeps it from sticking to the wire rack.

joconde_sponge


Determine how much cake you will need to create the wrapper. (The formula for the circumference of a circle comes in handy.) I cut some strips of parchment paper as a template and fit them inside my 8-inch diameter ring mold to make sure it was correct. Then I used those strips of parchment as a template for cutting out two strips of decorated cake.

joconde_strips


Fit the decorated cake strips around the inside of the ring mold (decorated side out). Make sure the strips and the bottom cake round fit snugly in the mold. I used an 8-inch cake pan with a removable bottom as my mold. Now it's ready to be filled.

joconde_pan


I made a lemon mousse to fill my entremets. The mousse was a combination of homemade lemon curd (a great way to use up some of the egg yolks leftover from making the joconde) and whipped heavy cream. And it was all fortified with a bit of gelatin. The cake strips and rounds were soaked with a tart and sweet lemon syrup. Then I topped it all off with a thin layer of gelatinized lemon curd.

lemon_mousse_2


As you can see from the photo below, for the middle cake round I just pieced together an 8-inch diameter round from whatever cake I had leftover after cutting out strips of the decorated joconde. I didn't want to waste or make more cake than I needed.

lemon_mousse_3


I think I did a decent job for my first try at a joconde imprime and entremets. The finished cake was so pretty. The joconde sponge cake was delicious, moist and very easy to work with. The mousse was light and lemony. And the lemon curd topping really gave the dessert a big lemon zing.

This was a great challenge. I would have never tried this on my own. Now that I know how simple it is to do I plan on making entremets of all flavors. Thanks to the host Astheroshe and all the Daring Bakers!

Blog-checking lines: The January 2011 Daring Bakers’ challenge was hosted by Astheroshe of the blog accro. She chose to challenge everyone to make a Biscuit Joconde Imprime to wrap around an Entremets dessert.

Continue reading...

Tuesday 25 January 2011

0 HEAD TO TOE POZOLE ROJO


mmmmm...POZOLE

this is a rich porky-meaty stew that is hearty, savory, and playful.  i say "playful" because you're eatin' along enjoying every bite, but you don't really know what bite of the pig you are enjoying....could it be an EAR?...a SNOUT?...a CHEEK? ...the BUTT?....or is it that TROTTER that really sends it over the top?....what ever part it might be i guarantee you'll love every bite...slurp and spoonful.


as far as i can tell, authentic POZOLE is made from a whole pig's head.  it's boiled and stewed for hours, then picked apart and every edible morsel is thrown back into the broth along with a few spices, onions, chilies and hominy.  although there was a whole pig's head available at my favorite Mexican market (Northgate in Santa Ana) i had to pass.  instead i went for the Pozole blend...small ready cut parts of a pig's head...it's a blend of cuts that seemed to be calling for my attempt at Authentic Pozole. don't know what seems scarier...the whole head?... or the grab bag i went for.  i recognized the ear and the snout and i think some tongue, but the other bits i'm not so sure...i went for it anyway.  to go along with that i bought some shoulder butt and scouted out the freshest trotters i could find.  i also had a terrine in mind for trotters so i needed a few.  the terrine came out FABULOUS!...i'll post about it soon.


straight up?...don't be afraid of this soup because of it's weird bits and pieces.  you can easily substitute with good pork shoulder-butt or any cut that works well for a stew.

a while back i made a CHICKEN POZOLE VERDE.  although it turned out fabulous and so very delicious, i was ever so gently informed that it was not "real Pozole".  a few of my Latino friends kind of giggled and looked at me funny when i said i had made Pozole.   the Pozole they had grown up knowing was deep red with the whole head simmering all day.  mine was made with Chicken and it was green???...well, i had to right my wrong and go for the real thing...or as close as i could possibly get here in Newport Beach.


my version of POZOLE ROJO

1 lb. of Pozole mix of meats from a Mexican market or Carniceria aka Mexican Meat Market
(this includes all the bits and pieces from the head of a pig)
OR...if you're daring you can just go ahead and purchase 2 ears, a snout and some tongue.
1 lb. pork shoulder/butt nice and fatty cut into large cubes the same size as your Pozole mix.
what ever you buy 2 lbs should be about enough
 AND 1-2 trotters (pig feet)...they usually come split in half

NOTE...when buying pig parts you need to do 2 important things.
1st....go over every inch and make sure there are no short little hairs that were missed by the butcher.  you can sear these off with a lighter or shave them with a razor...i know it's weird, but it's gotta be done.
2nd...put all the parts in a big pot and bring to a boil.  boil for about 10-15 mins to remove any impurities that might be there.  drain pot, discard water, clean the pot and wash off the pig parts.  this is just for food safety...we're talking ears, snouts and feet here, understand?

now, everybody back in the pool.

in a large pot put all the meats, 1 large onion (quartered), 4-5 smashed garlic cloves, 2-3 halved jalapenos, a few cut up celery stalks, 1 heaping Tbsp dried Mexican oregano, 1-2bay leaves, 1 tsp cumin, 1 tsp Mexican chili powder.  cover with 1 box low sodium chicken broth and the rest with water.  bring to a boil and turn down to a simmer for about 3-3 1/2 hours.  check your water levels every now and then.  remove when meats are fork tender...i mean REALLY fork tender.  if using trotters they take the longest...your other meats might be done in 2 to 2 1/2 hours...poke 'em...how do you really know when an ear is done if you've never done it before?...

while this is cooking make your RED SAUCE.  this red sauce is good for everything. 
this post is getting long so here's a link to the red sauce i make all the time.
note for the red sauce...take the extra time to strain the sauce...some recipes say it's not necessary, but it's much better strained.

remove from heat and strain the broth.  cheese cloth in a strainer works well or i try to completely separate the fat.  remove your meat and let cool to the touch.  remove all bones and hard bits from the trotters.  cut everything in uniform size pieces..

everybody back in the pool....

(in the washed out stock pot)...with 1 can of good hominy...Juanita's is best 
2-3 chilies in adobo sauce (from the can) diced
optional...1 med. onion diced and sauteed
add your red sauce...should be about a cup
add broth.  i liked mine thick...you can always add more broth to thin it out
check for seasoning...might need salt
might need cumin
heat everything and gently stir a few times for about 20-25 mins.  this is one of those things that gets better as it sits and all the flavors meld together

whew!!! almost done.  garnish with any or all of these....cilantro, radish, shredded cabbage, diced jalapeno, queso fresco and chiccarones (fried pork skin) 

sorry this was long.  if you really want to make this and my instructions are to sketchy, check out these few links that i used to make my first try at "real Pozole".  i had fun making my own version and it turned out FABULOUS.  if you have any questions let me know.

Friday 21 January 2011

0 GREENS, EGG AND HAM...Hock


my take on Dr. Seusses Green Eggs and Ham...a favorite book when i was little...still my favorite book.
the recipe here is nothin' real outlandish, just good eatin'...breakfast, lunch, brunch or dinner.  a simple perfect runny poached egg can make a side dish, like southern greens, into a  meal.

i love to have greens quite often.  i take a day and make up some good Hock Broth and freeze it in portions to use just for this....start to finish it's pretty time consuming, but well worth the effort.  the greens are easy once you've got your delicious broth ready on hand.  i set aside a day just for the broth.  you can find the HOCK BROTH RECIPE here that i posted a while back.  it's simple, but like i said you might want to set aside a few hours at home.  once it's done, freeze it in portions and you can whip up some authentic rich tasting greens for that down home Southern fix.
i know, i know, i know....my greens don't look like real Southern greens, but that's because i live in SOUTHERN CALIFORNIA !...that's about as "Southern" as i get.  mine aren't cooked down all the way.  i like to keep a little color on the plate, some texture to the leaves AND keep some of the rich nutrients still alive.


HEARTY-HOCKY COLLARD GREENS

2 bunches collard greens...or
most times i will use 1 bunch collard and 1 bunch tuscan kale
1 small onion french slice....or half rings
slice up a shallot if you have one
3-4 cloves garlic thin sliced or diced
 a dash of cumin is an option
1/4 tsp cayenne or to taste
salt and pepper to taste
2-3 Tbsp olive oil for sauteing the onion and garlic
1 - 1 1/2 cup ham hock broth with hock meat if you saved any.  there's not much meat on a smoked ham hock, but i sometimes get lucky.  you could add cooked bacon, diced ham or prosciutto.

wash your greens well.  they can be quite dirty sometimes.  in a large pot (large enough to handle all the greens) saute the onion, shallot and garlic until soft.  while that's cooking cut the greens the long way and remove the rib. slice into 2 inch wide strips.  add your broth to the sauteed goods and bring up the heat to about medium high... then start adding in your greens.  if you can fit them in all at once, great.  if you have to add 1/2 and cook down a little then add the rest.  add the sesonings.  stir to coat all the greens and incorporate the onion, garlic and seasonings into the greens.  put the lid on...cook to desired doneness, but check and stir every 5-10 minutes.  you might need to add more broth.  mine take about an hour then...turn off the heat and let them sit covered 'till ready to serve.  

Tuesday 18 January 2011

0 Oat Doodles


OAT DOODLES...
these are a treat and a healthy one at that.  i like to think the heart healthiness  of the oats kind of cancels out the sugar and butter.  maybe i'm fooling myself, but i know there's something healthy in my sweets and besides, i had to make them just because of the name.  
i was searching for cookies with OATS and i came across this one.   it's now in the favorites pile of recipes...seems my favorites pile is growing, growing growing....


i was so happy i found this post at The Ingredient Store.  check this out !...it's all SCHOOL CAFETERIA RECIPES...how fun is that?!...now i'll just need to recreate "Taco Tuesday" and i'll be all set with my dessert.

you know everybody loves a good old Snickerdoodle, so if your looking to add some oats to your diet due to some crazy new years resolutions...give these a try.  they're a little more hearty  than the real thing, but you'll feel better about yourself after eating more than your intended share. 


 OAT DOODLES
original found HERE, but copied for your convenience

2 cups rolled oats...not instant
2 cups flour...i used white whole wheat
1 tsp baking soda
1/2 teaspoon cream of tartar
4 teaspoons cinnamon
1 cup Butter Flavor Crisco
1 1/2 cups sugar
2 eggs
1 tsp vanilla extract
1/3 cup sugar AND 2 tsp cinnamon for rolling dough balls before baking

preheat oven to 400 F
grind oats in food processor until fine
combine oats, flour, soda, 4 tsp cinnamon and cream of tartar...set aside
cream Crisco and sugar until light in color
add eggs and vanilla to incorporate
add dry ingredients in 2 batches, mixing well between each addition
combine 1/3 cup sugar and 2 tsp cinnamon in a small bowl
roll dough in 1 inch balls...mine were about the size of a large walnut
roll dough balls in sugar cinnamon mixture
bake 8-10 minutes, until set and slightly cracked
cool on sheet and transfer to rack

you can add choc. chips or butterscotch or whatever, but you might loose the important "snickerdoodle" cracking effect

Wednesday 12 January 2011

0 Depression Era Oatmeal BACON FAT Cookies


did your Grandma keep a coffee tin on the back of the stove for BACON GREASE?
mine did.  she used that darn bacon grease for everything. butter and fancy oils weren't used for "saute-ing" in those days...it was more like frying. AND...butter was expensive!, bacon fat was almost a freebie.  besides,  i don't think my Grams knew what the term "saute" meant...
 but what ever it was, when Grandma made it...it always tasted better.  
i think it was all in the BACON FAT!

my Grandma lived 'til 108 !

i found this recipe kind of out of necessity... i, for some unknown reason, have accumulated loads of delicious BACON FAT ! little tupperwares tucked neatly on the bottom shelf of the overcrowded fridge hiding in the way back so as not to be discovered by the fridge police.  i had to find a use for it...
i knew if i already put bacon IN the cookie, why couldn't i use the fat as butter...just one animal fat for the other....because we all know...

butter IS fabulous...but...BACON FAT IS PHENOMENAL !!!

photos shown are with roasted-salted peanuts, peanut butter chips and flax

DEPRESSION ERA OATMEAL COOKIES
 posted by Adrianna and Caroline at A Cozy Kitchen
i adapted it ever so slightly

3/4 cup sugar
3/4 cup brown sugar
1 egg
1 tsp vanilla
1/2 tsp maple extract if adding pecans instead of chocolate
3/4 cup BACON FAT...room temp...SEE NOTES*
2 cups old fashion rolled oats
1 1/2 tsp cinnamon
1 tsp salt
1 tsp baking soda
1 1/2 cups flour...i used white whole wheat
4 pieces of bacon...HA !!!...I USED 8-10 slices cut or crumbled into fairly large pieces
i added 1/2 (give or take) cup mini chocolate chips in my 1st batch...
2nd time i used 1 cup lightly toasted pecans
3rd batch was with salted-roasted Virginia peanuts, 1/3 cup p-nut butter chips and 1 heaping Tbsp of flax seeds

preheat oven to 375 F
in a mixer combine the sugars and bacon fat until fluffy and light in color
*NOTE...i think it could handle almost 1 while cup of fat....also, i refrigerate the fat after cooking the bacon to solidify...then remove it and bring it to room temp...this works better from my experience than using it in it's liquid oil/fat form
add the egg and vanilla extract and combine well.
in a separate bowl combine the oats, flour, baking soda, salt and spices
in the mixer add the oat/flour mixture to the wet mixture in 3 batches and mix 'til just combined.  don't over mix, because you still need to add your goodies
stir or fold in your bacon and choc. chips or nuts or whatever...(cranberries a good add?)
 on ungreased or, i prefer parchment lined cookie sheet... make some round large tablespoon-walnut size balls and flatten slightly.   depending on how big you like your cookies will determine how flat...bake for  approx. 10 minuted or until done...i suggest doing a tester...all bacon fat is not equal and regulated like butter, so i say do a tester and check out how much your batch will spread.  also, the white whole wheat flour makes a hearty dough.

the pictures shown are of the cookies i added peanuts, peanut butter chips and a Tbsp of flax.  these are quite hearty cookies.  the dough seemed dry-ish and didn't really spread, so i flattened them with the bottom of a glass.  they turned out more of a crunchy cookie than chewy....DELICIOUS !


i've made these 3 times.  1st time was straight from the original recipe, then i started to change it up a bit with some spices and a little flax.  the sweet-savory factor is fabulous.  i prefer the strong flavor of apple wood smoked bacon fat, but any good bacon fat will do.

oh yeah...more notes... i like to cook my bacon in the oven on an aluminum lined cookie sheet.  half way through i pour off the fat and reserve in a heat proof tupperware...then continue cooking bacon until crispy...again pour off fat and reserve.
 
back to top //PART 2