Showing posts with label mexican. Show all posts

Friday, 4 May 2012

0 Queso de Puerco...Pig's Head Cheese


QUESO de PUERCO...or...QUESOS de CABEZA
sounds a lot better than the translation...HEAD CHEESE

but wait...don't go...come back...
all this talk about nose to tail eating, waste not want not, being green and everything...you can't tell me you're gonna shy away from a little head cheese.
come on...be the adventurous foodie that you think you are...it's delicious!


i know the picture is a little alarming...
but you DO have to get over the shock factor that it IS all ingredients from a pig's head.  part by part it can be a little daunting...maybe disturbing for first timers, but nowhere near as disturbing as  tackling the whole head.
authentic Queso de Puerco is made from the WHOLE pig's head boiled and broken down...
I COULDN'T DO IT.  i'm not there yet...baby steps...besides it's a well known fact that a whole pig's head would not be allowed into this house.  i've snuck ears, tails and trotters in before, but i think the head with a face...eyes and teeth might just sign my walking papers.
SO...i had a better idea...
i simply bought all the parts.  a few ears, a couple of snouts, some trotters and a Pozole meat mixture (grab bag) which includes tongue, cheek, ears, lips, and various other bits of fatty meats that work well for this thing called head cheese.  i'll bet you didn't know that delicious authentic Pozole you love so much from your favorite Mexican restaurant actually had all those parts in it.  well, consider yourself christened.  
now come on...try the Queso de Puerco

this is nothing like the head cheese you're afraid of.  if you consider yourself an adventurous foodie this is a fabulous challenge to take "head on".
when presenting it to unsuspecting guests and those less adventurous, slip a few slices onto your next meat/charcuterie platter...call it a fancy "terrine"  or "Pate de Tete" if you have to..., but this one really is good ol' head cheese with some spicy Mexican flavors
...it will surely be the conversation at the table.


the left overs...i'm sure there will be some...make a delicious sandwich...or sear a slice or two in a hot skillet.  it renders into crispy little unctuous fatty bits that are delicious on top of a cold crisp salad.


QUESO de PUERCO...or HEAD CHEESE with Mexican flavors

things like this always change in flavors, size and shape...it depends on what parts of the pig you can get your hands on...AND are you willing to handle the said parts?... 
this is what i started with....

2-3 full pig ears
2 full trotters, sliced in half by the butcher
2 lbs. (or a little less) of Pozole mix...various pieces of pig including tongue, cheek, ear, snout, butt.
2 pig snouts...i found cooked, roasted snouts at the hot food area in my favorite Mexican market..Northgate, Santa Ana, CA
1 1/2 tsp cumin
1 big Tbsp dried oregano
1 tsp chipotle powder
1/2 tsp cayenne, optional
8-10 peppercorns
 1 large onion, quartered
3-4 bay leaves
6 smashed garlic cloves
2 Tbsp apple cider vinegar
salt and fresh ground pepper

before you begin to cook, you need to take care of a couple things...
#1  you must look for any stray hairs that have made it past the first cut, so to speak.  check the ears, snout and trotters.  i find the easiest way is to burn them off with a lighter or even better, and more fun, use a kitchen torch...yes the one you use for creme brulee.
#2  i like to boil a big pot of water, big enough to hold everything and put all the meat in and boil the parts for about 5 minutes.  then remove, discard the water and clean the pot before using for the actual cooking.  this will take care of any lurking exterior impurities.

now...i could go on and on and get really involved with instructions, but really it "boils" down to this...

EVERYBODY IN THE POOL
all meats, veggies, herbs and spices into a pot big enough to hold it all.  cover with water,  water should just cover meats throughout the cooking process.
bring it to a boil, then to a nice simmer.  cook until all is fork tender.  approximately 3-4 hours.

again...trying to keep it simple...
remove meat and let cool to the touch.  remove bones, large fat and any unwanted parts...NO don't toss it all...that was a joke!
strain broth through cheesecloth.  taste broth.  it should taste quite over seasoned, so add more salt and spice if necessary.
pack meats into a large loaf pan lined with Saran wrap.  i like it well packed.  pour warm broth over and weigh some sort of lid down on top so as to press everything together packed tightly.  you will be pressing out most of the liquid so do this in the sink.  the more packed it is...the less gelatinous your block of head cheese will be.
refrigerate for a few hours.  it's ready when it is solid.

slice and enjoy with pride.
now you are a true nose to tail-er
or...snout to trotter...er


PS...if you truly want to attempt this and need more instruction, i would be more than happy to answer any questions.
here are a few other terrines i have posted about that pretty much use the same method.
once you have made one terrine you can make anything into a terrine.

Saturday, 28 April 2012

0 Chorizo Tortilla Egg Bake ...with a little less guilt


hi folks...it's almost Cinco de Mayo...
so dust off your sombrero and shake out that dusty old poncho...

Chorizo Tortilla Egg Bake is a perfect way to start the day...AND if you're watching your carbs and calories due to the swimsuit season fast approaching...not to worry.
believe it or not...this version is low carb, high protein and not as much fat as you might think. 
 chorizo can be quite fatty, but cooked down and given a little tender care it can be a big flavor punch without all the grease and fat.  
tortillas ARE really full of carbs, but if you just use a couple you'll be surprised at how much delicious corn masa flavor will carry through the whole dish.
eggs...full of good stuff, but cut the real eggs with some egg beaters and you'll never know the difference in an egg bake...i guarantee.

give this a try for a fun Mexican brunch.  the dish keeps very well and reheats in the microwave for a perfect on the go spicy breakfast or snack.  oh...and it freezes well too.

approximate NUTRITION
for 9 servings
cals...170
carbs...7
fat...8
protein 16


CHORIZO TORTILLA EGG BAKE
basic concept from Kalyn's Kitchen Egg Casserole

1/2 white onion, diced
1 1/2 jalapeno, diced , seeded and de-veined
(you can substitute jalapeno with canned diced green chiles)
1 Tbsp olive oil
4 large eggs, slightly beaten
2 large egg whites
1 cup egg beaters or substitute
4 oz fat free sharp cheddar cheese, grated
8 oz chorizo
1 cup cottage cheese, rinsed in a strainer and patted dry
2 1/2 corn tortillas, cut in to 1/2 inch long strips
1/2 tsp ground cumin
1/4 tsp ground coriander
a good pinch of cayenne if you can handle the heat
salt and pepper
a handful of fresh cilantro, chopped
NOTE...seasonings depend on how flavorful your chorizo is.
use more or less to your liking.

preheat oven to 375F degrees
spray a 2 quart, 8 x 8 or 7 x 11 baking dish with non stick spray or olive oil.
saute the onion and jalapeno, in as little oil as possible.
add chorizo and cook 'til done.
transfer to a paper towel lined bowl or dish and let the fats absorb in the towels.  change paper towel if necessary.
layer the bottom of your chosen cooking dish with 1/2 of the tortilla strips...evenly spread out.
now start layering 1/2 the chorizo onion mixture, 1/2 cheese and 1/2 cottage cheese curds, a little cilantro.
sprinkle 1/2 of your ground spices...and a little salt and pepper.... and then start again with the rest of the tortilla strips, chorizo, cheese, cottage cheese and cilantro.
sprinkle other half of ground spices...and a little salt and pepper
NOTE...watch your salt additions due to the chorizo, grated cheese and cottage cheese all have salt in them.
ANOTHER NOTE...not exact instructions, but you get the idea...you want a little of everything in each and every bite.  the remaining tortilla strips should be evenly distributed for maximum masa flavor.

in a bowl mix all the eggs and beaters until combined (not frothy).
pour eggs over layered ingredients.
gently use a fork to make sure egg mixture is well incorporated.
grate a little extra cheese over the top.
NOTE...if it doesn't look like the egg mixture is enough,  just beat up another and add it in.  i get carried away with my additions and often need to add another egg and an egg white.

bake until eggs are firmly set and top is lightly browned
20 - 25 minutes for an 8 x 8 dish
NOTE...mine might have taken a bit longer so keep an eye after 20 minutes.
the middle should rise a little and you will know it is cooked trough.
AND sometimes i need to tent with foil if getting too brown.

serve with some fresh pico de gallo, sliced avocado and a dollop of low fat sour cream
OR...just eat as is...reheat a square for a good breakfast though the week.
LAST NOTE...pretty darn good at room temperature while driving the car in a mad dash to work.
(i tested the freezing and thawing...it came out great.)


Monday, 27 February 2012

0 Tacos de LENGUA. YES..."Tongue" Tacos


WHAT ON EARTH ???

why, yes...it is a cow's tongue.


this, by far, is the most challenging item i have cooked so far.
i've cooked Pig's Tails, Chicken Feet, Turkey Tails, Pig Ears, Snouts and Trotters, just to name a few...
but the tongue has escaped me...until NOW.
i've been wrestling with the idea for quite some time and i finally took the challenge head on...so to speak.
of course, in Southern California we have some fabulous Mexican food.  lucky for us we also have quite a few fabulous Mexican/Latino markets.  but...if you're in the neighborhood of Newport Beach/Costa Mesa i highly suggest you try a tiny little place called El Toro Bravo Tortillaria for one of THE BEST AUTHENTIC MEXICAN STREET TACOS.  it's at the end of a tiny little strip mall on 19th street in Costa Mesa.  AND as the name implies, it is also a Tortillaria factory so you are guaranteed the freshest tortillas.
portions are HUGE and prices are low...well worth the road trip, but be prepared for a hole in the wall looking place and a long line at lunch time.

back to MY tongue.  after trying the Lengua at El Toro Bravo, and loving it, i decided it was time to try my hand at it.
WHOA !!! what a monstrous chunk of ugly meat.  the texture alone is enough to scare one running for the hills.  after it's cooked it gets even worse...not until you have conquered the actual peeling of the outer layer and cutting the thing up does it get any better.  when i say put your game face on I'M NOT KIDDING.

the good news is...IT'S DEEE-LICIOUS !!!


INGREDIENTS FOR COOKING THE TONGUE

1 beef tongue (3 - 4 lbs)
2 large onions
8 - 10 garlic cloves, peeled and crushed
5 - 6 bay leaves
1 Tbsp peppercorns
2 Tbsp salt
2 tsp cumin
1 heaping Tbsp Mexican oregano

FOR THE TACOS

fresh corn tortillas
pico de gallo...or fresh salsa of choice
avocado
cilantro
chopped white onion
lime wedges

COOKING THE TONGUE...

#1...put your game face on.

fill a large stock pot with water.  bring to a boil and put the tongue in for about 5 minutes.  remove tongue, discard the water and clean the pot...this is to remove any impurities.
fill the stock pot with water about 2/3 full.  add the tongue, onions, crushed garlic, bay leaves, peppercorns, oregano, cumin and salt.  bring to a boil.  reduce heat to a simmer, cover and cook for about 3 hours, until tongue is soft to the touch and fork tender.

remove the tongue from the water and cool for a couple of minutes...until is is cool enough to handle.
DO NOT WAIT TOO LONG...i was busy taking the photo and not thinking it would matter, i took my time.  it is harder to peel if the tongue has sat too long.  trust me...you do not want to spend a lot of time with the tongue in it's whole form trying to peel all the outer layer off.
i found it most unpleasant to peel skin off of a tongue...,BUT i'll admit it was kinda cool.
TO PEEL...notice the light colored skin covering most of the tongue.  using your fingers and a sharp small knife, remove the covering and discard.  there is no other way to describe this step.  you just have to experience it for yourself.
NOTE...notice the rough patch of meat where the tongue would attach to the bottom of the mouth...you may remove this if you don't like the looks of it.  i kept most of it.   mine wasn't to rough and ugly looking.  i did not want to waste any of the good edible meat.

after spending all morning and most of the afternoon with my tongue, i was over it for that day.  i took a small amount out and packed the rest away.
if not using right away....slice it in 1/2 inch, or so, thick slices, cover with strained cooking liquid and store in an airtight container.  i like to strain the broth before adding it back to the product that has cooked.

TO PREPARE FOR TACOS...reheat your slices either in a saute pan with a little oil until lightly browned or you can simply reheat in it's own juices in the microwave.
dice into small cubes, mince or you can shred...check your seasoning for salt and pepper and you're ready to build your tacos.

Mexican street tacos are pretty straight forward...FRESH TORTILLAS ARE KEY...then it's just meat, onions, cilantro and fresh salsa.  in America we tend to load them up with all kinds of other unnecessary items, but go ahead and help yourself with a little extra trimmings if you need to disguise the tongue on your first try.  work your way into it.
 i'll bet if you'll be amazed at how good a tongue could taste...
some how that doesn't sound right...

so...what do you say...

ARE YOU UP FOR THE CHALLENGE ???


Wednesday, 21 December 2011

0 Tamale Fusion...A savory and sweet success.


TAMALES  TAMALES   TAMALES...

'tis the season for TAMALES

fist time out of the gates with the tamales and i think i did alright..
maybe i bit off more than i could chew, but i made 3 different tamales... shredded Asian duck with lightly sauteed Comice pears in tarragon...then i made some with pulled pork smothered in Mexican Red Sauce (Red Sauce Recipe found here), Hatch Chilis and queso fresco...then to round out the trio i made sweet tamales with apples and sultana raisins sauteed in butter, brown sugar and cinnamon and topped with toasted pecans...WHEW that's a mouth full.  i'm tired just thinking about it.  they were all fabulous.


there really is nothing like a fresh tamale right out of the steamer.  i can't remember the last time i had one, but it was probably packaged or frozen or brought home and reheated.

once a year at this time our good long time friend, Lupe,  brings us "REAL" authentic Mexican Tamales...and i say real because she was born in Mexico and her mother taught her how her mother taught her and so on and so on...
below is a quick photo of the loot that Lupe brought to us on Saturday night...
i must state that Lupe's Tamales ROCK !...experience definitely shows in flavors and texture.
  
making them yourself is so rewarding and like i said...fresh from the steamer these tight little packages are unbelievably delicious.  it really isn't rocket science (when you take a few short cuts like i did) and they ARE a little labor intensive and tedious....BUT well worth the effort.


above is the shredded Asian Duck.
if you would like to know how i prepared the duck meat please refer to an earlier post i did on Asian style Duck Rillettes...just go as far as shredding the duck to bite size pieces.  i sauteed the Comice pear with a little butter, brown sugar and dried tarragon...then added fresh tarragon before wrapping.  this needed a little sauce to go with it.  my first thought was Sriracha (Asian HOT sauce)...but i think i could have been more creative.


above is the sweet tamale filled with 2 kinds of apples (Granny Smith and Yellow Delicious) sauteed in butter, brown sugar, cinnamon and nutmeg...with a few chopped toasted pecans.  i mixed a bit of sugar into the masa.  serve with whipped cream, ice cream or as i did with a little maple syrup for breakfast...YUMMM !

i have no real written recipe, BUT i do have...
A FEW GOOD HELPFUL HINTS AND SHORT CUTS...
from a first time tamale maker.

1.  buy prepared masa made for tamales.  find a real Mexican market or tortillaria near you.  i found mine at El Matate.  go in the morning, it's still warm in the bag.  now that's fresh.  try not to fall for anything pre-packaged.  the fresh will come in a big plastic bag and hopefully still warm, but definitely moist and mooshy.
2.  make your stuffing/filling the day before...or pull from your freezer like i did with the pulled pork and Mexican Red Sauce.  you don't want to do all this in one day...trust me, the tortilla assembly and cooking will be enough for one day.  i did, however, make the sweet tamale stuffing that day...quick and easy.  like making your favorite apple pie filling.
3.  if you can't deal with the corn husks, try wrapping them in parchment squares.  they aren't as cute and authentic, but it does the trick.  i think you can also purchase pre-cut tamale wrapping paper.  i would have bought a package had i known, but i'm glad i went with the husks on the first time out.
4.  when wrapping, make sure they are totally covered and your husks haven't split.  the filling WILL squish out during cooking.
5.  you can use string instead of corn husk strips to tie them up...this is not an easy task using the husk strips.

6.  if you don't have a proper tamale steamer, use your pasta strainer or vegetable steamer at the bottom of your stock pot.  i used a large vegetable steamer insert, as shown above, and had to lay my tamales flat instead of the traditional upright cooking method.
7.  you need to have them sit a coup[e inches from the bottom and not touch the water.
also...you need enough water to be able to steam for 1 hour.

8.  these can be wrapped ahead of time and cooked before serving.  they will take approximately 1 hour to steam.
9.  they keep well in the fridge for a quick meal and i suppose they can be frozen as well.
10.  reheat in the microwave wrapped in a damp paper or cloth towel to keep moist.


Thursday, 1 September 2011

0 Barbacoa Beef Cheeks - Slow Cooker Style


well i thought i better throw the dog a bone and serve you all up some MEAT
did you think i forgot about all my carnivorous friends and followers?

here, for those of you still on the fence about "nose-to-tail" cooking, is a tasty and safe introduction to a less common cut of meat.
BEEF CHEEKS......one of those illusive parts that you might be introduced to in fancy restaurants (or an authentic taco stand IN Mexico), but never see or hear about anywhere else.


i finally found some in my Mexican market here in So. California.  soooo happy...

beef cheeks are the definition of unctuous....
go ahead look it up... 

i think it's a cross between Mom's (Momacita's) all day pot roast and slow cooked oxtails...a wonderful rich beefy flavor with a little sticky gooey texture you find with the oxtails.
the recipe i found has a wonderful blend of flavors... with a hint of lime citrus and warm undertones from the cumin and oregano.  the broth was like none i had had before.  i think the fact that there were NO onions or other vegetables in the slow cooking process really set this one apart from my other crock pot recipes...

i will definitely use this base recipe again and again.


BUT i gotta tell ya...this is the ugliest, most difficult piece of meat i have ever had to butcher.

note to self and others....buy more than you need because by the time you trim away the chunks of fat and grizzle AND veins and silver skin you will have about 1/2 of what you purchased.
i suggest buying it already trimmed or ask the butcher.

luckily i knew i didn't have enough to fill the crock pot so i bought 4 large short ribs to add in.
THE SHORT RIBS WERE FABULOUS MELT IN YOUR MOUTH DELICIOUS !!!
so, by all means if you can't handle beef cheeks, or just can't find them, use short ribs or another choice of fatty meat that works well for slow cooking.


BARBACOA BEEF CHEEKS...slow cooker

the recipe calls for 6 pounds beef cheek meat
1 bought a package that read 2.65 pounds (that's all there was)...after trimming what ever i could i was left with 1 1/2 pounds so i supplemented with 4 large beef short ribs
2 tsp salt
2 tsp pepper
1 Tbsp cumin
1 Tbsp Mexican oregano (Mexican is best...get some)
2 tsp garlic powder
8 cloves garlic, peeled and smashed
1 whole bay leaf
2 whole limes
1 cup beef broth...homemade, rendered form roasted beef bones is best
2 tsp Mexican chili powder, optional
1/4-1/2 tsp cayenne, optional
i think a little heat is always necessary...

rinse cheek meat and trim away as much fat, gristle and silver skin as possible...good luck with this.  it ain't a pleasant job.  cut into large pieces.
put meat into large crock pot (i think mine is a 5 1/2 qt.) and season well with salt, pepper, cumin, oregano and garlic powder.
add bay leaf and squeeze lime juice all over (pulp is fine)
add the beef stock.
stir slightly, cover and cook on HIGH for at least 6 hours...mine was in for a little over 7 hours.
i checked on mine after a few hours and gave it a little stir.
if the meat is fork "butter" tender you're good to go.

take the meat out with a slotted spoon and strain the broth.  the broth might come in handy to remoisten the meat if necessary...and the broth might just make a delicious soup base.  shred the meat and discard any solid fat or grizzle you might have missed in the lovely trimming process.  taste and season as you see fit.  try not to eat it all yourself while shredding and seasoning...

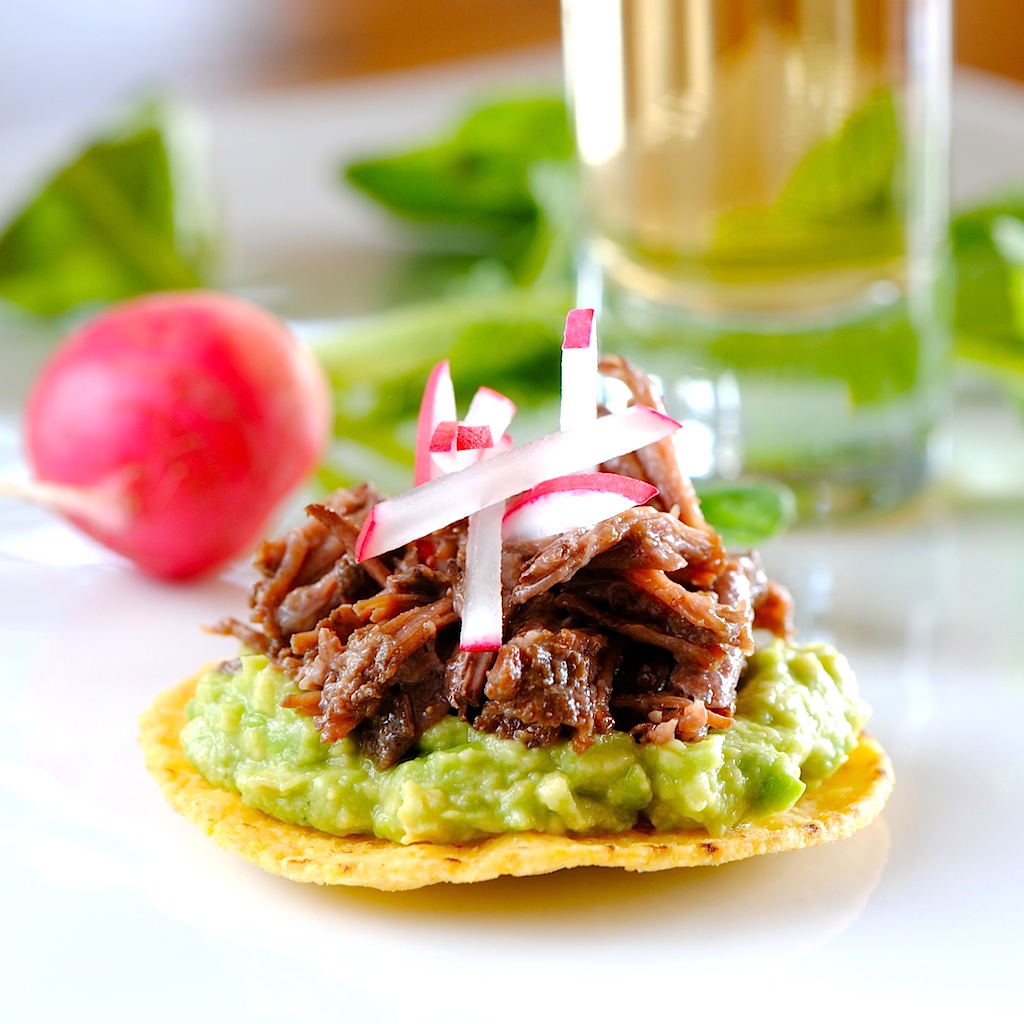
serve with your favorite tortillas, avocado, cilantro, crumbled queso fresco, fresh salsa, diced radish, etc etc etc...dress it up or just keep it simple....OR make little Tostaditas as i did for an interesting Mexican hors d'oeuvre...
maybe a fun amuse bouche for your next Mexican fiesta.

Monday, 11 July 2011

0 Vanilla Berry Chai Jello Treat


Stained Glass Jello Dessert made healthy...

i know, i know...we've all seen this one before.  commonly known as stained glass jello, but i bet you haven't tried this version.

it's lo-cal, lo-carb...no fat...NO GUILT...

it's FULL OF PROTEIN...and IT'S FUN !!! 


you see this type of jello dessert a lot in the Mexican markets, but it's usually made with sweetened condensed milk and sugary jello......and i've seen many recipes on the Internet all cute and colorful.  here's an example that i found at Mexicanfoodsandmore.com... BUT all the fun colors and flavors of jello are the pre-sugared ones and i don't see myself eating sweetened condensed milk in solid form anytime soon.

so i had a "light bulb moment"

why not use my vanilla protein drink as the milky base and use sugar-free jellos...
better yet...infuse different tea flavors into the colored jellos.
i dug out the Knox gelatin packets i had in the back of the pantry, put my lab-coat on and went to work.

the results have been delicious.  friends love the cute little squares i dole out and it's always a great conversation piece....
"where'd you get that?...what is that?...how'd you make that?...can i have some?..."
always followed by a big smile and a few giggles


this post is not so much a recipe as it is an idea,...
but i have put the ingredients for the treat i made shown in the photos.  you can see how flavors can easily be changed to suit what you have available.  i found that Worldwide Vanilla Pure Protein 21g or 35g protein (found at Trader Joe's) works well for the base and the Isopure (looks like this) Blue berry flavor worked well with it's icy blue color AND it added 40 more grams of protein to the batch.  look for Isopure at a nutrition store.  you could also try Gatorade G2 Icy Blue Berry or something else colorful.  i DID find that Gatorade wasn't as flavorful...Crystal light has some great flavors...cherry pomegranate is great


EASY PROTEIN JELLO TREAT

8 x 8 glass pyrex dish for finished product
2 cups vanilla protein drink
1 lrg box black cherry sugar free Jello (makes 8  1/2 cup servings)
16 oz of ice blue G2 Gatorade
OR 16 oz of Isopure Blueberry Protein drink
OR another flavor sugar free jello, 1 box
1 - 2 Chai tea sachet
dash cinnamon, cardamom and nutmeg, ginger

let me suggest a link to a GREAT blog post here at The food Librarian.  Mary has some fabulous photos and perfect instructions on making stained (broken) glass jello.  for an easy protein version, just substitute the condensed milk with the vanilla protein drink...NOTE...DON'T USE WATER...bloom your gelatin in 1 cup cold protein drink then heat in the microwave until completely dissolved then add the other cup protein drink and proceed.
use sugar free jello for the colors.
if you want to get creative or expand your flavors see below...

use chai ice tea for the water when making your colored boxed jello

also i like to add a small (small!) dash of cinnamon, cardamom, ginger and nutmeg to the vanilla protein drink.

if you are using another liquid, such as the Isopure Protein juice, Gatorade or what ever...use 2 gelatin packets for 2 cups of liquid....bloom your gelatin in 1 cup cold liquid for 5 minutes, give it a stir then heat in microwave until dissolved.  no need to boil, but don't walk away 'cuz it can over flow...not good.  stir...when completely dissolved add the other cup liquid and stir...pour into flat dish then refrigerate until completely firm.  cut into cubes....

 and again, refer to this great post/link, The Food Librarian, for finishing the project...i would write it all out, but Mary explains it so well and this would just get too long.

i'm sure you get the drift...it's not rocket science....
although you should win a prize for making it to the end of this post.

go wild with some fabulous flavor combos

i think i'll try something with chocolate protein drink?... next week when i'm done with this one.

Tuesday, 28 June 2011

0 Spicy Mexican Glazed Nuts


Oooh...these unassuming little nuggets are...whew!...spicy 
and oh so addicting.


if you want a quick spicy sweet nut recipe, this is a great one.  they turn out really crunchy, slightly glazed and you don't have to do anything on the stove with molten sugar or syrups...a simple egg white along with your spices and a little sugar... in the oven, and the magic spicy glazed coating happens without fail.  these were such a hit with my spice lovin' friends.  i tend to make things a bit spicier than most can handle, and these were just right.  i must say...i used REAL MEXICAN CHILI POWDER.  not the wimpy stuff you buy at a regular market so mine came out extra spicy...AND i used the cayenne.  i suggest you use your judgement on the spices, but if you have a Mexican market near you do yourself a favor and buy the real stuff.  it's cheap and always adds a nice blend of spicy chilies to what ever you're making.


SPICY MEXICAN GLAZED NUTS
adapted from Big World-Small Kitchen and Epicurious

3 cups raw mixed nuts
(i used almonds, pecans, macadamia and walnut)
1/3 cup sugar
1 egg white beaten until white and fluffy
1 Tbsp chili powder
(i used REAL Mexican chili powder...whew!...spicy!)
1 tsp cinnamon
1/2 - 3/4 tsp salt
1/4 tsp ground cumin
1/4 tsp cayenne pepper

preheat oven to 350 F...place rack in the middle

spray baking sheet with non stick spray.  in a small bowl combine sugar and spices.  in a large bowl whisk egg until white and frothy.  add nuts into egg white then add the sugar/spice mixture and stir until everything looks evenly coated

spread nuts evenly onto prepared baking sheet and bake until golden, about 20 minutes.

TIP... i took them out after 15-20 minutes and stirred and separated the nuts...then returned to the oven for approx. 10-15 more minutes.  keep your eye on them.  i think this second baking time helps to keep them crunchy.

TIP... do not store them until they are completely cooled, but do not wait over night to store them.  if they get a little sticky (they shouldn't because of the second bake) you can stick them back in the oven for a few minutes, let them cool, then store again.

TIP... store in a clip top glass jar with a rubber seal


TIP... also i saved some of those little stay-fresh packets you find at the bottom of other snack foods....you know that annoying little plastic pouch that says DO NOT EAT...DO NOT OPEN.  they look like sugar packets...i put one of those in the bottom of the jar if i have one available.  don't know if it does anything, but i made some nuts 2 weeks ago that are still good and crunchy.

trust me these won't last that long...you'll eat them all up, but i made a sweet glazed version for Dad and he doesn't eat them as quickly as i do


Saturday, 2 April 2011

0 Flan Cake. Totally worth it !


all i can say is OMG !!!

absolutely CARAMELICIOUS !!!


i might have just found the 8th wonder of the world...
the answer to all ones problems...(at least mine)
the reason for all things being...
this could actually be 
THE BEST THING SINCE SLICED BREAD !


do i like this cake...why, yes, i DO
do i suggest you make this cake...yes, i DO !!!

as you might know, i did try to make a Flan Cake last week.  total Flan Cake FAILURE as seen HERE.
i knew the idea of this cake sounded fabulous, but i had no idea it was going to be this good.  as i mentioned in the "failure post" i wasn't going to give up and i'm glad i didn't.   i tried a different recipe.  i think the first one had the wrong milk to egg ratio, but of course it could have been cook's error as well.

this recipe is pretty easy.  if you break it down it's all simple stuff, but you just have to have some patience and some faith.  if you intend to have it for a dinner party i suggest you start it in the morning or it can even be made the day before.  i had to let mine sit overnight because dinner was canceled.  the cake is easy to throw together, then bakes for about an hour, cooled down for another hour, then goes into the fridge for a couple of hours or over night...then before serving it comes out of the fridge and needs to come to room temp for about 2 hours.  this is where the patience comes in play.  FAITH?...you need it for the final unveiling...hoping that everything has cooked through and set properly.  no worries with this recipe if you follow it as i did.  
by the way...many thanks to the original blogger at What's Cookin, Chicago?
Joelen calls this a Tres Leche Flan Cake.  i'm not quite sure where the "Tres Leches" comes into play, but i love the secret ingredient of Coca Cola.  i think it's the perfect thing to add that extra caramel-ness to the store bought box cake.  i bet no one would ever know the cake part came from a box.


so...on with the recipe?...
i usually copy the recipe for your convenience, but this time i don't want to miss a step or make some typo that would send your cake to the failure pile like my first one...

BUT i will give you my few tips i think are necessary for success.
you might want to cut and paste these tips for the actual baking day.

1.  make sure you preheat your oven well
2. important....the time and temp works best for a regular oven setting...not convection.
3.  while prepping the cake, put some water on to boil for the bain marie.
4.  don't go overboard with the caramel in the bottom of the pan.  as you can see in my photo vs the original photo of Joelen's, my cake had a little dent on the top from the caramel ring....not a bad thing by any means, but you can always add some on after it is unmolded.  i found the real caramel called Cajeta de Leche at a Mexican market.
5.  DO use the Coke to replace the water.  i did NOT use the full can.  i used the amount the cake called for
6.  for the bain marie...make sure you put your bain marie vessel (i used a roasting pan) in the oven while it is preheating.
7.  put your cake in the bain marie pan and fill the bain marie with almost boiling water.
8.  after the long 2 hours of bringing it to room temp after refrigeration, you will have a pool of soupy caramel in the middle of the bundt pan...do not be alarmed.  either before or after you unmold the cake you should scoop this out with a small ladle and save for pouring over the cake.  if you don't, when you slice it you could have quite a flowing gush of caramel on your cake plate.

so without further adieu...
i give you the link to one of the best cakes i have ever made and ever tasted !

from Joelen at What's Cookin' Chicago?
the instructions are very well written and easy to interpret.
she also has a printer friendly app that come in handy.


Thursday, 24 March 2011

0 Caldo de Camaron Seco


Caldo de Camaron Seco

what a fabulous soup i have found!

it was pretty much be accident...as are many of the "out of the ordinary" things i come across. last week i was shopping at my favorite Mexican market, Northgate in Santa Ana, to get the correct/authentic caramel sauce for my Flan Cake.  i needed Cajeta de Leche as the recipe called for.  just in case you missed the post on "The Flailed Flan Cake" here's the link...so sad...so very sad...
anyway.....as i entered the market the impulse buys caught my eye (i'm a sucker).  they had a large display with these packaged up dried shrimp.  i had seen them many times before here and Asian markets.  "i wonder what the heck you do with these?" i asked myself.  i thought they must be some Mexican treat or for some fabulous special occasion recipe if they have them all out on display...
they're ugly salty dried up old shrimp...i HAVE to buy them...i'll find out what to do with them later.


well, as far as i'm concerned...I HIT PAY DIRT!

these ugly pale shriveled up little critters make the most incredible broth for this soup.  i can't describe the flavor, but it's FABULOUS.  the shrimp add a whole new layer that makes it taste rich and deep and totally authentic Mexican.  a friend said she was transported back to her vacation in Puerto Vallarta.  i'll take that as a compliment...thank you very much.


the recipe is fairly easy, but just a little time consuming.  the shrimp need a pre-soak, a little broth time and then you have to remove the head, legs and tails off of EVERY single little shrimp that goes in the pot, but it's well worth it.  you also have to make a real Mexican Red Sauce that requires steeping, pureeing, straining and sauteing the chills...again...well worth it.  i make red sauce all the time...it's not that big of a deal.  it's great for so many things...pork, chicken, turkey, beef etc...the Red Sauce recipe and instructions i use are found HERE, but i always add a few extras like cumin, oregano, 2-3 adobo chiles and adobo sauce.


i found this delicious soup recipe by googling "what to do with dried shrimp, Mexican".  i thought about going with an Asian recipe, but i was in the Mexican mood...you know the Flan Cake and all...it was going to be a Fiesta!...
the soup?...incredible !  
the flan cake?...don't ask...

CALDO de CAMARON
i made a few changes, so please check the link for the original and her comments...she has loads of great Mexican goodies

1/2 pound of Mexican dried shrimp
2-3 oz dried Guaillo chiles...i also used a few New Mexico Chilies
1 Tbsp Mexican oregano
1 ripe tomato, diced
3 garlic cloves
2 bay leaves
1/2 small onion, roughly chopped
1 tsp cumin
1/2 tsp cayenne...optional
3 carrots, sliced
1-2 diced potatoes are supposed to be added, but i chose other veggies...
2 celery stalks sliced
a handful of green beans
1/2 head small cauliflower
1 more tomato, diced
1/2 onion, sauteed...(this was a good addition)
1 jalapeno, sliced or diced...optional
2 Tbsp oil
limes and cilantro for garnish

FOR THE SHRIMP
cover the shrimp with cold water and let them sit for 10-15 minutes.  drain the shrimp, rinse them and place them in a medium pot.  cover the shrimp with 5 cups of water and bring to a simmer over med. high heat, then turn down to a slow simmer for 10 minutes.  strain the broth reserving both the broth and the shrimp.  allow to cool.
once the shrimp have cooled remove the heads, tails and legs.  Pati (original recipe blogger) suggests you keep the body shell on to add a little crunch to the soup, so that's what i did.  
FOR THE RED SAUCE...
remove the stems and seeds from the chiles and place them on a hot "comal".  i do not own a "comal" so a hot skillet works just fine.   toast lightly until they change color a bit...jus about 10-15 seconds per side.
place the chiles, tomatoes, garlic, onion, oregano, cumin, cayenne in a saucepan and cover with water.  bring to almost  boil and turn down to a slow simmer for 15 minutes.  get your stick blender out and puree until smooth...or use your regular blender or processor...i highly recommend getting a stick blender!
over medium heat add 2 Tbsp oil (olive is good) to a large soup pot.  strain the chili puree over the oil.
NOTE...use a regular strainer and push all the goodness through.  you should have just the tough bits left in the strainer.
add your cumin and cayenne if using.  simmer the sauce for 10 minutes over medium heat allowing the sauce to season and thicken.
FOR THE FINISHED SOUP
add the shrimp, broth, carrots, green beans, jalapeno, 1/2  sauteed onion to the chili puree and let simmer for 10-15 minutes until carrots are tender...also add in the cauliflower towards the end because you don't want it to fall apart.

serve the soup with wedges of lime, chopped cilantro and some fresh diced jalapeno.

this is great as is, but also fabulous over rice...or add a few more veggies of your choice.  i like my soups thick with goodies.  the original only called for carrots and potatoes, but i wanted to add a bit more...maybe not as authentic, but good and good for ya.


back to top //PART 2