Wednesday, 26 October 2011

0 Povitica

povitica_poppy_seed


I love making yeasted enriched breads. Even though most enriched breads are more bread than pastry, the fact that they are enriched with milk, eggs and butter makes them seem more like dessert. For this month's Daring Bakers' challenge hostess Jenni asked us to make povitica, an Eastern European dessert bread. It can also be known as potica, nutroll, kolachi, or strudia.

I went old school and put away my Kitchen Aid stand mixer. The dough came together quickly and easily using a wooden spoon and a big mixing bowl. It was a sticky dough so I had to knead it for some time before it came together for the initial rise.

Then came the fun part - rolling and stretching. I covered my work surface with a large sheet of cheesecloth and started rolling out the dough with a rolling pin. The dough was really easy to work with and never stuck to the cheesecloth. When it got to about 18 x 18-inches, I lifted the dough off the cloth and started stretching it using the back of my hands and arms. The goal was to get it thin enough that I could read through it.

povitica_very_thin

Dough so thin that I can read through it!


Jenni suggested that we try the traditional walnut filling, but I wanted to use poppy seeds. I used a poppy seed honey filling recipe that I normally use for filling hamentaschen. As you can see I didn't have enough filling to spread over all the edges, but it still turned out just fine. (In hindsight I should have spread the poppy seed filling thinner so that it covered more of the dough. The sliced loaf would have been prettier with evenly spaced layers of dough-filling-dough-filling. Oh well! Live and learn. )

povitica_filling


Then I folded the rolled up poppy seed filled dough like a snake into my prepared loaf pan. For my other loaf, I spread the stretched dough with some apricot jam, a light sprinkle of finely ground almonds and some dried cranberries. I rolled it and then twisted the roll into the pan.

povitica_twisted_in _pan


When the loaves came out of the oven I couldn't wait to slice into them. The smell was amazing. There really is nothing quite like the scent of freshly baked bread still hot from the oven. After patiently letting it cool in the pan for 30 minutes, I turned them out onto a wire rack.

povitica_baked_loaves


They tasted as good as they looked. The dough had a hint of sweetness and was very moist. Both flavors were delicious, but my favorite one was the cranberry. Even though I am on a self-imposed low-carb diet, I had a slice a day until the cranberry loaf was all gone!

povitica_cranberry_apricot


Who knew something so pretty would be so easy to make? A big thanks to Jenni for the recipe and please visit the Daring Kitchen for a slideshow of other bakers' poviticas.

The fine print:

The Daring Baker’s October 2011 challenge was Povitica, hosted by Jenni of The Gingered Whisk. Povitica is a traditional Eastern European Dessert Bread that is as lovely to look at as it is to eat!

Continue reading...

Saturday, 8 October 2011

0 Mean Green Collard Terrine


THE MEAN GREEN COLLARD GREENS TERRINE

i love terrines...i think they can be a work of art.


just about anything can be made into a terrine.  usually you find the good ones in specialty stores or just see them out for special occasions, but once you have made one yourself, i'm sure you'll enjoy a nice beautiful terrine more often.  sometimes i'll have one in the fridge to nosh on through the week.  a little slice can turn an uneventful weekday into at least something a little gourmet...you know what i'm talking about...add a little fancy into your diet and everything looks better.


 first, start with an idea of which type you want...hot or cold, meat or veggie, egg base or aspic...
one of my first terrines was a Pate de Campagne (found here)...for my meat loving friends i suggest you try this one...DELICIOUS!
but...for the veggie lovers the green terrine was a hit..(i DID slip that little layer if ham in).  as i look back i think i bit off a little more than i could chew with this "veggie terrine idea"...i had this visual of a fabulous layered  terrine one day so i went out and bought loads of greens, came home to realize the idea would be a little more effort than expected.  being the perfectionist that i think i am,  i had the bright idea that if i blanched and shocked EACH LEAF it might retain the beautiful green color rather than that semi grey color collards can get when cooked...out came the pots and the bowls and the ice and the paper towels.  after washing each leaf carefully...now i have to touch and coddle each leaf again?!...me and my "bright ideas"
this was definitely a hands on, made with love terrine...more like a work of art rather than a simple dish of collard greens.


THE RECIPE...?....or INSTRUCTIONS to...

A MEAN GREEN COLLARD TERRINE

there really isn't much of a recipe...more like instructions of how to.
if you really have some questions about this terrine please leave a comment and i'll help out.  otherwise here is my attempt at writing out the recipe for this particular terrine...every terrine will come out different and mid way through the building you might want to add a different layer.  i happen to have some sliced ham in the fridge so i slipped a few slices in.  i recommend something with a little more flavor...maybe a little prosciutto or black forest ham.  i find that you need to slightly over season terrines because they just soak it up...choose your ingredients wisely and definitely season as you go along.

2 bunches of collard greens...washed very well, tough middle stalk removed
7 - 10 large asparagus
1 bunch of haricots verts
sliced meat of your choice...prosciutto would be nice
1 - 2 cups good stock made from pig's trotters or chicken feet...something that will be very gelatinous

make your stock...i always keep some rich hearty stock in my fridge.  it has to be made from trotters or tails or chicken feet..(something that creates a gelatinous broth when chilled). not only will this give the terrine some good "glue", but it will have more flavor than using a gelatin or aspic base.
blanch and shock each vegetable separately...this will keep the nice deep green color.
if using a collard layer...keep your greens flat for easier layering and nicer presentation.
next i lined the glass loaf dish with a layer of collard leaves.  let them hang over the sides as you build the inside of the terrine.
now you just start layering...make thick enough layers so you can tell what it is, but just do whatever you want with the vegetables you have chosen.  i happen to have some ham in the fridge so i threw a layer of that in...i think it should have been something else, but it worked.

once you're done with the inside, pour a little broth over the top.  then take the over-hanging leaves and cover the top.  lightly press down to compact everything...there might be some over-spill of broth, so be ready for that...
cut a piece of parchment to cover the top and then cover with foil.
bake in 350 oven for 30 minutes
IMPORTANT NOTE...i used a bain marie,so the outside wouldn't get browned.
preheat your oven and your bain marie vessel of choice.  make sure your water is hot going into the bath.
NOTE...the timing depends on how much you have packed in there, how much liquid, how done you like your veggies and so on and so on...i think mine was 30-40 minutes.  i looked for little bubbles boiling on the sides of the glass dish and took it out.
let this cool to room temp and refrigerate.

to remove you'll need to run a flat thin blade around the edges...or dunk in some hot water to loosen.

slice and serve at room temp or slightly warmed as a side.  i bet a nice poached egg would really be delicious with this and some crumble prosciutto over top

thanks for making it to the end and, again...please leave a comment with any questions

Wednesday, 5 October 2011

0 Crack Pie

crack_pie_fork_2


If you follow the food media, then you know about crack pie. I mean, Crack Pie ™. Yup, I believe that Momofuku has trademarked the name. I did not have a chance to visit Momofuku's Milk Bar during my last visit to New York City, but I will definitely go to Milk Bar during my next trip to NYC. And I will try Christina Tosi's Crack Pie ™. If the real thing tastes anything like the pie I baked today, then I will gladly pay $44 for the pie. Although, if the real thing does taste anything like the pie I baked today, then I actually don't need to buy the pie ever again since I can do it myself.

When I first set out to make the crack pie, I wasn't sure which recipe to use. Searching the internet resulted in 2 or 3 "official" recipes from Tosi. Her Milk Bar cook book is coming out this month and it will probably have yet another version of the recipe. I decided to go with the recipe published in the LA Times.

crack_pie_crust_closeup


The recipe yields two 10-inch pies. I don't have any 10-inch pie pans, so I used one 9-inch pie pan (1-inch deep) and one 10-inch tart pan (3/4-inch deep). My pie version had a lower crust to filling ratio. The bottom crust was less distinct and melded into the thick and gooey layer of filling. My tart version had a higher crust to filling ratio. The crust stayed distinct and crisp. The thin layer of filling was less gooey and a tad more set than the filling in the pie version.

I had a hard time deciding which version I liked more. If I had to pick only one then I choose the tart version. I really liked how crisp the salty and sweet toasted oatmeal cookie crust was in the tart. It had a perfect amount of the sweet, buttery filling. Not too much and not too little.

crack_pie_tart_slice

^tart version^


crack_pie_pie_slice

^pie version^


The pie version was delicious too, but most of the bottom crust was slightly softened with the yummy filling and was not crisp enough for me. The side crust stayed crisp, but I wanted more crispy crust with every bite of my slice and not just at the edge. A 10-inch pie pan would actually result in the perfect ratio of filling to crust and just the right crispiness which is probably why the recipe says to use 10-inch pie pans (duh!). I will be running out soon to buy a couple pans since I will definitely be making this pie again.

There is an incredible amount of hype surrounding this pie. Many swoon over it. But there are just as many haters. Many of the dissenters have tried the pie at Milk Bar and were less than impressed. They tried the real thing and felt it was just so-so and would never pay to eat it again. I have no problem with that. But even more of the dissenters are people who have not tasted the Milk Bar Crack Pie ™ and have only tasted their own homemade version made using one of those "official" recipes. A lot of people are flabbergasted that anyone would have the nerve to charge $44 (or whatever price) for a simple pie and criticize a pie's cost instead of the taste of said pie. A more fair criticism would be that they would never pay $44 for the pie they made.

[BTW...Yes, I know we're in a recession and $44 for any pie in any economic climate can be considered excessive, but this is a luxury item not unlike $5 lattes or $100,000 cars.]

Initially I was a little worried about serving my crack pie since it's quite cosmetically challenged. It's very brown. Even the dusting of powdered sugar didn’t help dress it up. It was hard to slice and get out of the pan cleanly. When I set the pie out to serve, I wasn't sure what to call it. Should I just say it's a chess pie with a salty, toasted oatmeal cookie crust? Would it be presumptuous to label it "crack" pie? What if people didn't get the name? Or even worse, what if they did get it and didn't agree that it was as addictive as crack? My worries were totally unfounded. Everyone who tried my pie absolutely loved it and said it totally lived up to its name. Someone told me that butter is her favorite food group.

crack_pie_fork_1


Crack Pie
(Recipe from LA Times February 11, 2010)
Makes two 10-inch pies

LA Times Note: Adapted from Momofuku. This pie calls for two 10-inch pie tins. You can substitute two 9-inch pie tins, but note that the pies will require additional baking time, about 5 minutes, due to the increased thickness of the filling.

Alpineberry Notes:

-- Instead of a 9x13 pan to bake the oatmeal cookies, I used a half-sheet pan and spread the batter out to about 9x13.

cp_oatmeal_1
cp_oatmeal_2


-- Instead of two 10-inch pie pans, I used one 9-inch pie pan and one 10-inch tart pan.

cp_pie_pan
cp_tart_pan


-- My baking time for the pies was different from what is stated in the LA Times recipe. My total baking time was 40 minutes (350F for 20 minutes and then 325F for 20 minutes).
crack_pie_be


Continue reading...

Tuesday, 27 September 2011

0 Cocoa Oatmeal Muffins

cocoa_oatmeal_muffin_2


I totally wanted to dust off my rolling pin and participate in this month's Daring Bakers' croissant challenge, but I just couldn't find enough time to fit it in before the posting deadline. Croissants have been on my baking to-do list forever and I don't think I will be marking it off anytime soon.

I've been baking less since I've been trying to eat less sugar lately. I don't like using sugar substitutes like stevia (Truvia), sucralose (Splenda) or aspartame (Equal, Nutrasweet). They all have a funny aftertaste. And those sugar substitutes don't do well in most baked goods anyway since real sugar not only adds sweetness but aerates, moistens and adds structure to the baked good. Sugar substitutes can only add sweetness.

This cocoa oatmeal muffin is by no means health food and is definitely not low in sugar or fat. It is seemingly healthy due to the oatmeal. I love the deep, rich flavor of the unsweetened cocoa powder. And as strange as this might sound, it tastes just like a bowl of oatmeal (but with chocolate!).

Cocoa Oatmeal Muffins
(makes 15-18 muffins)

2 cups old-fashioned rolled oats (not quick-cooking)
2 cups buttermilk (low fat is okay)
1 cup all-purpose flour
1/2 cup unsweetened cocoa powder (natural not Dutch-processed)
1 1/2 tsp baking soda
1 1/2 tsp baking powder
1/2 tsp kosher salt
2 large eggs
3/4 cup granulated sugar
2/3 cup vegetable oil (like canola or grapeseed)
1 tsp pure vanilla extract
1/2 cup chopped bittersweet chocolate (optional)

Preheat oven to 350 F. Line 15-18 standard-sized muffin wells with cupcake liners.

Combine rolled oats and buttermilk in a large mixing bowl. Let mixture sit at room temperature for about 30 minutes, stirring occasionally.

In another bowl, whisk flour, cocoa, baking soda, baking powder and salt to combine. Set aside the dry ingredients.

Add eggs to the oats-buttermilk mixture and mix well. Add sugar and mix well. Then add oil and vanilla extract and mix well.

Add the flour-cocoa mixture to the wet ingredients and fold until the dry ingredients are just incorporated. Gently fold in chopped chocolate (if using). Do not over mix. The batter should still be slightly lumpy.

Fill your muffin wells about 3/4 full. Bake at 350 F until muffin tops have risen slightly and a cake tester inserted into the center of a muffin comes out clean (a few crumbs are okay), about 20-25 minutes.

Sunday, 25 September 2011

0 Parmesan Pound Cake

i know i've said this more than a few times lately..but...

this is another one of my new favorites


PARMESAN POUND CAKE !!!


i agree, this does sound a bit odd, but it totally works...it more than works
it's moist, it's dense...very surprisingly light in flavor and...

IT'S DELICIOUS !!!


this fabulous recipe was impressively obtained by a fellow blogger after she tried it at the restaurant Metrovino in Portland Oregon.  many kudos out to Susan S. Bradley at lunacafe.com...AND the chef that handed over the recipe.  sometimes we just get to enjoy the food at a restaurant never  to have it again, but she loved it so much she begged the owner for the recipe.  i was so happy she did. ..AND so kind of Chef de Cuisine Gabrielle Quiñónez  because there are many many chefs out there who covet their recipes so that no one can duplicate it.
i am quite sure that i, in no way, have duplicated it, but mine DID come out quite spectacular.  it reminded me of these little muffin cakes i made a while back called "Quesadillas" or Sweet Cheese Bread.  did i post about those?...i don't think so.  i should have...they were eaten too fast.  this recipe intrigued me because not only were these little cakes called "quesadillas", but they also had a sweet and savory factor.   these cheesy muffins  are also made with Parmesan AND loads of butter!...a breakfast staple and any-time treat that is very popular in El Salvador.

on with THIS cake...did i mention i LOVE it?!...really a must try.  the recipe is pretty easy and the original with comments can be found here.  i chose to add just a touch of lemon zest for a little zip and acidity. for service?...this is a pound cake!...pound cakes go with just about anything and can be eaten any time.  it's absolutely at it's peak a few hours after baking, but can be kept out covered over night or in the fridge for a few days and brought to room temp for service.  BTW...it sliced very clean with a little chill on it (for presentation purposes)


PARMESAN POUND CAKE
recipe from Metrovino Restaurant in Portland, 

preheat oven to 350 F.  butter and lightly flour two 8 x 8 metal cake pans or one  9 x 12 or 9 x 13 metal baking pan...i used a 9 x 13

2 cups unbleached AP flour (10 oz.)
2 tsp baking powder
1/2 tsp fine sea salt
1 cup freshly grated Parmesan cheese...fine NOT shredded
1 cup butter, room temperature
2 cups sugar
6 large eggs, room temperature
2 cups creme fraiche, room temperature (or substitute 1 cup cream and 1 cup sour cream combined)
1/2 cup cream cheese
zest of 1 lemon...my add in...optional, but delicious

sift flour, baking powder and salt into a large bowl
whisk in Parmesan.  set aside
cream together the butter and sugar in a mixer for about 5 minutes
add eggs one at a time at medium speed, mixing well after each addition
add cream cheese and zest of 1 lemon...mix until smooth
on slowest speed, alternate adding the creme fraiche and flour mixture, ending with the flour mixture...do not over mix
pour the cake batter into prepared pan and spread evenly.  tap the pan down sharp;y on the counter a couple of times to release any air bubbles
bake at 350 F for 45-55 minutes or until toothpick come out clean. i used NON confection at 350F and it was done at 45 minutes.   let cool

invert the completely cool cake onto cutting board...i let it sit there for a while to completely...i say completely cool.  you don't want the cake to sweat if you are storing it in the pan...so then i flipped it right side up onto parchment paper and back into it's cleaned out baking pan...i knew it was not going to be eaten up that day.  my baking pan has a nice cover and i LOVE parchment.

this recipe is pretty large and goes a long way.  what you don't eat will keep very well in the fridge for about a week...just let it come back to room temp because it's quite dense when cold.
serve as-is or with fresh berries, ice cream, creme anglaise, a little sprig of basil was nice...
how ever you serve it, i'm sure this will be a big winner.


Sunday, 4 September 2011

0 Lemon Lavender Pound Cake


lemon and lavender is a fabulous combo. this lovely simple pound cake shows it well.
bright fresh aromatic flavors really pop with this easy recipe.
just get ahold of some organic dried lavender and the rest is probably in your pantry and fridge.  
Organic you might ask?...
i DID happen to have some that i had bought a while back, BUT i have used lavender from the garden and i'm not dead yet!...so if that's what you've got, or your neighbor (thanks Wendy) has some in the yard...
i don't think the lavender police will be knocking anytime soon.  wash it well or look up some safe methods for drying lavender...maybe you can just use the buds straight from the stem.  we're pretty pesticide free here at this house.


with a nice cuppa tea for a quite afternoon break...


or sliced and presented for that last late summer brunch...
everyone enjoyed this cake.
it's not dense and heavy like some pound cakes and it's not too light like a regular cake.  it's right between the two.  the texture is smooth and the flavor is sweet and tart from the pop of lemon...the slight hint of lavender just gives you a nice calming effect.  be careful and don't get heavy handed with the lavender...more is not better.  you want just a slight..."hmmmm, what is that?" aroma to hit the senses...as you and your guests fight for the last crumb.


LEMON LAVENDER POUND CAKE

preheat oven to 350 F.  grease 9 x 5 loaf pan

CAKE
1 1/4 cup flour
1 tsp baking powder
1/2 tsp salt
1 large lemon, zested and juiced...keep seperate
1/2 cup unsalted butter, room temperature
1 cup sugar
2 eggs
1 tsp vanilla extract
1/2 lemon extract
1/4 tsp lavender extract (if you have it)
2 Tbsp dried lavender (if no extract use a little more dried lavender)
2/3 cups milk

GLAZE...squeeze 3 Tbsp of lemon juice into a small bowl.  stir in 3/4 cups powdered sugar until there are no lumps.

in a small bowl combine the flour baking powder and salt...stir in zest of 1/2 lemon...set aside.  in another bowl, beat butter and the 2 Tbsp of lavender with mixer...gradually add 1 cup of sugar and beat until light and fluffy.  add eggs 1 at a time.  then vanilla, lemon, lavender extracts and slowly add the milk.  it will look kind of curdled...that's OK.  Hanna, the original poster, says to do the rest with a wooden spoon...Momma knows best so i did as i was told.  stir in the flour mixture with a wooden spoon just until well combined.  don't over mix.
pour into prepared loaf pan and bake for approx. 55 minutes or until golden brown and tooth pick comes out clean.
when the loaf is done put pan on a rack and get a skewer to poke holes in the top while the loaf is hot.  drizzle or brush half of the glaze over the top.  let cool for about 15 minutes, then run a knife around the edges of the pan.  turn the loaf out, then right side up and drizzle the remaining glaze...finish with a little more lemon zest.


Thursday, 1 September 2011

0 Barbacoa Beef Cheeks - Slow Cooker Style


well i thought i better throw the dog a bone and serve you all up some MEAT. 
did you think i forgot about all my carnivorous friends and followers?

here, for those of you still on the fence about "nose-to-tail" cooking, is a tasty and safe introduction to a less common cut of meat.
BEEF CHEEKS......one of those illusive parts that you might be introduced to in fancy restaurants (or an authentic taco stand IN Mexico), but never see or hear about anywhere else.


i finally found some in my Mexican market here in So. California.  soooo happy...

beef cheeks are the definition of unctuous....
go ahead look it up... 

i think it's a cross between Mom's (Momacita's) all day pot roast and slow cooked oxtails...a wonderful rich beefy flavor with a little sticky gooey texture you find with the oxtails.
the recipe i found has a wonderful blend of flavors... with a hint of lime citrus and warm undertones from the cumin and oregano.  the broth was like none i had had before.  i think the fact that there were NO onions or other vegetables in the slow cooking process really set this one apart from my other crock pot recipes...

i will definitely use this base recipe again and again.


BUT i gotta tell ya...this is the ugliest, most difficult piece of meat i have ever had to butcher.

note to self and others....buy more than you need because by the time you trim away the chunks of fat and grizzle AND veins and silver skin you will have about 1/2 of what you purchased.
i suggest buying it already trimmed or ask the butcher.

luckily i knew i didn't have enough to fill the crock pot so i bought 4 large short ribs to add in.
THE SHORT RIBS WERE FABULOUS MELT IN YOUR MOUTH DELICIOUS !!!
so, by all means if you can't handle beef cheeks, or just can't find them, use short ribs or another choice of fatty meat that works well for slow cooking.


BARBACOA BEEF CHEEKS...slow cooker

the recipe calls for 6 pounds beef cheek meat
1 bought a package that read 2.65 pounds (that's all there was)...after trimming what ever i could i was left with 1 1/2 pounds so i supplemented with 4 large beef short ribs
2 tsp salt
2 tsp pepper
1 Tbsp cumin
1 Tbsp Mexican oregano (Mexican is best...get some)
2 tsp garlic powder
8 cloves garlic, peeled and smashed
1 whole bay leaf
2 whole limes
1 cup beef broth...homemade, rendered form roasted beef bones is best
2 tsp Mexican chili powder, optional
1/4-1/2 tsp cayenne, optional
i think a little heat is always necessary...

rinse cheek meat and trim away as much fat, gristle and silver skin as possible...good luck with this.  it ain't a pleasant job.  cut into large pieces.
put meat into large crock pot (i think mine is a 5 1/2 qt.) and season well with salt, pepper, cumin, oregano and garlic powder.
add bay leaf and squeeze lime juice all over (pulp is fine)
add the beef stock.
stir slightly, cover and cook on HIGH for at least 6 hours...mine was in for a little over 7 hours.
i checked on mine after a few hours and gave it a little stir.
if the meat is fork "butter" tender you're good to go.

take the meat out with a slotted spoon and strain the broth.  the broth might come in handy to remoisten the meat if necessary...and the broth might just make a delicious soup base.  shred the meat and discard any solid fat or grizzle you might have missed in the lovely trimming process.  taste and season as you see fit.  try not to eat it all yourself while shredding and seasoning...

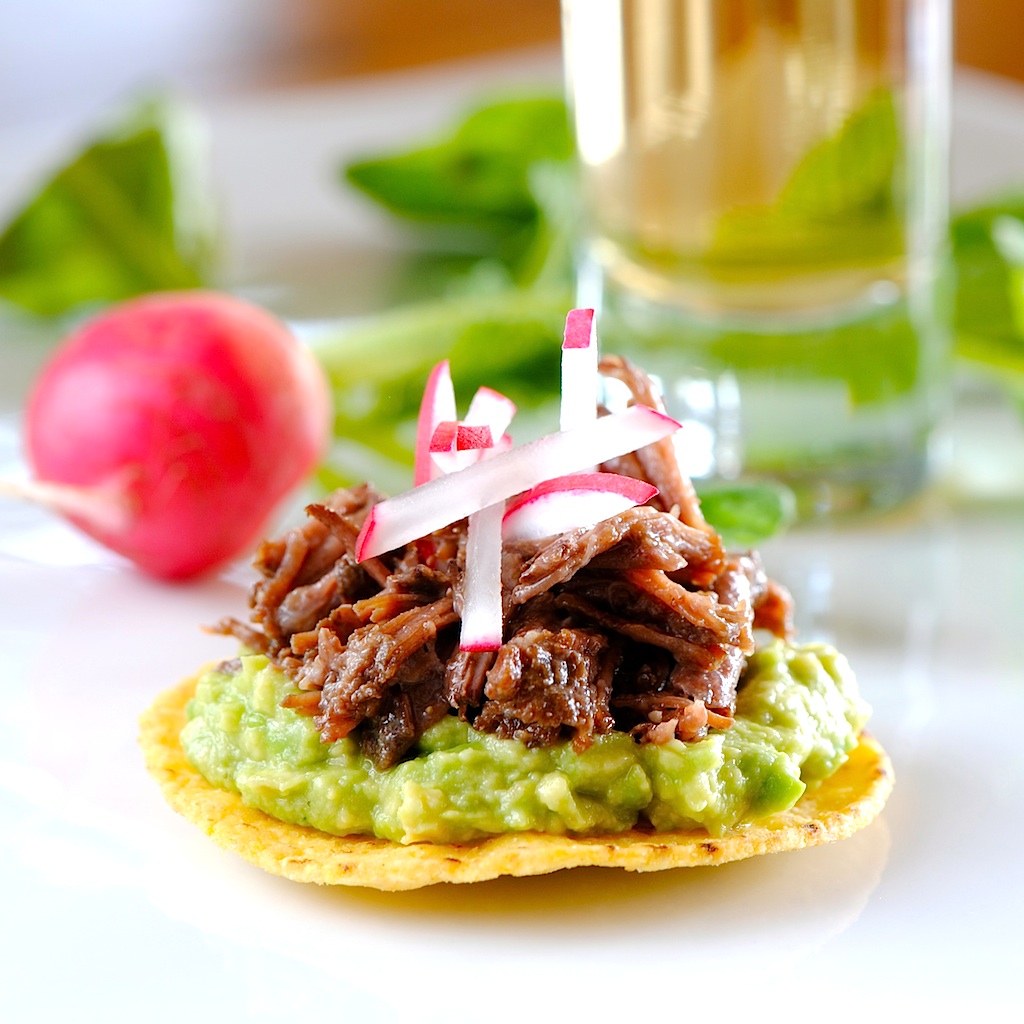
serve with your favorite tortillas, avocado, cilantro, crumbled queso fresco, fresh salsa, diced radish, etc etc etc...dress it up or just keep it simple....OR make little Tostaditas as i did for an interesting Mexican hors d'oeuvre...
maybe a fun amuse bouche for your next Mexican fiesta.

 
back to top //PART 2