Showing posts with label fowl. Show all posts

Saturday, 9 June 2012

0 Chicken Curry-Indian style


 a straight up Chicken Curry recipe.  my go-to sauce when i want something rich, warm and spicy.  i don't know how 'authentic' it is, being that Newport Beach is not the mecca of Indian cuisine...and i have not yet been to India, but it does the deal when craving something with a good deep garam masala curry flavor, not that boring yellow curry that i grew up with.  i do have another great curry recipe, but this one is so easy with no frills, no creamy coconut or yogurt sauce...just good curry.

the chicken is tender, the curry sauce is tasty, it's easy to throw together and it freezes well for reheating. i've made it quite a few times and always change up a little something, but i finally wrote down the basics.  you could easily add a little coconut milk or some plain Greek yogurt if you wanted to make it a creamy style curry.

 i'm not big on carbs so i usually serve this with some steamed cauliflower, but this would be a fabulous main dish over some basmati rice, cous cous or maybe wrapped up in some naan...even a soft flour tortilla or some pasta if you're feelin' like some fusion.

NOTE...i've made this with extra firm tofu as well.  one time i cubed and sauteed the tofu in a little olive oil before adding to the curry mixture.  the second time i just added it in cubed.  always drain and press your tofu before using so it will absorb all the flavors.  i just finished some that i had frozen and it was delicious...not quite as saucy but still very flavorful and didn't separate as some sauces might.


CHICKEN CURRY... INDIAN STYLE

2-3 Tbsp olive oil
1 large onion, diced
1 clove garlic, small dice
1-2 jalapeno, small dice (remove seeds if you can't handle the heat)
1 Tbsp grated ginger
1 1/4 lbs skinned boneless chicken thighs cut into large bite size.
2 cups chicken stock.  homemade or low sodium
1 Tbsp Madras curry
2 Tbsp Garam Masala curry
1 tsp Mexican chili powder (use your discretion)
zest from 1/2 lemon
a squeeze of lemon juice, more or less to taste
cilantro or parsley for garnish
salt and pepper to taste

saute onion, garlic, jalapeno and ginger in olive oil until onion is just translucent
add spices, stir in for 2-3 minutes to wake up the spices...until fragrant
add chicken and stir
add broth and incorporate all
let simmer until chicken is cooked through
curry sauce should thicken a bit.
add a bit of zest and a squeeze of lemon
taste for seasoning.  probably needs salt at this point
zest lemon and sprinkle parsley/cilantro over and serve.


Wednesday, 21 December 2011

0 Tamale Fusion...A savory and sweet success.


TAMALES  TAMALES   TAMALES...

'tis the season for TAMALES

fist time out of the gates with the tamales and i think i did alright..
maybe i bit off more than i could chew, but i made 3 different tamales... shredded Asian duck with lightly sauteed Comice pears in tarragon...then i made some with pulled pork smothered in Mexican Red Sauce (Red Sauce Recipe found here), Hatch Chilis and queso fresco...then to round out the trio i made sweet tamales with apples and sultana raisins sauteed in butter, brown sugar and cinnamon and topped with toasted pecans...WHEW that's a mouth full.  i'm tired just thinking about it.  they were all fabulous.


there really is nothing like a fresh tamale right out of the steamer.  i can't remember the last time i had one, but it was probably packaged or frozen or brought home and reheated.

once a year at this time our good long time friend, Lupe,  brings us "REAL" authentic Mexican Tamales...and i say real because she was born in Mexico and her mother taught her how her mother taught her and so on and so on...
below is a quick photo of the loot that Lupe brought to us on Saturday night...
i must state that Lupe's Tamales ROCK !...experience definitely shows in flavors and texture.
  
making them yourself is so rewarding and like i said...fresh from the steamer these tight little packages are unbelievably delicious.  it really isn't rocket science (when you take a few short cuts like i did) and they ARE a little labor intensive and tedious....BUT well worth the effort.


above is the shredded Asian Duck.
if you would like to know how i prepared the duck meat please refer to an earlier post i did on Asian style Duck Rillettes...just go as far as shredding the duck to bite size pieces.  i sauteed the Comice pear with a little butter, brown sugar and dried tarragon...then added fresh tarragon before wrapping.  this needed a little sauce to go with it.  my first thought was Sriracha (Asian HOT sauce)...but i think i could have been more creative.


above is the sweet tamale filled with 2 kinds of apples (Granny Smith and Yellow Delicious) sauteed in butter, brown sugar, cinnamon and nutmeg...with a few chopped toasted pecans.  i mixed a bit of sugar into the masa.  serve with whipped cream, ice cream or as i did with a little maple syrup for breakfast...YUMMM !

i have no real written recipe, BUT i do have...
A FEW GOOD HELPFUL HINTS AND SHORT CUTS...
from a first time tamale maker.

1.  buy prepared masa made for tamales.  find a real Mexican market or tortillaria near you.  i found mine at El Matate.  go in the morning, it's still warm in the bag.  now that's fresh.  try not to fall for anything pre-packaged.  the fresh will come in a big plastic bag and hopefully still warm, but definitely moist and mooshy.
2.  make your stuffing/filling the day before...or pull from your freezer like i did with the pulled pork and Mexican Red Sauce.  you don't want to do all this in one day...trust me, the tortilla assembly and cooking will be enough for one day.  i did, however, make the sweet tamale stuffing that day...quick and easy.  like making your favorite apple pie filling.
3.  if you can't deal with the corn husks, try wrapping them in parchment squares.  they aren't as cute and authentic, but it does the trick.  i think you can also purchase pre-cut tamale wrapping paper.  i would have bought a package had i known, but i'm glad i went with the husks on the first time out.
4.  when wrapping, make sure they are totally covered and your husks haven't split.  the filling WILL squish out during cooking.
5.  you can use string instead of corn husk strips to tie them up...this is not an easy task using the husk strips.

6.  if you don't have a proper tamale steamer, use your pasta strainer or vegetable steamer at the bottom of your stock pot.  i used a large vegetable steamer insert, as shown above, and had to lay my tamales flat instead of the traditional upright cooking method.
7.  you need to have them sit a coup[e inches from the bottom and not touch the water.
also...you need enough water to be able to steam for 1 hour.

8.  these can be wrapped ahead of time and cooked before serving.  they will take approximately 1 hour to steam.
9.  they keep well in the fridge for a quick meal and i suppose they can be frozen as well.
10.  reheat in the microwave wrapped in a damp paper or cloth towel to keep moist.


Tuesday, 8 March 2011

0 Turkey Tails...Braised and Roasted


TURKEY TAILS...

it might be the last thing over the fence, but...

it's the best bite on the bird.

they're so delicious and so easy to prepare, but extremely hard to find more than one at a time...
and that ONE is usually attached to your Thanksgiving bird.


 back in Sept. '09 i posted about BBQ Turkey Tails...  well, i'm still eatin' tails and i thought i'd share this easy way to prepare them without going out in the cold and lighting the grill.  they're boiled, (or "braised" if ya want to get fancy) for a few hours while you're hanging around the house and roasted 'til they get plump, golden, sticky with glaze and absolutely unctuous !...i find this way they are even more succulent and delicious.  they are addicting...really.  i get all my friends and family to join the Turkey Tail Club.  some just can't wrap their head around the idea.  too bad, they aren't in the club!  some people are amazed and some are on the fence...no pun intended.  mostly it's just fun for me to watch the person, their reaction and see if they ask for another.

come on..you're a bit curious aren't you?...
i'm not kidding...if you can get a hold of some of these babies please try them.  the conversation alone is worth the small effort...besides you'll end up with some delicious broth if all else fails.
and they're CHEAP!!!


TURKEY TAILS...Braised (boiled) and Roasted

WHERE TO FIND THESE LITTLE NUGGETS???
 i'm lucky to have a store here in So. Cal called Gelson's that serves fresh roasted turkey everyday at the deli.  they, for some odd reason, keep the tails and package them up and put them up for grabs in the poultry section, about 6 per package runs about $1.50...i'm always curious...who the heck knows about these tails?  is there someone else out there that loves these things as much as i do?...if your market sells fresh roasted turkey, go ahead and ask what they do with the tails.  maybe some lucky guy in the back gets the best bite everyday...maybe he'll share.  otherwise, just ask your butcher where you might find some...if anything, both of you will get a good laugh out of it.

PREPARATION
short version...boil them in good flavorful stock for 3 hours, marinade for a few hours, then glaze and roast 'til sticky and golden brown.
more explicit directions...start these like you would any good stock or broth.  i'm always making stock with a roasted chicken carcass from Costco so i throw it all into the pot with a quartered large onion, a few celery stalks, a couple of carrots, 4-5 smashed garlic cloves, bay leaf, Mexican oregano, fresh rosemary sprig, a dash of cayenne, a tsp of cumin and some fresh ground pepper.  water to cover by an inch or 2...or better...throw in some homemade stock from the freezer or a can or 2 of store bought stock and water to cover.
NOTE...remember...your end product is not only the turkey tails but a delicious broth as well.
bring to a boil, then down to a slow simmer for about 3 hours.  check your liquid level a few time to make sure they are covered.
after about 3 hours, remove the tails from the pot.  strain your lovely broth and save for a rainy day.
NOTE...here's an odd thing.  sometimes there is a little feather membrane piece that is protruding from the top of the tail.  pull these out while they are warm...don't freak out.  there not always there and if they are it's 1 or 2 at most.
let the tails cool.  while cooling,  smother them in your favorite marinade/glaze.  the one i like best is by Soy-vay.  the Hoisin Garlic Sauce, but any tasty marinade/glaze will do.  you want them to rest and soak up the flavor.  anywhere from 1-3 hours is fine...i leave my in the fridge sometimes over night.
preheat oven to 370 F
place tails on aluminum covered (easy clean up) cookie sheet or roasting pan.  put in the oven and keep an eye on them.  you'll need to turn them and glaze them to get good and sticky.  time varies, but i have found about 30-40 minutes in total works well.

EATING A TURKEY TAIL
they not only look odd, but they ARE odd.  
this is one of those "GO FOR IT" instances where you just have to take in a huge bite to get the whole unctuous effect.  there's no nibbling here.  you need to bite the whole side off one side of the tail bone.  i wish i could demonstrate...it's kinda hard to explain.
another way to go is to remove each side off the bone with a knife, but still you must stick a whole side in your mouth...i promise you.

i'll stop now...geez, this is one of my longer posts.  i just get so excited about the strangest things.

so...ask yourself...

are you willing to join "THE TURKEY TAIL CLUB" ??? !!!


Sunday, 6 March 2011

0 Chicken Terrine with Bacon and Sun Dried Tomatoes


terrines are great. they usually come with some fancy name or some fancy ingredients, but alot of them are just a glorified cold meatloaf.  you can put just about anything in a terrine.  i made this one quite a while ago and forgot to post about it.  this was my first attempt at what i thought was going to be a big "challenge"...not so.  it was easy.  i just tend too make things more involved than necessary.  since this lovely specimen, i have made quite a few "Terrines"...a few weeks ago i made a "Trotter" Terrine with Roasted Chicken that i will be posting about soon..DELICIOUS! and i've made a few Pate De Campagnes that could be considered a type of terrine...also DELICIOUS !

you can fancy your terrine up for a party or you can simply slice it up for a snack or a packed lunch.  they keep very well because they're packed tight and don't contain any ingredients that spoil easily....great for sandwiches or paninis and a fabulous addition to any salad

photo above is my ultra professional gourmet-way of the pressing process...
no need for some fancy terrine press.  just a meatloaf pan, a piece of foil covered cardboard to fit inside and some heavy stuff that will weigh it down.  might look kinda funny sitting in the fridge and you have to make some room, but it doesn't take but a little while and it's well worth it.
since this was my first terrine i thought i'd go to the basics...that means google "easy terrine recipe"...

you'll never guess who popped up...and not just once....
BETTY CROCKER!
yes sir-ie...good old Betty C.
if your interested in trying out a terrine for the first time, i'd suggest this one.   it's safe, has no weird ingredients (like liver or other odd parts), it's easy and pretty much all done in your processor.  i added bacon so that was another step, but i always have bacon on hand...so should you. hee hee

CHICKEN TERRINE
with BACON AND SUNDRIED TOMATOES
adapted form Betty Crocker (original found HERE)

1/4 cup chopped parsley
1 1/2 lb. boneless skinless chicken breast halves
2 Tbsp chopped shallots
1 Tbsp fresh chopped thyme
1 Tbsp fresh chopped rosemary
1 Tbsp olive oil
1 tsp salt...maybe a little more
2 egg whites
5-6 slices cooked bacon cut into pieces
5-6 chopped sundries tomatoes...depends on the size

heat the oven to 350 F.  line the loaf pan, 8 1/2 x 4 1/2 inches, with aluminum foil.  sprinkle parsley in the bottom of the pan.
remove fat from chicken.  cut chicken into 1 inch pieces.  place chicken into food processor.  cover and process until coarsely ground.  add remaining ingredients except sun dried tomatoes and bacon.  cover and process until semi smooth or until your liking.  mix in sun dried tomatoes and bacon.  spread into pan
cover pan tightly with aluminum foil.  bake for 1 hour.
NOTE...i'm pretty sure i used the bain marie method
remove foil and bake for 20-30 minutes or until meat thermometer reads 180 F in the center.  cover and let stand for 1 hour.
pour out remaining liquid after it has cooled.  refrigerate for at least 3 hours.
NOTE...this is when i put the weights on and press it.  i don't know if this is totally necessary, but it ensures a nice tight loaf for better slicing..
when cooled invert and remove from pan and remove foil...VOILA...your "Terrine"


Tuesday, 14 December 2010

0 Chicken Coconut Curry...Indian Style


INDIAN CHICKEN CURRY...

this is definitely a KILLER CURRY recipe.  i admit, i am a novice to Indian cooking and Indian foods, but this is a fabulous introduction to some delicious Indian style flavors and cuisine.  i think it's pretty darn easy, you just need the right spices.  from what i gather your choice of spice blend or Garam Masala is a key factor in the curry department.  i suppose most people think of "curry" as that yellow powder, but as i quickly found out there are many many different curries out there AND not all Garam Masalas are alike.  i would suggest buying your curries and or Garam Masala from somewhere authentic.  the first bottle i bought from a huge chain store wasn't even close to the stuff i bought at the Persian/Middle Eastern market.

anyway...if you're looking for some good belly warming curry, this is a great recipe to start with.  don't worry about the coconut milk being too strong.  the coconut milk does not make it taste "coco-nutty" as i thought it might...it just adds to the rich sauce.  it's all pretty simple, done in one pot/large skillet and my first try was a delicious winner.  i will definitely make this again and would be quite proud to bring this to a holiday potluck...oh, yeah, right...like i'm going to sooooo many potlucks lately.

INDIAN CHICKEN CURRY
found at Recipes.com submitted by Amanda Fetters

i adapted the recipe a little... where it calls for 3 Tbsp of "curry" i used 2 Tbsp of Garam Masala and 1 Tbsp of yellow curry
ALSO i used more ginger root, approx 1 Tbsp
AND 4 chicken breast halves.  approx 1.25 lbs

INGREDIENTS
3 Tbsp olive oil
1 small onion, chopped
2 cloves garlic, minced
3 Tbsp curry (2 Tbsp Garam Masala, 1 Tbsp yellow curry powder)
1 tsp cinnamon
1 tsp paprika
1 bay leaf
1/2 tsp fresh grated ginger root...i used more!
1/2 tsp white sugar
salt and pepper to taste
2 skinless, boneless chicken breast halves-cut into large bite size
1/2 tsp grated fresh ginger root
1 Tbsp tomato paste
1 cup plain yogurt...i used Greek non fat
3/4 cup coconut milk
1/2 lemon, juiced
1/2 tsp cayenne pepper.  optional more or less to taste

prepared rice and or some steamed vegetables go great with this.
photo is with steamed cauliflower and peas.

DIRECTIONS
heat olive oil in a skillet over med. heat.  saute onion 'till lightly browned.  stir in garlic, curry powder, cinnamon, paprika, bay leaf, ginger, sugar and salt.  continue stirring for 2 min.  add chicken pieces, tomato paste, yogurt, and coconut milk.  bring to a boil, reduce heat and simmer for 20-25 min.

remove bay leaf, and stir in lemon juice and cayenne.  simmer for 5 more min.

serve with rice, indian breads, steamed vegetables or what ever you fancy.
i dug in with a big spoon!

Friday, 3 December 2010

0 West African Chicken Stew


this is by far one of the most delicious recipes i have come across lately.  not only is it one of my new favorites, it's an instant winner with everyone else.  first thought for most is...chicken and peanut butter?  some "pansy palettes" are not so ready to try as others, BUT once they try that first curious bite...it's all over...
actually IT'S ALL GONE !!!
no kidding...my sister-in-law was here (for 24 hours) and i had a fresh batch in the fridge.  i didn't tell her what was in it, i just said it was interesting and "West African"... she was game for a bite...it was ALL GONE by the next morning.  my mother, the namesake of "pansy palette", couldn't keep her fork out of the pot.  now every time we come home from Cost-co with a roast chicken she asks if i would whip up "that yummy chicken pea-nutty thing"...i've even eaten it cold because i couldn't wait for it to be warmed...really you must try this one.


i came across this by luck.  i was on the hunt for some "lo-carb" recipes and found a great blog.
Kalyn's Kitchen.  she has some delicious lo-carb, lo-glycemic, South Beach friendly recipes...AND she introduced me to this wonderful WEST AFRICAN STEW.  (she adapted it from a recipe by  Tony Rosenfield with his 150 ways to use a roast chicken) 
i have copied the recipe for your convenience, but please visit her blog and get her info on this recipe and i'm sure you'll find other great guilt-free goodies.


West African Chicken and Peanut Stew with Chiles, Ginger, and Green Onions
(Makes 4-6 servings, recipe adapted from 
150 Things to Make with Roast Chicken and 50 Ways to Roast It by Tony Rosenfield.)

1-2 T olive or canola oil (the recipe called for 2 T, but I think you could use less)
1/4 cup finely diced red onion (could also use regular onion)
1 T finely minced ginger root (I wouldn't use ginger from a jar for this dish)
2 tsp. finely minced jalapeno (I used pickled jalapenos which worked fine. Increase if you want it spicy.)
salt to taste (I used about 1/2 tsp. sea salt)
1 tsp. chile powder
1 cup chicken stock (chicken broth from a can is fine)
1/2 cup chunky peanut butter (use natural peanut butter without added sugar for South Beach Diet)
2 T tomato paste
1 T cider vinegar
3 cups diced, cooked chicken (use white meat or carefully remove fat from dark meat for South Beach Diet)
fresh ground black pepper to taste
3-4 green onions (scallions) thinly sliced
Finely chop the red onion, ginger, and jalapeno, and roughly chop the chicken. Heat oil in a heavy pan, add finely diced onion, ginger, and jalapenos, season with salt, and saute about 2 minutes. Add the chile powder, stir into other ingredients, and saute about 1 minute more.

Add chicken stock, peanut butter, tomato paste, and apple cider vinegar, stir, and bring to a slight boil. As soon as it starts to boil, lower heat to a very gentle simmer, add roughly chopped chicken, gently stir to combine, and let simmer 10-15 minutes. (Resist the urge to stir it very much, or the chicken will shred apart, which you don't want here.)

While mixture simmers, wash, dry, and slice green onions. After 10-15 minutes, gently stir again if the oil from the peanut butter has separated. Serve hot, with a generous handful of green onion slices on each serving.


Monday, 18 October 2010

0 WHOLE BOILED CHICKEN

BOILED CHICKEN ??? !!!...how completely boring you might say.

well, you wouldn't say that if you lived on my block while this baby was boilin'. the aromas alone were just right for the day...kinda gloomy, kinda Fall-ish, nuthin' goin' on, and mom didn't feel so great. so, what better than some good ol' Grandma style boiled chicken and clear yummy golden broth? all is right in the world when the house smells like Grandma's in the kitchen.

the trick to this beauty is to boil it whole...i mean whole...do not cut it up to fit the pot. get a pot that will fit the whole bird. i don't know why, but for some reason this will turn out the best "OLD SCHOOL BOILED CHICKEN" you've ever had. it's great right out of the pot, but with a few extra steps and a little patience you will have the best ever chicken for chicken salad and a RICH GOLDEN "GRANDMA" CHICKEN BROTH for some delicious stock or soup, like my Mega Chunky Veggie-C Soup...

Grandma's Whole Boiled Chicken

1 whole chicken
2 stalks celery
2 large carrots-unpeeled
1 med onion
4-5 cloves garlic
1 large box (24 oz.) low sodium chicken broth

wash your chicken inside and out. remove gizzards and extra bits...don't throw them out, they go in the pot as well.  put everything in a large stock pot...chicken should be breast side up... and add enough water to cover the chicken by about 2 inches. bring to a boil and then turn down to a slow simmer for about 2 hours.  after 2 hours check the chicken by grabbing hold of a leg and giving it a wiggle.  if it seems loose, like it would pull right off, then it's done.  now for the important GRANDMA TIP...don't take it out...leave everything alone to cool as is.  Grandma just left it there to cool, so that's what works best.  it will take a few hours.  this will let your bird rest in all that good broth and soak up all the yummy goodness.
when cooled to about room temp i like to break down the chicken...it practically falls apart.  i keep the main parts whole, like breast, leg, thigh, wing so they can be dealt with easier the next day or make for a nice presentation at dinner
what ever parts you have not eaten...put into a large tupperware-ish type container.
strain the broth and pour over chicken to cover.  (strain though cheese cloth to lessen the fat or use a fat separator).  refrigerate over night.  again, for some "Grandma" reason it seems the chicken is even better the next day after it has cooled in it's gelatinous brothy goodness.
the next day you'll find the most delicious moist chicken for your favorite chicken salad...and you'll have all that fabulous pure golden broth for a rainy day.             

Thursday, 14 October 2010

0 Asian Duck Rillettes

 
the Asian flavors along with Chinese roasted duck really make this rillette different and put a little twist on a charcuterie favorite. i think i've found an easy way to accomplish a great tasting fancy treat without alot of time and effort. 
my secret trick is a Chinese style roasted duck.  i can not pass one of these up when i visit my favorite Asian market...99 Ranch.  it's like going to Costco and not getting the $4.99 roasted chicken.  these things are fabulous. all done, cooked and crispy, moist and ready to eat $14.99...amazing.  that's pretty darn good considering the normal price of a whole raw duck can be around $20.00-$30.00 bucks.

this is a quick shortcut to Duck Rillettes and  fairly easy, well... you might say alot easier than the typical duck rillette that requires the whole confit situation.  done properly a rillette takes days and loads of expensive $$$ duck fat.
  this can be done in a few hours.

ASIAN STYLE DUCK RILLETTES
what you'll need...
start with a whole roast duck. i get mine from an Asian market in Irvine called 99 Ranch.
break it down...legs, thighs, wings,  neck and head, etc...i have the deli man do it for me, but let him know you don't want it chopped up Chinese style.  i like to save the breast meat for myself, but throw the skin and fat into the pot.
2 onions, peeled and cut in quarters
3-4 smashed garlic cloves
2-3 stalks of lemongrass, white part only, bashed
2 inch piece of ginger, peeled and cut into rounds
2 jalapeno peppers halved
2-3 star anise
A few sprigs of cilantro
A few stalks spring onions (I used about 3)
Whole black peppercorns approx. 10 - 15
1/4 cup soy sauce
2 Tsp brown sugar
small jars with airtight lids...or ramekins if you will be eating within a week or 2

in a nut shell this is what you're gonna do...
put everything in a large stock pot and bring to a boil...then to a slow simmer for about 3 hours.  take the duck out and strain the stock.  don't use cheese cloth... you want to save as much fat as possible.  let the stock cool and separate.  let the duck cool enough so you can remove the meat from the skin and bones.  pick or fork the meat apart into small bits, by hand works best ( kinda weird, but it should resemble tuna out of the can). add a little of the stock into the bowl of meat until it is moist.  give it a good stir.  taste test time...check for seasoning.  fill little jars with your meat mixture...make sure there are no air pockets.  i released the air pockets with a fork.  you might need to add a little more stock if your meat mixture is not moist enough...flatten the top a little but leave enough room for a 1/4 inch of fat to cover the meat.  put your jars with meat mixture in the fridge for about 20 min.(this helps the layer of fat stay on top instead of soaking though the whole mixture).  remove from fridge and put the all important yummy layer of duck fat on top.  use a spoon with care or a baster to cover the meat with the pure fat that has separated and floated to the top of your cooled stock.  1/4 inch should do the trick.  you want a good seal.  close with airtight lid and refrigerate. if sealed well with the layer of fat you can save them for weeks in the fridge.  save the stock for a rainy day.  the flavor is outstanding for a quick Asian style soup.  (for example...my Duck Duck Soup)

when ready to eat, bring to room temp and enjoy.  i really like to serve this with some pickled ginger and sesame crackers.  give this a try..it's just a little labor intensive, but so rewarding when you open up your little homemade jar of charcuterie goodness.

Monday, 4 October 2010

0 The Silky Chicken or Black Chicken

THE ELUSIVE BLACK CHICKEN
aka THE SILKY

this is a rare bird indeed!
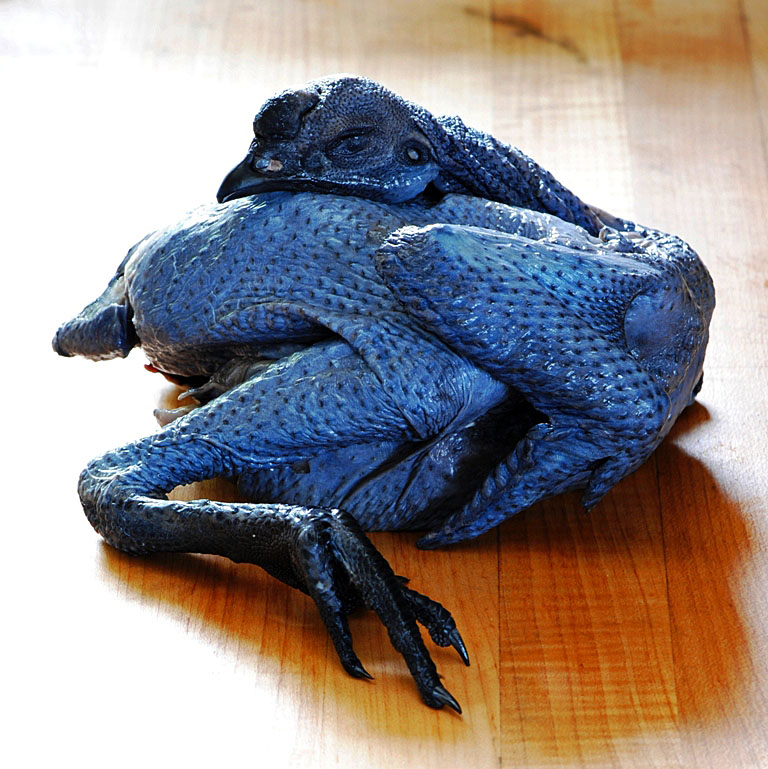
well, on my hunt for the "out-of-the-ordinary" i came across this lovely(?) looking creature...YIKES! can i just say YIKES again.  i must say.......this one finally stumped me.  stymied...as you might know i'm pretty adventurous with foods.  i'm no Andrew Zimmer, but i like to go for the strange stuff.  i find a good challenge and give it a go...this one got me.  i still ask myself why?...it's just a chicken, right?...well...not so much.

#1...always remember to read the fine print on the package..."head and feet intact" AND it has FIVE TOES instead of four!. i missed that part. as the thing thawed and started to unfold, and i DO mean unfold...this small little wrapped up bird was over 2 feet stretched out. AND IT"S BLUE !!!!!...you can imagine what i was thinking. i can handle alot of things, but this one was definitely high on the scale of "what the heck am i gonna do with this?" and "what was i thinking?" BUT, curiosity still had the best of me.

#2...investigate and research what your strange product is all about. i found a few sites with recipes for soup...i thought great! a new twist on an old favorite, chicken soup. not so much. as i read further, after purchase, i found that the black chicken is most used for Chinese medicinal purposes...mainly for sick people, pregnant women or just after giving birth. it's a very lean bird, does not necessarily produce a tasty unforgettable unctuous broth...and i don't really fall into one of the needy categories.

#3...keep your game face on. anyone walking in on you dismantling this black (blue) bird will think you are in need of some help...serious help...i don't mean with the soup...

so what do i do ?...i decided to wing it, of course...(again, sorry about the bad pun).
the easiest recipe i found was HERE at  eating club Vancouver by fellow bloggers ts & js.  they call it Mama's Silkie Chicken or "Dyong Kwe".  this recipe seemed easiest to tackle due to the short list of ingredients.  please visit their site for an easy and quick step by step (with photos) to see how Mama does it.
i didn't have a few of the ingredients so i just went with the recipe i use for Duck Soup found HERE.  it sounded pretty similar with Asian style flavors and such.  i thought if the flavors were basic and normal i might be able to salvage a meal or at least a good stock out of this deal....not so my friend.  after thawing, washing and the obvious photo session...i was not so enthused about the out come.  still i went ahead and threw everything in the pot and hoped for the best.  the best never came...the blue skin turned an unappealing limpy blackish grey and the flesh was unlike any chicken i had ever seen.  hmmmmm...not so good.
next, i thought to myself... get the photo of the finished product, make it look pretty and appealing and maybe it will seem more appetizing.  not so my friend...my "Mama" always warned me that looks can be deceiving...definitly correct when it comes to food photography.  the photo looked great and i was ready to give it a try, but like i said...this one stumped me. i removed the blackish grey skin that i just knew i was not going to be able to eat, to unveil the tough, lean flesh that was streaked with black...and i mean weirdly streaked with black.  at this point (hours from the start of this little journey) i had to give up for the day...throw in the towel...raise the white flag.   i strained the broth and threw everything into a tupperware for a second chance at it some other time. 
that second chance hasn't come up yet...it's in the freezer right now.  i didn't have the heart to toss it. 
i can't let this one get me.  I WILL EAT THE BLACK CHICKEN.  not today, not tomorrow...but...
I WILL NOT LET THIS BIRD WIN !!! 

Tuesday, 14 September 2010

0 Roasted Quail with Orange, Tarragon, Garlic Glaze

Roasted Quail

there really isn't much to them...a few nibbles on the legs, a couple bites of breast meat and you're done...but i must say...what an impressive presentation and a unique dish that really isn't hard to create at all. so easy i've done them twice and i think i'll get some more for this weekend.

i've been interested in birds other than chicken lately and quail has been on my list for quite a while, but they were always a bit too expensive at 5 or 6.00 $ each...and you can't buy just one or two...what would be the fun in that? so i finally found these at my favorite Asian market 99 Ranch in Irvine, Ca. they came 6 to a package for about 10.00$...frozen, of course. i was soooo excited.

i thought as a first timer i better just go the easy route. i had read somewhere that roasting the little bird was the way to go. actually, cooking them is the easy part..eating them is a different story. the first one i attempted to have a little etiquette with the knife and fork, half way through the 2nd it was all hand to mouth...not to attractive, but i definitely enjoyed myself.

OVEN ROASTED QUAIL

2 or more quail...i did 3
butter, room temp
1 small juice orange
a few sprigs of fresh tarragon
1-2 cloves garlic- thin sliced
salt and pepper

QUICK GLAZE

3-4 T. apricot or orange marmalade
2 T.orange juice...more or less
1 garlic clove...
minced fresh tarragon
salt and pepper
note...the amount of ingredients varies with how many quails you have.

preheat oven to 350 degrees
clean your quail inside and out and pat dry.
salt and pepper the inside (remember these are tiny birds, so don't over salt).
inside the cavity put a teaspoon of butter, a small wedge of the orange, a sprig of fresh tarragon and a couple slices of garlic it you want.
rub some butter on the outside, sprinkle with a little salt and tie the legs together with some string. i think this makes for a better presentation.
place on a rack breast side up and place in oven for 20-25 min. checking on them throughout. baste with more butter at least once. if they don't look browned on top you can turn on the broiler and watch them carefully. if the legs are getting too brown you can cover them with a little piece of foil.
remove them from the oven...if they are browned then they are done...there's really not much meat to cook. now you can glaze them and let them rest or glaze and put back in the oven for a few mins. it depends on how you like your glaze....but don't let it burn! i just brushed the glaze on and let them rest. i couldn't eat all 3 in one sitting so it's good to know they warm up well after refrigeration.

FOR THE GLAZE...easy!
in a microwavable dish put marmalade, finely chopped tarragon, orange juice and pressed garlic clove and mix. heat 'till thick brushable liquid or a runny jam consistency. oh geez... just heat it through a few times so the flavors meld and you can brush it on. taste it. season if necessary.

serve one as a starter or two as a main....or go head and do as i did...eat all them yourself ...absolutely no sign of etiquette. they are delicious and quite fun to eat...
when no one is looking

Sunday, 12 September 2010

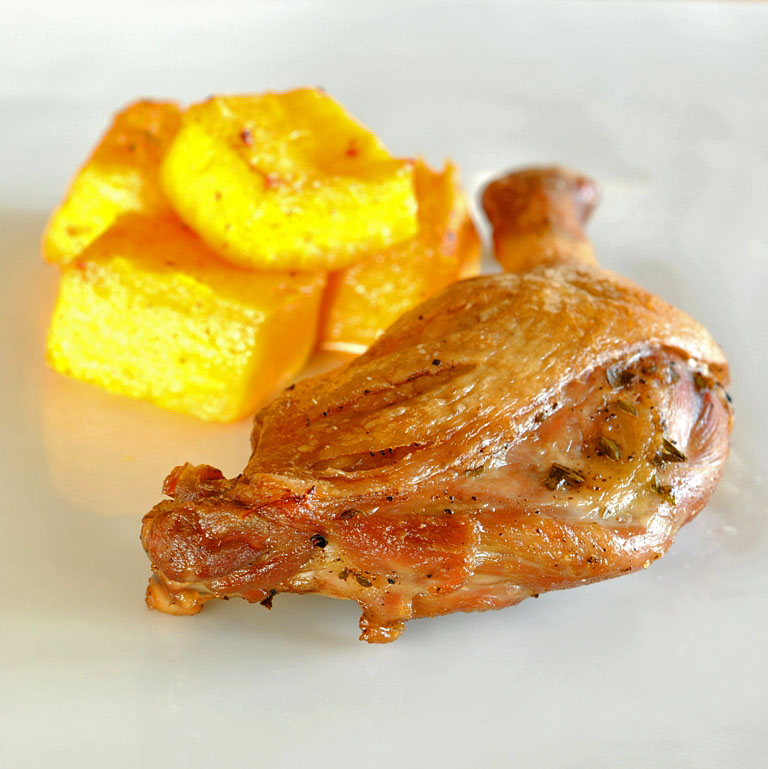
0 Confit Style Roast Duck Legs

yes...i'm still riding the DUCK TRAIN...

and still lovin' every bite of it. if you're game (pardon the pun...so so sorry..they just slip out and i can't help it) please do try some duck cookin'. i think you might find it interesting and a bit more flavorful than the ever popular ever so over used chicken. i am continuously looking for things that have just that little extra something. duck has that rich flavor that chicken sometimes lacks. i recently cooked some duck breasts (expensive, by the way) and i thought it tasted like a cross between a good filet mignon and a perfectly cooked chicken. sounds odd, but it was like a flying cow. the texture was meaty and the flavor was poultry. the leg and thigh are a rich dark meat that are equally as tasty, but not so expensive...2 leg/thighs run about $5.00 as opposed to 2 breasts costing around $18.00 smackers.

if you haven't tried duck, i suggest you do. i found a recipe that is fairly easy and the end result is a roasted confit-style duck, but with a fabulous crispy skin. the truth is...i've never had REAL duck confit, so i have nothing to compare it to. i must say that now after all the duck i have been making i DO have enough rendered duck fat to make a good confit. i've read that it takes a few days to do a proper job of it. one of these days i'll get to the real deal, but for now this Easy Duck Confit recipe will do just fine.
this great recipe was found at Simple Recipes posted by Hank Shaw. many many thanks to Hank and his pals at Simple Recipes for introducing a quick Confit by making it sound so easy and SIMPLE.

i've copied the whole thing for your convenience and added a few notes of my own, but check out the original recipe HERE @ Simplerecipes.com......

EASY DUCK CONFIT
Ingredients
Duck legs-thigh attached (at least one per person)
Salt...i also added fresh thyme to the salt rub and fresh tarragon, unpeeled garlic cloves and about 1/4 cup extra duck fat to the roasting dish as you can see in the photo above. i added the extra duck fat because my legs weren't snug in the dish and i though it would help in the confit-style cooking...not necessary if your legs are fatty (please don't take this out of context)...just use a dish that will fit the legs snug.

Method
1. Pat the duck legs dry with paper towels. Find a needle or a very pointy knife and prick the skin of the duck all over. Focus on the skin that covers fat. Do your best to avoid piercing the meat itself by pricking the skin at an angle over the drumstick and the center of the thigh. You are doing this to give the fat that lies under the skin a place to seep out – if you don’t do this, it will be far more difficult to get crispy skin.

note....i didn't use the needle method. as you can see in the photo i just slashed the skin a few times and it worked just fine

2. Salt your duck legs well, more than you think you ought to, actually. Let them rest at room temperature for at least 20 minutes and up to an hour. Don’t worry, they’ll be fine.

3. Put the duck legs in a small casserole, skin side up. How small? You want it just big enough to hold the legs. Put a thin sheen of oil or melted duck fat on the bottom of the casserole, then place the duck legs in close together but not overlapping.

note...if you want some really good confit garlic cloves add them in under and around the legs. enjoy them with your legs or peel them and save them in a jar with some of the duck fat for a rainy day and a crispy baguette.

4. Put the casserole in the oven and turn it to 300 degrees; if you have a digital oven, you could even go down to 285 degrees. Do not preheat the oven. You want to cook the duck as gently as possible.

Walk away and watch football, go shopping, read a book or something. How long? Every duck has a different level of fat, so I can’t tell you exactly. But it will be at least 90 minutes, and two hours is better. After 90 minutes, check the duck: It should be partly submerged in melted fat and the skin should be getting crispy.

5. When the skin is starting to look crispy, turn up the heat to 375 degrees. Check after 15 minutes. You’re looking for a light golden brown. If you missed some spots with the needle and there are places where the skin won’t crisp that’s OK – better that than burnt skin elsewhere.

6. Remove from the oven and let cool for 10-15 minutes before eating. Save the accumulated fat for cooking vegetables, other meats or for keeping your skin shiny. I strain the fat through cheesecloth, but you really only need to do this if you are saving the fat for several weeks or months; strained, it will keep for 6 months tightly covered in the fridge. Well wrapped, the duck meat itself will last up to 2 weeks in the fridge.

note...by adding the tarragon and garlic i ended up with some delicious duck fat that was slightly infused with these flavors...i call it DUCK BUTTER

Friday, 23 July 2010

0 Duck Duck Soup

Duck Duck Soup...Stock, Broth and rendered Duck FAT...YUMMM !


what do you do when you bring home an absolutely beautiful whole roasted duck and no one is as excited as you are?...make soup. actually it's a 3 in one bonus. you'll end up with a flavorful soup, rich stock and the always sought after and ever so expensive rendered DUCK FAT.


the broth is fabulous and rich. i like to reduce about half of the pot and keep a bit in the freezer to use with quick sauteed veggies or add into a braising liquid for just about anything. the other half goes into the soup for the night.


i found my beautiful duck fully cooked at my favorite Asian market, 99 Ranch Market in Irvine, CA. i've been fascinated with duck for a while and never tried cooking a whole one myself. #1, they are pretty expensive in regular markets (about 25-30 bucks) and #2 i've heard they are kind of tricky to cook properly. the ratio of fat to meat is not even throughout the body so it seems one must control the cooking to get the perfect roast bird. when i saw this baby hanging in the deli section i was so excited, but immediately knew it would be pricey...not so. the whole cooked duck was only $14.00...i'll take 3 please. no, i just bought one, but you can bet i was back within the week getting another. i made Asian flavor Duck Rillettes with the second. i haven't posted about it yet, but oooh they were delicious.

so, since this duck was ALL MINE i took it apart piece by piece...totally enjoyed and devoured the wings, legs and thighs on their own and set aside the breasts for the soup or stew i knew i had to make with all this ducky goodness. the meat was a little seasoned and the skin was delicious and crispy. after wiping away the carnivorous debris, i was smart enough to keep all the bones and fatty skin from the parts i had eaten and, as you can see, i had the whole body/carcass...head to tail...with all it's flavorful fatty skin and bones. everybody into the pool. what i mean is everything goes in the pot except, of course, the breasts.

DUCK STOCK
adapted from Chichajo @ 80 Breakfasts
original recipe and great blog found HERE

The bones (the whole carcass including head) of 1 Peking Duck (or roasted, as shown)
2 carrots, peeled and cut in large pieces
2 onions, peeled and cut in quarters
2-3 stalks of lemongrass, white part only, bashed
1-2 inch piece of ginger, peeled and cut into rounds
2 jalepeno peppers halved
2 star anise
A few sprigs of cilantro
A few stalks spring onions (I used about 3)
Whole black peppercorns approx. 10 - 15
1/4 cup soy sauce

- Place everything in a stockpot and cover with water. The water should reach about an inch over the duck.
- Bring to a boil and skim off any scum that appears. Reduce to a simmer and cover pot. Let the stock simmer gently for 2-3 hours.
- Uncover pot and simmer for about 30 minutes more to reduce stock. Taste and either adjust seasoning or reduce further to deepen flavor.
strain, but do not use cheese cloth. use a regular fine strainer if you are interested in rendering as much of the duck fat as possible
- Portion as you prefer and let cool. Use immediately or store in the fridge if you’ll be using it in a couple of days…if not, freeze for future enjoyment

don't forget to render the duck fat. i like to pour the stock into 1 qt. containers and let it come to room temp. to let the fat rise to the top. then into the fridge for the fat to solidify. render the fat off each container and put into separate container...microwave the fat slightly back to liquid state and pour into an appropriate size container for storage. this will keep in the fridge like butter or you can freeze it for future use.

Friday, 18 December 2009

0 Chicken in Red Chili Sauce w/MAIZ MORADO (purple hominy)


this recipe is super delicious and really easy once you have your red sauce made up. i really suggest you make your own red sauce. you won't settle for anything else once you've tried it. i've tried a few and came up with a fairly easy one. it just takes a little extra time and it's a bit messy(just the straining part and the fact that it can stain things)...once you have your red sauce the sky's the limit with what you might use it for. i end up putting it on or in everything.

the purple Indian corn was amazing. just like your regular hominy, but i found it a bit more...hmmm...a bit more dense?...a bit more like a bean?...maybe just a bit more fun because it was different. i found this at my favorite Mexican market, NORTHGATE in Santa Ana. find them and try them is what i say to you...

RED SAUCE

i use this recipe from Dona Martha i found while researching Chili Colorado

i didn't copy it for you because this site explains it so well and her info is there if you have questions for her. i want more recipes from Dona Martha.

my notes about the RED SAUCE...

i have used dried New Mexico Chilies, Pasilla Chilies and Guallio Chilies. depends on what i can get my hands on. i always add a few Chilies de Arbol as well.

i use an immersion blender, due to the fact i don't have a reg. blender and it works really well.

a few thing i like to add while chilies are simmering....

CUMIN...i like to add about 1/2 tsp.

GARLIC SALT...you decide

BLACK PEPPER...grind some in there

DRIED OREGANO...i like to add 1/2-1 tsp...just cuz...

HONEY?...yeah...i got a little Bobby Flay with it one time...it worked

also, it states that Dona does not strain the sauce...the 1st time i made Red Sauce i didn't strain it. it turned out great, but the 2nd time i strained it and it was soooo much better. so i suggest straining...you'll be surprised even after all the purree-ing how much chili skin will strain out. take your time and press it through the strainer slowly, because it's already kinda thick.

now....let it sit for a few hours, then get back in there and taste it. you'll find that you have created a nice thick slightly spicy sauce that can really be used on and in anything...veggies, fish, chicken, pork, beef...tamales, enchiladas, tacos......

CHICKEN IN RED CHILI SAUCE w/MAIZ MORADO

EASY...EASY..EASY!!!!

store bought roasted chicken. shred into bite size pieces. i used almost a whole chicken depends, of course on how many you're serving and how much yummy left-overs you want. it just gets better and better.

1 large onion diced and slightly sauteed

1 can plum tomatoes cut into large pieces (drained and squeezed)

1 1/2 c. - 2 c. purple Indian corn (of course you can substitute hominy)

put all the above in a med. sauce pan.

to this i add enough red sauce to coat everything plus a bit more in case the inevitable reduction. bring this to a nice simmer...not a boil...just heat it through and let it sit. let all the flavors meld. when ready to serve bring out the fresh tortillas, cilantro, avocado and salsas etc....

well, i think that's it...i really should write these things down as i'm cooking, but one doesn't think of it at the time...now does one...?!
 
back to top //PART 2